Download
1 / 2
20 likes | 28 Views
If the customer wants to turn off Password Protected Sharing in Window 11, then you must read this blog post and they will know the method to fix this issue. <br><br>https://office.com-setup.com/blog/window-11/turn-off-password-protected-sharing-in-window-11/<br>

E N D
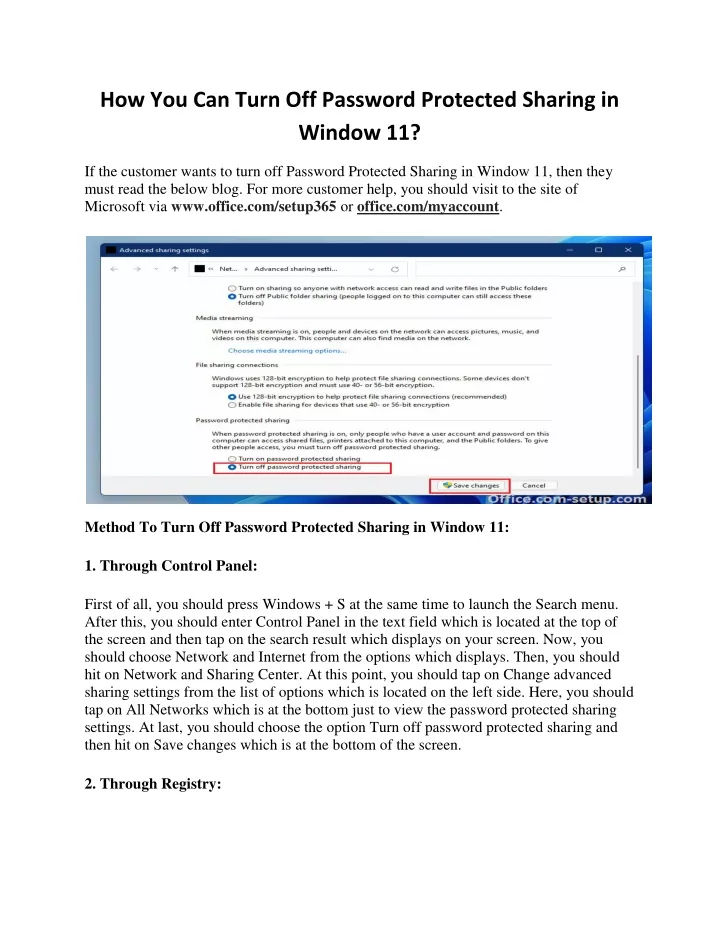
How You Can Turn Off Password Protected Sharing in Window 11? If the customer wants to turn off Password Protected Sharing in Window 11, then they must read the below blog. For more customer help, you should visit to the site of Microsoft via www.office.com/setup365 or office.com/myaccount. Method To Turn Off Password Protected Sharing in Window 11: 1. Through Control Panel: First of all, you should press Windows + S at the same time to launch the Search menu. After this, you should enter Control Panel in the text field which is located at the top of the screen and then tap on the search result which displays on your screen. Now, you should choose Network and Internet from the options which displays. Then, you should hit on Network and Sharing Center. At this point, you should tap on Change advanced sharing settings from the list of options which is located on the left side. Here, you should tap on All Networks which is at the bottom just to view the password protected sharing settings. At last, you should choose the option Turn off password protected sharing and then hit on Save changes which is at the bottom of the screen. 2. Through Registry:
The customer should press Windows + R key altogether to launch the Run command. Now, you should type regedit in the text field and then hit on OK or Enter button to launch the Registry Editor. After this, you should tap on Yes option on the UAC prompt which pops up on your screen. Here, you need to paste the below path in the address bar which is at the top and then press Enter key. At this point, you should double-tap on the everyoneincludeanonymous REG_DWORD: HKEY_LOCAL_MACHINE\SYSTEM\CurrentControlSet\Control\Lsa Then, you should enter 1 under Value data and then tap on OK button to save the changes. Next, you should go to the below path which is in the address bar and then tap on Enter key and then double-hit on the restrictnullsessaccess REG_DWORD: HKEY_LOCAL_MACHINE\SYSTEM\CurrentControlSet\Services\LanmanServer\Para meters Next, you should enter 0 under Value data and then tap on OK button to save the changes. At last, you should close the Registry Editor and just restart the computer system in order to turn off password protected sharing in Windows 11. 3. Through Local Users and Groups: For this, you should tap on Windows + R at the same time to launch the Run command. Now, you should type lusrmgr.msc in the text field and hit on OK or Enter key in order to launch the Local Users and Groups window. At this point, you should tap on the Users entry which is on the right side. After this, you should right-tap on Guest option and then choose Properties from the context menu. Here, you need to tick the checkbox for Password never expires and then untick the others option and then tap on OK button to save the changes. At last, Restart your system. Through this way, the user can turn off Password Protected Sharing in Window 11. If the users need any help, then go to www.office.com/setup.