Download
1 / 26

E N D
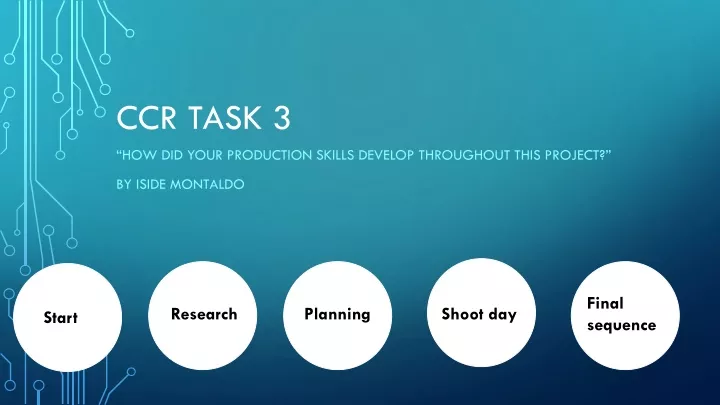
CCR Task 3 “How did your production skills develop throughout this project?” By iside montaldo Final sequence Research Planning Shoot day Start
Production camera work shop 1 Yours mine rule: 180 degree rule: • We were taught the basics of the camera: The 'yours' 'mine' rule must be used when handling camera equipment, this is to avoid dropping the expensive equipment, by simply saying to the other person in the group "yours" and whilst they receive the equipment say "mine". This way we are able to avoid mis communication ensuring that the passing along of equipment is safely handled and done efficiently. Loosening the height adjustment, meaning that we are able to change the height. With tripods there are 3 on each level, 3 on the base which needs to be turned anti clockwise. Once the height is adjusted you turn the nobs clockwise in order to lock the height in place, this process is repeated for the next level or any change. The first rule we were taught is the 180 camera rule, this concerns the space between two actors within a frame. This suggests that it is important to keep the camera on one side of the 180 degree line making sure the actors keep the same right/left relationship with eachother.
Camera workshop 1 Equipment we used: - Black Magic ISO 4K (camera) mini URSA • On camera it is extremely important that you give time to the focus and what you want in focus in the scene. In order to focus and zoom at the same time you have to zoom all the way into your shot, then change the focus until it is clear. Once this is done you zoom out to the correct distance you want for the shot. The zoom lens is adjusted at the end of the lens and the focus is adjusted further back. • Lighting is one of the key importances to camera works. White balancing is one of the key components and its important to make sure the white balance is correct for the atmosphere and location that you are in. The white balance is adjusted on the touch screen; if you don't change the white balance (or haven't done it correctly) then the shot will be incorrect.
Development • The camera workshops helped us obtain these techniques and accumulate knowledge to film our opening title sequence. Prior to this I came in with no knowledge of how to work a camera as I had never even held one before however after these workshops I felt like I had learned these skills clearly and I was able to actually understand the concept of a camera. • Before shooting our opening title sequence we made a short transition video with our phone just to clear up how we wanted our flashback to be. Which later on we included in our opening title sequence by using a real film camera.
Editing workshop 1 • In this workshop we were taught how to use an editing app called Premier Pro. Premier Pro is an editing app that is used YouTube videos up to high budget blockbuster films. We were shown how to make folders which are referred to as bins to keep our work organized. We were also taught how to make a folder called rushes which is were we put our unedited footage that was shot on shooting day. Other technical words we were taught is scrubbing, which is moving clips. As well as this logging which means going through footage and making copies.
Development • The editing workshop helped me a lot, as prior to this I had just used I Movie as a platform to edit my videos. Therefore I was a bit nervous to use premier pro as I had never actually worked with it before, however after the workshop I felt like I had a recognition of the principles of the application. We then applied these editing techniques to our opening title sequence which we thought worked very well, as we could take out pieces and put pieces of clips we wanted back in to create our perfect picture to our opening title sequence.
1st day Editing our sequence • For the first day of editing, we were all extremely excited and glad to be there watching all the footage we had filmed. the first day was very basic as we had to build the foundation of our opening title sequence, therefore what we did was go through all the footage and make sure that nothing was missing. We looked at all the shots and decided what we liked and the shots we thought were necessary. We started putting all the pieces together and using the cutting tool to start the motion and differing from close up shots to wide shots and mid shots. We started getting used to the process of selecting a shot and then cutting it in motion with another swift shot form another angle or different perspective. We didn't get much done as it was our first day but I’d say we got 1 third of it cut and edited.
Shoot Day • On my shoot day, I learned a variety of different things and felt incredibly grateful to have experienced such a realistic shoot day. We had a few complications however, I definitely learned that time management is very necessary as there is limited amount of time to film especially depending on the lighting and where you are filming. Therefore Time managing is the first thing I learnt is very important on a shoot day. Next, I also learnt that usually when something goes wrong you just have to improvise and continue going with the shoot as there is a limited amount of time to shoot the opening title sequence.
Development • As we had a specific location at the Hurtwood Inn where we wanted to film the beginning of our opening title sequence to show Jules’s room we had a limited amount of time to film. However we then had another complications where the actress portraying Jules’s had to leave half way through the shoot and come back half an hour later. Therefore we were extremely unorganized as we didnt know what we were going to do because we had limited time and wanted to get filming straight away. However after speaking to Adam and Tom they helped us organize what we were going to do and instead of waiting and sitting around, whilst Jules wasn’t there we filmed clips of Jules’s room to incorporate in our opening title sequence later. We then also shot the entrance of Beth, Jules’s mother and try to make the most out of the little time we had.
Genre We initially learned about different genres and conventions and how many people are more intrigued in the different styles of film. We found out that psychological thrillers are audiences second favorite after action genre. Genre is a style or category of art music and literature. In our opening title sequence we decided to go for a psychological thriller. Therefore as we saw that psychological thriller is a popular genre after researching about the conventions our group decided to go for this genre. Elements of psychological thriller include themes such as crime, morality, mental illness and substance abuse.
Development • In our opening title sequence we included themes of mental abuse, kidnapping, mental health and memory loss. We included this by showing the contrast between the first half of the opening title sequence were we see a relaxed teenage girl focusing on her morning routine and then it makes a drastic change to a flashback were we change to lowkey lighting and build up tension by adding dialogue suggesting that something is wrong. As well as this, we included diegetic heart beat sounds to set the mood and create a tense atmosphere.
Titles: • The order, it is very important to have a structured order and style depending on the film as this gives to audience a preview of what the films genre will be about. Our film in particular is a unexpected psychological thriller therefore we wanted to give a hint to the audience about this. As our opening title sequence already includes a lot of action going on in the scenes we didn’t want to take the main focus out for the audience to connect and understand what is happening in the scene. Therefore we decided to stick to a traditional method of titles and add a white classical font before the flashback happened and as we didn’t have time to add transitions this also benefited us as it didn’t take much away from the scenes, instead the titles were just placed in and out of the sequence.
Development One thing I learnt about titles is that depending on the film genre, the font and the way they enter the opening title sequence can create a major effect on the film. We included a classical white font as we thought that was what was best for our film, however if I were to improve anything I would have added more transitions as I think it brings attention and can also look very well with the genre of our film, psychological thriller.
Storyboard • A storyboard helps the planning stage. It is created before the final product is developed and used to illustrate a story or show the changes of scene. In many cases this will be based on a timeline but could also be decided by the user's choices of selection or navigation. We created a few drafts before final sing our main story board as we weren’t clear with what we exactly going to do for our idea. However after many days of planning we finally decided our idea and created a main story board, although we had to cut out a few scenes of our opening title sequence during the editing process we still followed our main story board and stayed loyal to it with all the details included.
Shooting schedule • A shoot schedule is a planning document that helps your film crew be more efficient on set and organized. Shoot schedules also ensure the crew on set what to do and at exactly what time they are needed so no time is wasted whilst filming the opening title sequence. Shooting schedule includes times and places where to film and directs the people on set. • Example of a shooting schedule:
Our shooting schedule: • This is what we planed for our shooting schedule, we stuck to this, and created a organized shoot day for our opening title sequence.
Shoot Day • We created a shoot day reflection video to show what we did and what we leaned throughout our shoot day! • https://youtu.be/c8o6jC1-znA
Shoot day reflection The workshops we did prior to filming the opening title sequence helped me improve and understand the skills needed to produce a opening title sequence. The camera workshop really explained to me in detail how to properly use a camera and film different angles and shots, as well as this the editing workshops helped me comprehend how to edit and show continuity throughout the editing stage of our opening title sequence.
Development • Due to the research made from our whole team we were able to produce a good quality opening title sequence with a lot of effort. We were able to film in a hotel room with the help of Adam and the research made on different types of rooms and what status and aspect we wanted the room to look like. As well as this, with the research made on opening title sequences and the genre of psychological thriller we were able to add enigma codes such as cliff hangers at the end of our opening title sequence to create a good quality and engaging to the audience opening title sequence that we enjoyed and felt like intrigued the audience.

![Introduktion til Presentation [presentation]](https://cdn3.slideserve.com/5539771/introduktion-til-presentation-presentation-dt.jpg)