Download
1 / 27
290 likes | 599 Views
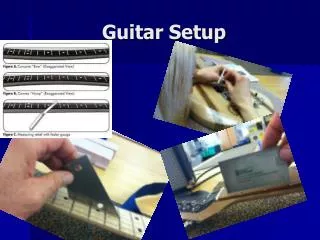
Guitar Intonation & Setup. Introduction. Guitar setup on your new guitar is an iterative process that will take you approximately an hour. Additional time will be needed for nut and string retainer installation. String names. Standard Tuning big to little… E, A, D, g, b, e. Install the nut.

E N D
Introduction Guitar setup on your new guitar is an iterative process that will take you approximately an hour. Additional time will be needed for nut and string retainer installation
String names • Standard Tuning big to little…E, A, D, g, b, e
Install the nut • The nut has a burr on the bottom edge, making it wider than 1/8” • Sand the nut thinner to fit the nut slot • Ideal fit = won’t fall out • Clean the nut slot out so it is free of finish and glue
Install the nut • Shims may be needed beneath the nut to raise the nut up if the strings touch the first fret • Evergreen strip styrene .125 wide.
Install strings • There are several methods to wind strings around tuning machine posts • Simplest is to wrap starting at the top of the post and work down
Install strings • Unwound strings=approx 5 or 6 winds • Wound strings, less • D = 4, A = 3, E = 2 winds • Leave enough extra string to wind around the post • Pull taught, then back up for the winds • Do not kink the strings
Tuning stability • For tuning stability, tug new strings to stretch them. Tug about as much as you could stand to have your hair pulled, just to ouch. • This also causes the windings to slip a little against each other and lock in place. • Repeat tug and retune several times for larger strings.
Install string retainer bar • Bar increases “break angle” • Eliminates buzz, side-to-side motion at the nut • Sitar-like effect
String Heights at 1st fret • .020 - .030 at the 1st fret • Shim behind nut if strings too low • Cut slots deeper if strings too high
String Heights at 21st fret .080 at the 21st fret…less on the treble side Set saddles in a 12”R arc Use allen wrench in saddles
String Heights at 21st fret • Set two E strings, and make the other four too high on purpose. • Once satisfied with the two E strings, lower the other four to just touch the understring radius gauge.
String Lengths – rough-in • Measure 12.75 from 12th fret to little e string to start • Stagger saddles as shown for “rough-in” • D and B about the same distance
Scope software link free http://www.zeitnitz.de/Christian/scope_en
Scope software • Tune the guitar, open strings, using SCOPE software • E - 82Hz • A - 110Hz • D - 147Hz • g - 196Hz • b - 247Hz • e - 330 Hz
Scope Choose Frequency Analysis display no peak hold
Scope Set Zoom slider to 20 and right-hand scroll all the way to the left to see frequencies in the range of the guitar
Scope Set Band pass frequency filter to isolate desired frequencies, otherwise you will see many harmonic overtones! Adjust cut-offs for each string and octave
Neck Relief Neck relief is where you have some intentional concave curvature to the neck We do this after tuning open to ensure the neck is experiencing typical forces of string tension It allows strings to vibrate without buzzing against frets
Neck Relief • 1st fret and 17th fret (fret where neck meets body) • .010” gap between strings and 8th fret Information from http://support.fender.com/manuals/instruments/Fender_Guitars_and_Basses_(1992-1994)_manual.pdf
Neck Relief • As you look from the bridge of the guitar toward the string nut…… • Turn truss rod adjuster CCW to lower the middle of the neck • Turn truss rod adjuster CW to raise the middle of the neck
Intonation • Intonate after tuning open and setting neck relief to ensure the neck is experiencing typical forces of string tension • Adjusting the truss rod requires readjusting the saddles • (overall length is changed) • Detune string before moving saddle!
Intonation • Use Scope software • 12th fret to bridge saddle • Sharp = string too short, turn CW to lengthen • Flat = string too long, turn CCW to shorten
Intonation • Any time you move the bridge saddle, the open string must be retuned • Then re-check the 12th fret to see if it is an octave higher, or flat, or sharp. • Repeat
Intonation • Guitar neck will change shape with seasons • Guitar will “settle in” over the next 3-6 months • Adjustments will be necessary
Congratulations This concludes guitar setup dhunt@swell.k12.in.us