Download

1 / 18

E N D
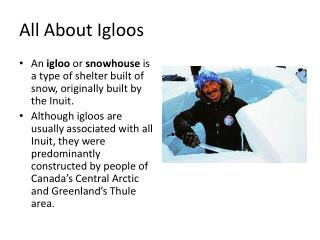
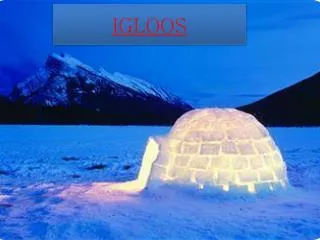
How The First Igloo Was Made After a few years of camping in mountainous country in the summer some people found themselves wanting more and decided to get into winter camping. The pristine serenity of the woods while skiing or snow shoeing was very rewarding, but using tents for their winter shelter left them somewhat wanting for a warmer, more comfortable environment. They had always known that a snow shelter was warmer and quieter than a tent and then started making snow caves and hybrid igloos (half snow cave half igloo) using many different construction techniques.
How The First Igloo Was Made Winter camping turned into snow camping as they advanced in our methods of snow shelter construction. They started building walls of snow under rocks so the snow cave wouldn't sag while they were gone for weeks or more. They tried using snow blocks and found that they would compress and separate from the rocks drastically overnight. Then they tried forming walls using our sleeping pads and packing the snow into blocks as we went. What they found is snow that is packed rather than blocked did not compress much if any over time.
How The First Igloo Was Made After seeing how solid a wall of packed snow is, it led them to a self supporting structure like the igloo that could be built in any area accessible by snow shoeing or skiing. There were two advantages to packing the snow rather than blocking. They could use any kind of snow and these igloos lasted up to 3 months or more. This is how the igloo as we know it today, was first made. It appeared they had found the perfect snow camping shelter. But after years of using the same rocks they started wanting for new areas and the right types of rocks were hard to find. They wanted to camp anywhere there was snow.
How To Build An Igloo The only tool needed in addition to a snow spade is a saw. A special snow saw is recommended, but a carpenter's saw will do. A machete or small axe is handy for moulding the snow blocks, but not necessary (use a ski instead - less to carry) To build an igloo a hard field of snow is required - hard enough to make solid snow blocks. Even if the top layer of snow is soft, hard snow can usually be found underneath. Use some sticks to make a circle, marking the base of the dome. The snow depth should be at least 1m where the igloo is placed. Don't make it too big, or there will be trouble later.
How To Build An Igloo The snow blocks are prepared with the saw. They should be solid enough to be carried horizontal without breaking by their own weight. Large blocks are used at the base of the dome, smaller ones at the top. A thickness of 15-30cm is good. The blocks can be made extra strong by setting them up to harden in the wind. The edges of each snow block should be smoothed and angled correctly to make a strong bond to the adjacent blocks. A ski with its tip placed in the centre of the igloo is a perfect tool for this. There will always be some (or maybe a lot of) cracks between blocks, but that is fixed later. It is very important that the bottom row of snow blocks are placed aslant, otherwise you are building a tower because you need a dome shape
How To Build An Igloo The snow blocks are prepared with the saw. They should be solid enough to be carried horizontal without breaking by their own weight. Large blocks are used at the base of the dome, smaller ones at the top. A thickness of 15-30cm is good. The blocks can be made extra strong by setting them up to harden in the wind. The edges of each snow block should be smoothed and angled correctly to make a strong bond to the adjacent blocks. A ski with its tip placed in the centre of the igloo is a perfect tool for this. There will always be some (or maybe a lot of) cracks between blocks, but that is fixed later. It is very important that the bottom row of snow blocks are placed aslant, otherwise you are building a tower because you need a dome shape.
How To Build An Igloo A full circle of snow blocks has been built. Ideally, the blocks should be placed in a spiral. This will make the building easier. Note the entrance. It is made of two vertical placed blocks pointing outwards with a solid block on top to make a small roof. It might look tiny, but a lot of snow is dug out later. At this stage you might want to lower the floor inside the igloo. This way you can get 10-30cm of extra headroom! Now the dome is starting to form. Keep removing the snow that is piling up inside. It is a lot easier to throw it out of an open dome than to shovel it out the entrance afterwards.
How To Build An Igloo If everything is done right, the dome will not collapse because the blocks are supporting each other. But in some critical situations, you might want to use a stick inside to support the topmost blocks until the dome is closed. The last few blocks are moved into the igloo through the entrance and lifted up. There might be need of two people inside at this stage.
How To Build An Igloo The igloo is closed! Not a perfect dome, but good enough. Now it is time to fill all those cracks with snow. (The really big cracks are filled with small blocks of snow.) Then the inside of the igloo must be smoothed. This is done by hand (your gloves get very wet, bring extra pair!). If the inside of the dome is one, smooth surface, there will be no dripping of water at all. When the smoothing of the inside is done and all the snow has been shovelled out, it is time to finish the entrance. An L-shaped entrance is a good solution, and will prevent any snow from blowing in. First dig an L with an depth of 1m (or more), then cover it with a square 'roof' made of snow blocks. Or you can just keep the entrance simple like a small hole entrance too.
Some Experiments For Different Igloos The Second Igloo This time, he started the first row of blocks with a fair bit of an inward slant. He continued with the initial inward slant. Having started at a certain slant, he was obliged to keep curving inwards. As it was, his second igloo didn't end up much taller than the first, but it covered a bigger ground area. Work progressed fairly quickly, and his sister started helping him. Even though he started the second igloo after Johanna started hers, we finished this one a fair bit before Johanna, with Markus' help, finished her igloo.
Some Experiments For Different Igloos The first Igloo This person’s first experiment was to use a rectangular garbage can to see if that would work as an igloo making tool. The idea being was to make blocks with the garbage can, and then stack them. He had powdered snow when he tried this. Even though the snow wasn't sticky on its own, he was able to make blocks with the garbage can. This is by filling it with snow, pushing it into the can, then inverting it and slamming it down on his driveway. This loosened the snow from the can enough that he could lift the can and have the block left over.
Iside An Igloo Village A Travellers View High above the town of Zermatt, in the Swiss Alps, having a drink in a mountainside bar before skiing down at the end of the day, I was told by my friends that we would not, as I had thought, be descending to stay in a hotel that night. No, we would be staying up here, 2,700 metres above sea level, in an igloo. No wonder they had insisted I bring a torch and a sleeping bag liner with me. I now also understood why, long after the lifts had stopped, a group of rowdy Swiss Germans remained in the bar with us. We were all about to be introduced to the bizarre world of Iglu-Dorf.
Iside An Igloo Village A Travellers View Adrian Gunter, the inventor of the Iglu-Dorf concept, built his first igloo, with the help of friends, in 1996 at the resort of Scuol, to get an early start on skiing the next day (and, presumably, to avoid paying the high room charges levied by Alpine hotels). Since then, the company has evolved into a small empire of igloo villages across the Swiss Alps - at Gstaad, Scuol, Engelberg, Zugspitze and Zermatt - each accommodating some 38 guests a night from December through to the end of the season, in April
Iside An Igloo Village A Travellers View My initial scepticism at the idea turned to amazement, then to wonder, as we picked our way through the powder off the edge of the piste towards what looked like the set of a forgotten episode of Star Wars: a series of perfectly shaped domes, smoke wisping from a makeshift chimney, and a wall of snow encircling a line of deckchairs from which we could lie back and watch the sun going down over the Matterhorn, turning the clearest blue sky slowly black.
Iside An Igloo Village A Travellers View As we lounged, we were told that, for our first hour in the village, we would be allowed to look around all of the igloos, but after that we should respect each other’s privacy. My initial worries about comfort were allayed: the sleeping bags are designed to withstand temperatures of -40°C, the rooms are well ventilated because the snow is not completely airtight and the entrances are large enough to ensure a circulation of fresh air.
Biblioghrapy http://home.no.net/gedra/igloo_bg.htm http://www.grandshelters.com/ http://www.sentex.net/~mwandel/winter/igloo.html http://www.icehotel.com/ http://www.primitiveways.com/igloo.html http://travel.guardian.co.uk/article/2007/apr/02/skiing.hotels.switzerland http://www.abc.net.au/science/antarctica/ingrid/diaries/981027.htm http://fun.familyeducation.com/winter/culture/35038.html http://passporttoknowledge.com/polar-palooza/pp00a.php http://www.sentex.net/~mwandel/winter/igloo2.html