Download
1 / 35
350 likes | 357 Views
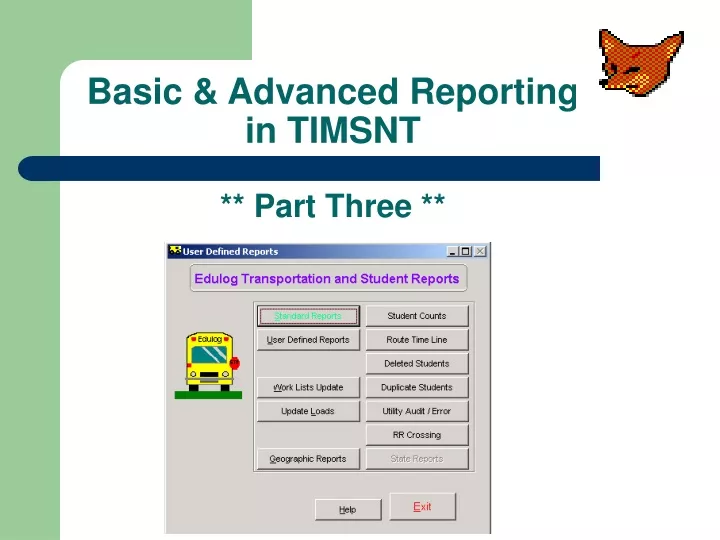
Basic & Advanced Reporting in TIMSNT ** Part Three **. Sorting Data. User Defined Reporting: Sorting Data. Suppose you have a report that would be more useful if it was sorted.

E N D
Sorting Data User Defined Reporting: Sorting Data • Suppose you have a report that would be more useful if it was sorted. • For this next example we’ll use a Standardstudent bus passes report that I’ve already copied and named ‘All students sorted by School/Grade’. • I have also made some additional modifications to my report, such as adding/removing fields, changing font sizes, etc.
Sorting Data User Defined Reporting: Sorting Data Notice that this reports default is to sort by student last name only. Lets run it and see what our output will look like.
Sorting Data Example Report Sorted by Student Last Name Nice to see all the students sorted by last name, but the Schools and Grades are mixed. Time to edit the sort order now…..
Select the Edit Sort Order option Sorting Data User Defined Reporting: Selecting Fields to Sort By Find Student School and Student Grade in the left pane. Double-click on them to send to the right pane.
Sorting Data User Defined Reporting: Rearrange the Sort Order Rearrange the sort order by clicking on the square beside the field name to move it up or down. FYI: The sort order begins from the top.
Sorting Data Example Report: Sorted by School, Grade and Last Name Now are students are sorted by 1. School, 2. Grade, 3. Last name!!!
Modifying Searches User Defined Reporting: Modifying Searches The Standard passenger list for runsreport displays the passengers for every run in TIMS.NT. Nice report, but what if we just want the passengers from just one run? For our next example, Lets take the Standard passenger list for runsreport and modify it so it only displays the passenger list for the runs we specify. I’ve already copied the report and named it passenger list for run(s).
Select the Edit Record Filter option Modifying Searches Modifying Searches: Edit Record Filter Here we can modify, delete, or add additional filters. The filters listed below automatically came in with this report. Lets Add another….
Modifying Searches Modifying Searches: Edit Record Filter (continued) Locate and select run RunID then select Next step
Modifying Searches Modifying Searches: Edit Record Filter- Within a List Select Is within a list then select Next step
Modifying Searches Modifying Searches: Edit Record Filter- Ask Later Select Ask Later
Modifying Searches Modifying Searches: Edit Record Filter (continued) You have now successfully added a new filter. Click Done to Exit and run query
Modifying Searches Modifying Searches: Edit Record Filter-Enter Runs Enter your desired Run(s) and click Done.
Modifying Searches Modifying Searches: Example Report Now you’ve got a much smaller report, listing only the runs that begin with 308 and 317!!!!
Example – Creating a Single TD-29 • Select Student Transportation from the Users Defined Reports menu • Select Standard run report #7 PTS3 from the list • Select Copy on the right
Example – Creating a Single TD-29 • Type in “TD 29 Single Run” in the new title line • Click OK
Example – Creating a Single TD-29 • Your new query appears at the bottom of your list • Now you can work with this query
Work With a Copy • Anywhere you see a report listed in Query Maker that starts with the word “Standard” it is a template query that cannot be edited or changed in any way • You must always copy one of these standard queries to another name and work with the copy
Making Edits • The copy you just made is still set up to show all runs that are not Deadhead or Garage runs • We are going to change it to make it give us a single report for a run we choose
Choose Edit • When you see this screen, delete the three lines by selecting the Delete key three times
STEP 1: Pick a Field • Select the Add option • Scroll to the run RunID field • Select Next Step
STEP 2: Pick an Operator Now select the “Exactly Matches” option
STEP 3: Enter a Value = Ask Later! • Instead of making this query only work when you want a particular run ID, select Ask Later
A New Filter • Your finished query will look like this
Running the New Query • Your copied query is now ready to run • Either double click it or click once and then click on the Select button
Running the New Query (continued) Now select “Run Query” from the screen
Enter What You Want to Match • Your use of the “Ask Later” button in the setup now generates the field to select your run for reporting
Start Report • Then select the output device • Next, click on the “Start Report” button
Example of a Finished Report The finished report will show you any valid run ID that you select
Add Reports to a Custom List • Customized Reports we send you or reports you create can be added to a drop down box for quick access. Click the ‘add reports to custom’ button.
Adding reports to the custom button • 1. Click on the reports you want from the left side. • 2. Send them over to the right side. • 3. Save and exit.
Easy access to User defined reports • Now just click the ‘custom’ button and use the drop down button to select your customized report.
Maintenance Issues • Remember that reporting is handled differently in TIMS.NT. Edits in TIMS.NT are not reflected in reports until the dumpall utility has run. • Running dumpall is the most dependable way to get a completely updated set of reports. If your report output doesn’t match with what you think you should have, run dumpall.
Basic & Advanced Reporting in TIMSNT** End of Part Three ** This concludes the Basic & Advanced Reporting in TIMSNT