Download
1 / 9
90 likes | 253 Views
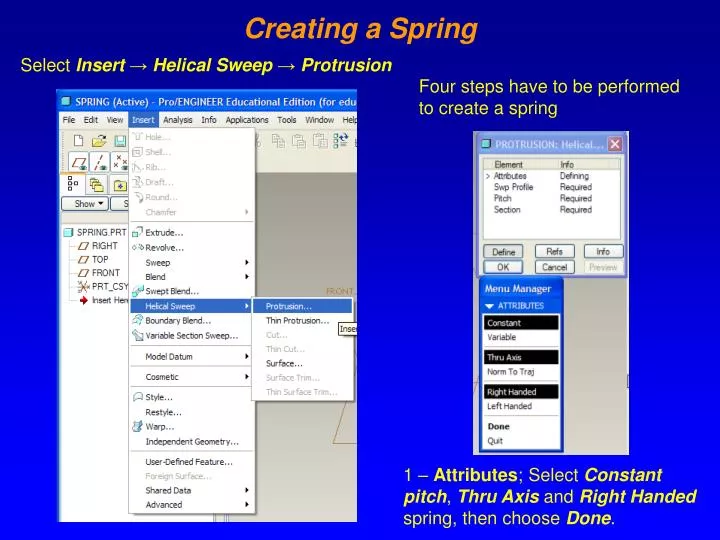
Four steps have to be performed to create a spring. 1 – Attributes ; Select Constant pitch , Thru Axis and Right Handed spring, then choose Done. Creating a Spring. Select Insert → Helical Sweep → Protrusion. Select Front plane. Select okay. Select Default. Creating a Spring.

E N D
Four steps have to be performed to create a spring 1 – Attributes; Select Constant pitch, Thru Axis and Right Handed spring, then choose Done. Creating a Spring Select Insert → Helical Sweep → Protrusion
Select Front plane Select okay Select Default Creating a Spring 2 – Swp Profile; Select Plane and choose the Front plane select okay and then choose Default for view orientation
4 - Exit the sketcher and enter pitch value of 0.25. Pitch is the distance between each coil. Confirm by selecting the check mark Enter pitch value Creating a Spring 3 - In the sketch, draw a vertical line 3.0 inch long and .5 from the origin. This will create a 3 inch long spring with outside diameter of 1.0 inch. Also, draw a vertical centerline from the origin. The spring pattern will revolve about the centerline. Centerline Spring height Coil radius
Exit the sketcher and select OK Creating a Spring Sketch the diameter of the wire. Spring profile
2 - Select Insert → Helical Sweep → Cut Creating a Bolt 1 - Create a solid section, sketch a circle and extrude
4 – Select Plane and choose the Front plane → okay → Default Creating a Bolt Helical Sweep (Cut) menu, same as before. One extra selection, material side removal direction 3 – Select Constant pitch, Thru Axis and Right Handed, then choose Done.
6 - Exit the sketcher and enter pitch value of .125 Pitch is the distance between each thread. Confirm by selecting the check mark Creating a Bolt 5 – Draw a vertical centerline from the origin. Draw a vertical line to specify the height of the thread. The distance between this line and the centerline should be equal to the radius of the solid section. centerline End point Start point
Origin Creating a Bolt 7 - Draw the profile of the thread (zoom in to the origin). It will be used to create the pattern. Origin
The Bolt Creating a Bolt 8 - Choose the direction of the cut