Download
1 / 1
10 likes | 166 Views
1- bring sample into focus with objective focus knob 2- close field diaphragm to minimum size 3- focus condenser until you can see a clear image of the field diaphragm (open and close field diaphragm to check, center as needed)

E N D
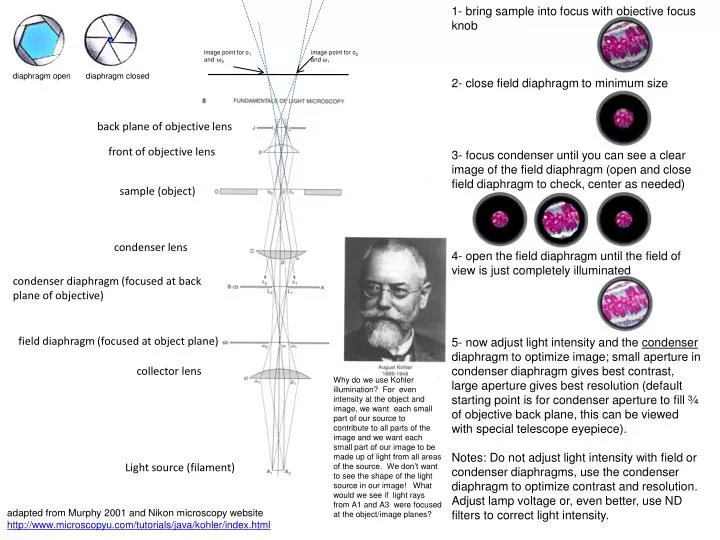
1- bring sample into focus with objective focus knob 2- close field diaphragm to minimum size 3- focus condenser until you can see a clear image of the field diaphragm (open and close field diaphragm to check, center as needed) 4- open the field diaphragm until the field of view is just completely illuminated 5- now adjust light intensity and the condenser diaphragm to optimize image; small aperture in condenser diaphragm gives best contrast, large aperture gives best resolution (default starting point is for condenser aperture to fill ¾ of objective back plane, this can be viewed with special telescope eyepiece). Notes: Do not adjust light intensity with field or condenser diaphragms, use the condenser diaphragm to optimize contrast and resolution. Adjust lamp voltage or, even better, use ND filters to correct light intensity. image point for o1 and ω2 image point for o2 and ω1 diaphragm open diaphragm closed back plane of objective lens front of objective lens sample (object) condenser lens condenser diaphragm (focused at back plane of objective) field diaphragm (focused at object plane) collector lens Why do we use Kohler illumination? For even intensity at the object and image, we want each small part of our source to contribute to all parts of the image and we want each small part of our image to be made up of light from all areas of the source. We don’t want to see the shape of the light source in our image! What would we see if light rays from A1 and A3 were focused at the object/image planes? Light source (filament) adapted from Murphy 2001 and Nikon microscopy websitehttp://www.microscopyu.com/tutorials/java/kohler/index.html