Download
1 / 57
580 likes | 719 Views
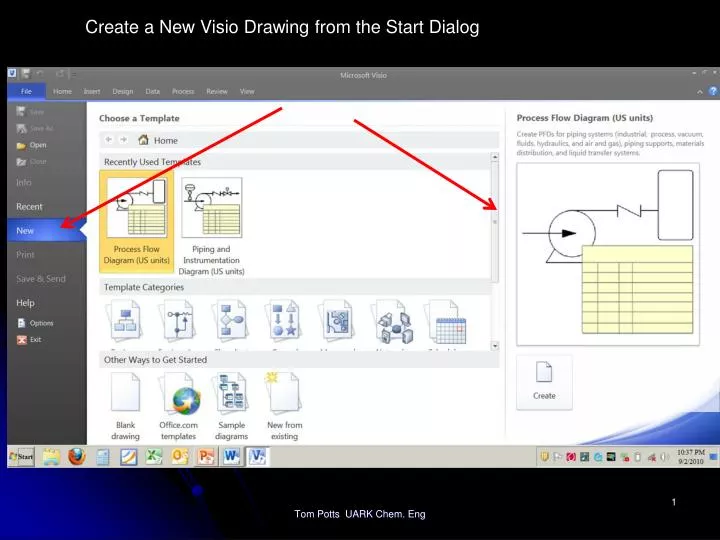
Create a New Visio Drawing from the Start Dialog. Select the template category if the desired template is not recent. Now pick the template from the category, then click Create. Elements of a Visio Drawing. Ribbon. Palette or Page. Shapes.

E N D
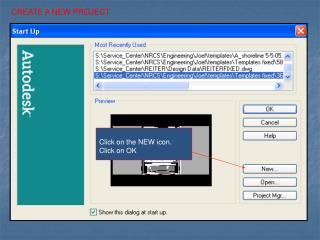
Create a New Visio Drawing from the Start Dialog Tom Potts UARK Chem. Eng
Select the template category if the desired template is not recent Tom Potts UARK Chem. Eng
Now pick the template from the category, then click Create Tom Potts UARK Chem. Eng
Elements of a Visio Drawing Ribbon Palette or Page Shapes Tom Potts UARK Chem. Eng
Setting the Page Layout, select Design, then size, then orientation Tom Potts UARK Chem. Eng
Recommended Settings: 8 ½ by 11, orientation to fit goals The working page after page setup Tom Potts UARK Chem. Eng
Set the Snap Settings Select View, then Visual Aids Tom Potts UARK Chem. Eng
Snap & Glue Dialog Box – Recommended Settings Tom Potts UARK Chem. Eng
Set up how the shapes are displayed Right click the Shapes title bar, select your style Tom Potts UARK Chem. Eng
Example – Add a column Change Zoom settings to fine-adjust Select the shape group Drag & Drop to approximate location Tom Potts UARK Chem. Eng
Control Points, square & green, change length & height of shape Click and drag the control point Use these to change width Use these to change height Use the corner points to enlarge or diminish keeping the aspect ratio constant Tom Potts UARK Chem. Eng
Control Points, round & green, rotate the shape Click and drag the control point To move a shape, click and drag it (The cursor will become a 4 headed arrow) To move multiple shapes, either select them by dragging a box or use Ctrl-click to select them To Copy a shape, use one of the following: Click on the shape, copy, paste (Edit menu or right click) Click on the shape and press the keys Ctrl and D Or click the shape, drag it to the new location, hold control key down, release the mouse button Tom Potts UARK Chem. Eng
Labels move with the shape To add your own label, click on the shape and type in the label To modify an existing label, click on the shape and press F2 To format the label box or text, right click the text, select “Format” To move the label relative to the shape, drag the yellow diamond shaped control point To make the label disappear, right click on the object and select “Hide Tag”. To make it re-appear, right click the object and select “Show Tag.” Tom Potts UARK Chem. Eng
Shapes overlapping other shapes Use these menu selections to change the order of the shapes Or right click the object to change its order E-12 is in front of E-11 E-10 is in front of E-9 Tom Potts UARK Chem. Eng
Shapes can have opaque color or be transparent Right click on the shape to get the menu Use this menu selection to change the pattern of the shape to none to make it tranparent Use this menu selection to get the “Fill” dialog box Use this menu selection to change the color of the shape Tom Potts UARK Chem. Eng
Summarizing what has gone on before, a simple example These items were added by drag & drop, then adjusted by size and rotation “Nudge” shapes with fine control using the shift + arrow keys Tom Potts UARK Chem. Eng
Connecting the Shapes Click on this menu selection to change to the connector pointer Click on the connection point, a blue x, on the first shape, then drag to the desired connection point on the second shape The connectors are dynamic, if either shape is moved, Visio will automatically re-route the connector Connectors have labels just like shapes Tom Potts UARK Chem. Eng
About Connectors Use this menu selection to add arrows to a connector Connectors don’t have to start or end on a shape’s connection point. This connector starts in free space. If the end of a connector is green, it is not attached to anything. If it is red, it is connected to a connection point To break a connection, click on the red end point and drag it away from the shape. Tom Potts UARK Chem. Eng
Tweaking the connectors Right click on a connector, select this menu to get the line format dialog box These connectors were rounded from the dialog box The upright of this connector was moved by clicking on it, then dragging its square control point to the left This connector was made a dotted line by changing the pattern in the dialog box The width or weight of this connector was changed in the dialog box Tom Potts UARK Chem. Eng
Everything put together Tom Potts UARK Chem. Eng
Opening other shape collections Use the “More Shapes” option to open other shape collections Or use “Search for Shapes” to find a specific shape This coupling set is from the Mechanical Engineering Fluid Power – Valve shape collection When you are done with a shape collection, right click its title and select “Close” Tom Potts UARK Chem. Eng
Exporting to Word After you have saved as VSD, do a Save As Tom Potts UARK Chem. Eng
Exporting to Word Select WMF as the type Tom Potts UARK Chem. Eng
Exporting to Word In WORD, do an Insert Picture Select your saved file Tom Potts UARK Chem. Eng
Exporting to Word Resize & Tweak to your heart’s content Tom Potts UARK Chem. Eng
Advanced Topic: Using Grouping Drop the components on the page Tom Potts UARK Chem. Eng
Advanced Topic: Using Grouping Arrange the components Tom Potts UARK Chem. Eng
Advanced Topic: Using Grouping Use Ctrl+click to select the desired components Tom Potts UARK Chem. Eng
Advanced Topic: Using Grouping Right click on any selected shape, select Group Tom Potts UARK Chem. Eng
Advanced topic – Adding connection points Suppose you want to connect a connector line here, but there is no connection point Tom Potts UARK Chem. Eng
Advanced topic – Adding connection points Select the connection point tool Tom Potts UARK Chem. Eng
Advanced topic – Adding connection points Click and drag an existing connection point to a new location, or Ctrl-click to create a new connection point Tom Potts UARK Chem. Eng
Advanced topic – Finding more shapes Where would we be without Google? Google Visio Shapes Download Tom Potts UARK Chem. Eng
Advanced topic – Finding more shapes Microsoft provides some free Educational shapes http://www.microsoft.com/downloads/details.aspx?FamilyID=c4d6f3d5-1b4a-4a6b-ad12-197b8e2a0c61&displaylang=en Tom Potts UARK Chem. Eng
Advanced topic – Finding more shapes Microsoft provides some free Educational shapes http://www.microsoft.com/downloads/details.aspx?FamilyID=c4d6f3d5-1b4a-4a6b-ad12-197b8e2a0c61&displaylang=en Tom Potts UARK Chem. Eng
Advanced topic – Finding more shapes After installation, new shapes are in MyShapes menu selection Tom Potts UARK Chem. Eng
Advanced topic – Finding more shapes This is the organic compounds shape collection Tom Potts UARK Chem. Eng
Advanced topic – Finding more shapes Some manufacturers will supply Visio shapes, some call them stencils. This is from Cisco communications. Tom Potts UARK Chem. Eng
Get Visio Cheap (Students)! • http://www.microsoft.com/student/discounts/theultimatesteal-us/terms.aspx Visio Professional 2007 - $55.95 Tom Potts UARK Chem. Eng
Advanced topic – Making your own shapes Select the Options Tom Potts UARK Chem. Eng
Advanced topic – Making your own shapes Select Customize Ribbon Tom Potts UARK Chem. Eng
Advanced topic – Making your own shapes Check the Developer box, then OK Tom Potts UARK Chem. Eng
Advanced topic – Making your own shapes Now you have a Developer tab The Operations box is a powerful tool Tom Potts UARK Chem. Eng
Advanced topic – Making your own shapesExample: Make a 90 degree elbow Select the ellipse pointer Use Shift + drag to create a circle Tom Potts UARK Chem. Eng
Advanced topic – Making your own shapesExample: Make a 90 degree elbow Do it again to make a smaller circle Tom Potts UARK Chem. Eng
Advanced topic – Making your own shapesExample: Make a 90 degree elbow Drag the small circle on top of the larger one, center them Click on the large circle, then Control + click on the smaller Tom Potts UARK Chem. Eng
Advanced topic – Making your own shapesExample: Make a 90 degree elbow In the Developer tab, select Operations, then Subtract Tom Potts UARK Chem. Eng
Advanced topic – Making your own shapesExample: Make a 90 degree elbow Now you have a torus, the center is not part of the shape Tom Potts UARK Chem. Eng
Advanced topic – Making your own shapesExample: Make a 90 degree elbow We can save the torus so we can use it later Select More Shapes, then MyShapes, then Favorites Tom Potts UARK Chem. Eng
Advanced topic – Making your own shapesExample: Make a 90 degree elbow Use Control + drag the torus to the Favorites stencil Answer Yes to put your shape into the stencil Tom Potts UARK Chem. Eng