Download
1 / 19
190 likes | 291 Views
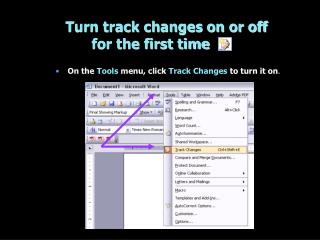
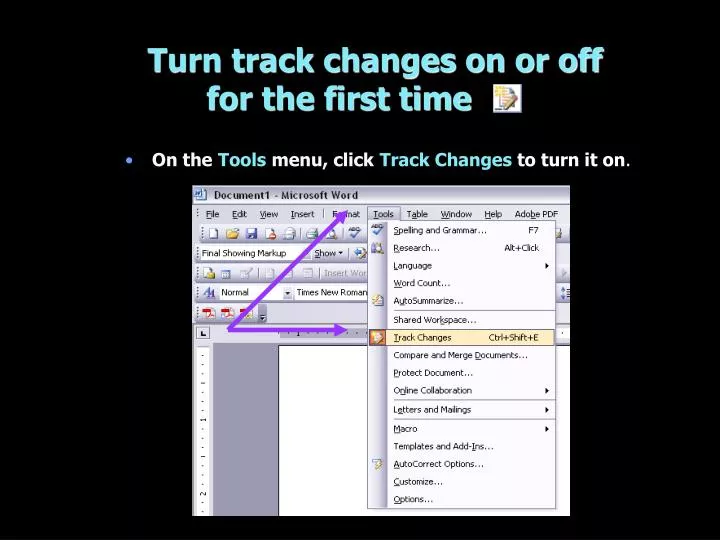
Turn track changes on or off for the first time. On the Tools menu, click Track Changes to turn it on. Using Track Changes Painlessly. Make sure you have the Reviewing toolbar up on your screen: View → Toolbars → Reviewing. This is titled: Final Showing Markup

E N D
Turn track changes on or off for the first time • On theToolsmenu, clickTrack Changes to turn it on.
Using Track Changes Painlessly • Make sure you have the Reviewing toolbar up on your screen: View → Toolbars → Reviewing. This is titled:Final Showing Markup • The Reviewing tool bar is basically a set of short cuts. Click onShowto set your preferences. See next slide for example
Options for the Reviewing Toolbar Track changes On or off Previous Change Accept Change Comment Delete Comments/ Changes Reviewing Pane Next Change Highlight See next slide for more detailed example
Accept change Reject change/ Delete comment Insert comment Highlight on/off Track changes on/off Review Pane on/off
For your changes to be visible onscreen, set your view to print layout
Set your preferences by clicking on Show in the Reviewing Tool bar If Balloons are set to Always, changes and comments will appear as balloons in the right margin. Clicking onReview Panewill make all comments and changes appear at the bottom of the page. Unclick Formattingtohide formatting changes so you can concentrate on content changes only.
If you have never activated Track Changes before… If you have never activated Track Changes before, you must click on the Reviewing Pane and then click on the comment bar for changes to show as balloons. Remember to click off the Reviewing Pane to remove the pane from the bottom of the page once you have the balloons showing.
Options will allow you to set markup colors, identities, balloons In the Show menu, clicking on Options will allow you to set markup colors, identities, balloons. Please set Balloons on “Always”. Click OK to save your settings.
How does track changes appear in the different layout views? • In Print Layout, Web Layout, or Reading Layout view, deleted text or a format change appears in a balloon in the margin. • In Normal or Outline view, deleted text appears in the document with a line through it, not in balloons, and format changes appear directly in the text. • In all views, inserted text is underlined, and a vertical line appears to the left of any line where any change has been made.
Comments in View Format • In Print Layout, Web Layout, or Reading Layout view, an empty comment balloon appears in the margin for you to type in. • In Normal or Outline view, you type comments in the reviewing pane at the bottom of the window. To open or close the reviewing pane, click on the Reviewing toolbar.
How to Insert comments • On the Insert menu, click Comment. OR • On the Reviewing toolbar, click Insert Comment.
Final and Final Showing Markup • In general, you should be working in the layout Final Showing Markup. • On theReviewingtoolbar, in theDisplay for Reviewbox, choose and clickFinal Showing Markup. • However, if you want to do a final check for punctuation, spelling, and sentence structure, using Final can be helpful. • Be sure after you have made all of your corrections that you return to Final Showing Markup to submit your manuscript with changes tracked.
Use the Show menu to change how balloons work • On the Reviewing toolbar, click Show, point to Balloons, and then click one of the following: • Never: If you don't want balloons to appear at all. If you choose this option, deleted text will appear in the document with a line through it. Comments and formatting changes will appear in the reviewing pane. • Only for Comments/Formatting If you want comments and formatting changes to appear in balloons, but deleted text to appear in the document with a line through it. • Always If you want balloons for deleted text, comments, and formatting changes (in the views that use balloons). See next slide for example
Rejecting changes • Do notuse the Show menu to remove revisions. It can't do that. When you clear check boxes on the menu, markup is only temporarily hidden. It will show up again the next time you or someone else opens the document. • Do notclear the Make hidden markup visible when opening or saving check box on the Security tab (Tools menu, Options command). Clearing this check box will not make markup go away, but it may make markup harder for you to find and remove. Please see next slide for steps on how to get rid of Markups.
Rejecting changes and deleting comments • Click the Show button on the Reviewing toolbar. Make sure that Comments, Ink Annotations, Insertions and Deletions, and Formattingall have check marks. Then point to Reviewers and make sure that All Reviewers has a check mark. • Place the insertion point at the beginning of the document. On theReviewingtoolbar, clickNextand proceed through the document, rejecting revisions and deleting comments as needed.
STOP here for submitting a revision with changes tracked • You now have a document with changes tracked. • The changes you want to keep are still in place. • You can use the comment balloons to indicate the reviewer query (ie, R1.1). • This can be submitted to manuscript central with your cover letter explaining your changes.
To submit a clean copy, • Save as a different file name. • On the Reviewing toolbar, under accept click “accept all changes in document”.