Download
1 / 6
60 likes | 153 Views
Using the Personal Image Photo Library Welcome to the DataSource Document Management System for Wells Fargo Advisors.

E N D
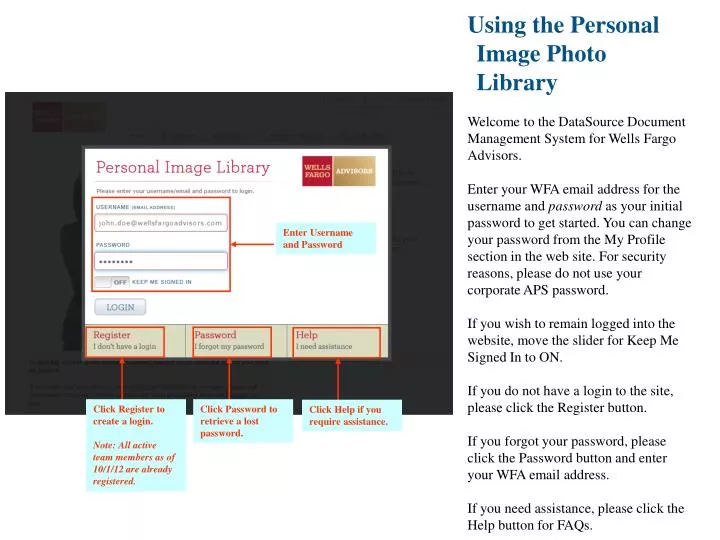
Using the Personal Image Photo Library Welcome to the DataSource Document Management System for Wells Fargo Advisors. Enter your WFA email address for the username and password as your initial password to get started. You can change your password from the My Profile section in the web site. For security reasons, please do not use your corporate APS password. If you wish to remain logged into the website, move the slider for Keep Me Signed In to ON. If you do not have a login to the site, please click the Register button. If you forgot your password, please click the Password button and enter your WFA email address. If you need assistance, please click the Help button for FAQs. Enter Username and Password Click Register to create a login. Note: All active team members as of 10/1/12 are already registered. Click Password to retrieve a lost password. Click Help if you require assistance.
Welcome Page • Header Bar • Home: Returns the user to the home page. • My Profile: Access to account settings. • My Favorites: Create a collection of regularly downloaded images or images to be downloaded together. • Retrieve Images: Access your stored images. • Upload Images: Upload new images to your personal image library. • Search Box • Enter your A#, name, branch name, city, state or zip. Use the Search box to find your files by A# or metadata tags. Use the tabs in the header bar to navigate the site. See recently added files uploaded for your access. Use the Quick Start box to enter your A# here to quickly find your files.
My Profile • On the My Profile tab, users can update their password, name and/or email address. Users also have the ability to switch their default views for the Retrieve Images tab.Those options are: • View As: Select to view the files as a list or by thumbnails. • Assets Per Page: Select the number of files to show per page, ranging from 12 to 60. Modify your password, name or email address Select the number of files to display per page: 12, 24, 36, 48 or 60 Select List or Thumbnails
My Favorites On the My Favorites tab, users can create a Favorites folder to store their selected images while searching and then download all at once instead of downloading one file at a time. To add images to your Favorites folder(s), go to Retrieve Images to select the photo you want to add, then click Add to Favorites. After entering a Name and Description, click Create Favorites. Click View to access the files saved under your specified Favorites folder.
Retrieve Images • The Retrieve Images tab contains all of your assigned images. To begin search, enter your A# or name in the Search box. • Under each image, use the following icons to preview, add to favorites or view details. Enter your A# to locate your files Click one of the icons to use the file.
Upload Images • Have a new file to submit to add to your personal image library? Use this simple form to start the progress. • Enter your A# • Enter your full name • Click Browse for Images • Locate the file on your computer • Click Submit • For Team photos, please enter the A# and full name for each person in the team photo into the box provided. • Information on Photo Standards can be found in the How To section on this website or see story name PHOTOGRAPHY on InfoMAX. Enter your A#. Enter your full name. For Team Photos, enter A #s and Full Names for everyone in the photo. Click Browse for Images to locate the files on your computer.