Download
1 / 51
510 likes | 528 Views
System Configuration. Definitions and Terms. Chapter Objectives. After completing this chapter you will: Understand the different ways to configure a microcomputer. Understand how to replace a battery.

E N D
System Configuration Definitions and Terms
Chapter Objectives After completing this chapter you will: • Understand the different ways to configure a microcomputer. • Understand how to replace a battery. • Understand and be able to identify system resources such as interrupts, DMA channels, memory addresses, and I/O addresses. • Understand how different architectures and local bus adapters are configured. • Understand the effects of plug and play, Windows 9x, NT, 2000, and XP on configuring adapters.
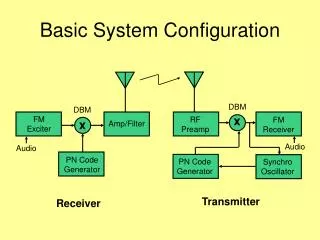
Configuration Overview • Setup program – Used to configure a computer system. • It indicates: • How much RAM is installed. • The type and number of hard drives and floppy drives. • Where the boot disk is located. • Date and time, etc. • Displays an error message if information in the setup program doesn’t match the hardware or if a specific device fails to operate properly.
Setup Software • Most computers require Setup software to access the Setup program that is often built into the BIOS chip and accessed by specific keystrokes. • Sometimes BIOS requires updating and this can require replacing one or more chips on the motherboard or using an executable file. • Computers may need a BIOS upgrade for supporting more floppy drives, higher capacity hard drives, virus protection, password protection, or to solve problems with the current BIOS.
Setup Software Setup Keystrokes Configuration – Table #1
Flash BIOS • Flash BIOS – A type of memory that allows the BIOS to be changed without installing a new chip. The BIOS is updated via files that have been downloaded from the Internet. • Viruses can infect the Flash BIOS. Keep the BIOS write-protected until you need to update it.
CMOS Memory • CMOS (Complementary Metal Oxide Semiconductor) chip – A special type of static memory on the motherboard that holds the setup configuration information. CMOS holds the computer’s current configuration information. • Part of the BIOS software routine that runs after power on checks CMOS for information about which components are supposed to be installed. After the information is read from CMOS, these components are tested. This the POST (described in Chap. 1), which runs whenever the computer cold boots. • A small battery on the motherboard keeps the CMOS memory from losing the setting information. If the battery dies, the information is lost and must be reentered. • The wrong configuration information causes POST error codes or error messages that might indicate a hardware problem. • The correct Setup information should be kept by a technician for each computer. The wrong information entered into the Setup program may cause the computer to operate improperly or fail to boot.
Advanced Configuration Information • Many computers have an Advanced Setup with the following options: • Boot Sequence – This option determines if the computer looks first to the floppy drive, the hard drive, CD, or DVD drive for the operating system. • System BIOS Shadow or System BIOS Cacheable – This setting puts a copy of the software contained in the BIOS into RAM. • PNP/PCI Configuration Setup – This option is used to configure the PCI slots, configure the computer for a PNP operating system, and allow the BIOS to control IRQ and DMA assignments. • Power Saver: This option turns the system off after a period of non-use. • When installing a new system, use the default BIOS settings until all components are tested. • Passwords that have been set and forgotten can be cleared by jumpering pins together to clear either the power-on password or all of the CMOS settings.
Batteries • Computer batteries come in various shapes and sizes, the most common today being a lithium battery about the size of a nickel (see Fig. 1). They slide into a special holder making them easy to change. • Older computers also used a cylindrical battery about 1.5 inches long that was soldered to the motherboard, but these batteries usually failed in a few years and were difficult to change. • Other computers use a 3.6 volt cylinder of lithium batteries or alkaline 4.5 volt batteries. • AA flashlight batteries were also used in a special holder and mounted inside the computer using velcro. • Other manufacturers use their own version of a battery pack.
Batteries Motherboard with Lithium Battery Configuration – Figure #1
Batteries Computer Batteries Configuration – Figure #2
Laptop and Device Batteries • Up until 1996, the most popular laptop battery was the NiCad (Nickel Cadmium) battery. • NiMH (Nickel-Metal Hydride) batteries replaced the NiCad. These were lighter and stored 50% more power. • Li-Ion (Lithium Ion) batteries are replacing the NiMH, which are very light and can hold a charge longer than any other type of battery, but are also expensive. • Li-Ion Polymer batteries are similar to Li-Ion, but are packed in pouched cells, allowing for smaller batteries and more efficient use of space. • Zinc-Air battery is environmentally friendly and hold a charge for extended amount of time. • Fuel Cells – an upcoming technology that can hold a charge for 5 to 10 hours when used with a laptop.
Replacing a Battery • Computer batteries last 7 to 10 years, with Li-Ion batteries currently lasting the longest. • Some technicians will change a battery with the power on to prevent the loss of configuration information. • The only way to ensure the settings aren’t lost is that setup configurations must be printed or written down before replacing a battery. • Always refer to the motherboard documentation for the proper battery specifications and follow all manufacturer instructions for the proper way to change the battery.
Plug and Play • PnP (or Plug and Play) – A specification that allows automatic configuration of an adapter. • There are 3 conditions that must be met for plug and play to work. The following items must support plug and play: • The motherboard BIOS • The adapter that’s being installed • The operating system • Adapters that are PnP may still need a device driver loaded due to the operating system or an updated version of the driver being available.
Configuration Through Switches • Some older computers do not have batteries or CMOS memory to store the configuration information, instead they are configured using special switches on the motherboard called DIP switches. • DIP switches – Used to set the computer’s configuration and located on the motherboard (or sometimes ISA adapters). • There are two basic models of DIP switches: slide and rocker.
Slide DIP Switch • With a slide DIP switch, a sliding tab sticks up out of the switch bank for each switch that can be turned either on (closed or 1) or off (open or 0). • Switch bank – A group of DIP switches located together on the motherboard. • There are many different ways to label DIP switches and these are determined by the manufacturer of the particular switch or switch bank.
Slide DIP Switch Slide Type DIP Switch Configuration – Figure #5
Rocker DIP Switch • Rocker DIP switch – Has a rocker switch in each switch position that presses down to either the On or Off position. • CAUTION: Never use a pencil to change a DIP switch. The pencil lead may break and damage the switch. A small screwdriver is recommended.
Rocker DIP Switch Rocker Type DIP Switch Configuration – Figure #6
Other Configuration Parameters • System Resources – Parameters that are assigned to adapters and ports, known as Interrupt Requests (IRQs), I/O (Input/Output) addresses, DMA (Direct Memory Access) channels, and memory addresses. • These parameters are assigned to devices like: • Individual adapters and ports such as disk controllers • Serial, parallel, mouse, and keyboard ports • These are not the same as system resources used when discussing Windows operating systems.
IRQ (Interrupt Request) • IRQ (Interrupt ReQuest) – A number assigned to expansion adapters for communication between the device or port and the microprocessor. • Cascaded Interrupts – The two interrupt controller chips use IRQ 2 and IRQ 9 to bridge or cascade to the other controller chip. • Non-cascaded Interrupts – When two interrupt controller chips are not bridged together. Each chip handles eight interrupts that connect directly with the microprocessor. • Interrupts are set through the system’s Setup program, an adapter or device’s setup program, switches or jumpers, Device Manager (in Windows 9x/2000/XP), or NT Diagnostics (NT Workstation). • MSINFO (System Information) – Shows interrupt conflicts in Windows 98 and Windows 2000. • Ports that support multiple devices only require one interrupt per port.
IRQ (Interrupt Request) Cascaded Interrupts Configuration – Figure #8
IRQ (Interrupt Request) Common Interrupt Assignments Configuration – Table #5
IRQ (Interrupt Request) IRQs in Device Manager Configuration – Figure #9
PCI Interrupts • PCI devices use interrupts called INTA, INTB, INTC, INTD, etc. PCI devices share interrupts, but must still be mapped to one of the traditional IRQ addresses. However, using PCI interrupts extends the range of interrupts through the use of this sharing ability. • IRQ Steering – Allows multiple PCI adapters to be mapped to the same traditional interrupt. • Some PCI cards do not share well, however it works reliably in most cases. If you suspect a resource conflict with a PCI card, move the card to another slot.
PCI Interrupts IRQ Steering Window Configuration – Figure #10
I/O (Input/Output) Addresses • I/O addresses (Input/Output addresses) – Also known as port addresses; allow the device and the microprocessor to exchange data. • Most computers have 65,535 different I/O addresses. • Each device must have a unique I/O address in order for the microprocessor to distinguish between the devices and communicate with them.
I/O (Input/Output) Addresses Decimal, Binary, and Hexadecimal Numbers Configuration – Table #6
I/O (Input/Output) Addresses Common I/O Addresses Configuration – Table #7
I/O (Input/Output) Addresses System Information’s I/O Addresses Configuration – Figure #11
DMA (Direct Memory Access) Channels • DMA channel (Direct Memory Access) – Allows adapters to bypass the microprocessor and communicate directly with the RAM chips. • This technique speeds transfers by allowing transferring data directly to memory. • A drawback is that sometime the processor must be put on hold for a DMA data transfer to complete. • Each device or adapter must have a unique DMA channel assigned. • A better and more efficient method than DMA is bus-mastering.
DMA (Direct Memory Access) Channels Common DMA Channel Assignments Configuration – Table #5
Memory Addresses • Memory Address – A unique address assigned to the BIOS, ROM chips installed on adapters, and RAM chips installed in the system. The memory address is used by the microprocessor when it accesses information inside the chip. Conflicts can prevent an adapter or device from functioning properly. • Memory addresses are shown in hexadecimal numbers. An example is the memory address range for all ROM chips is usually A00000h to FFFFFh. • System resources for integrated ports and motherboard connectors are configured through the BIOS Setup program.
Memory Addresses Common Memory Address Assignments Configuration – Table #9
Memory Addresses System Information’s Memory Addresses Configuration – Figure #12
Utilities • Utility programs – Computers will use their own utility programs to display the interrupt, DMA, and I/O address information. • Refer to the computer documentation for information on how to access and use these programs. • There are external utility programs such Symantec’s System Works and others. Because of the many utility programs that come with operating systems and support for plug and play, these are not as necessary for technicians as in the past.
Configuration Overview • ISA, EISA, PCI, and AGP adapters must be configured with the proper IRQ, I/O address, memory address, and DMA channel. • Methods of configuration differ and normally depend on the system architecture. • There are standards, but manufacturers have the final say, so refer to documentation for the correct configuration.
Configuration of ISA Adapters • Configuration methods for ISA adapters varies and may be done manually through jumper and switches, and/or through software. • Configuration is determined by the manufacturer of the adapter and the documentation should be consulted for the specific instructions. • Your book contains a good set of steps to install and ISA adapter, beginning on page 3-31.
Configuration of EISA Adapters • EISA adapters are configured with software, very similar to MicroChannel adapters. The file extension .CFG is used for EISA configuration files. • Sometimes manufacturers recommend that all ISA adapters are removed during the initial configuration of EISA adapters. Just remember not to remove the video adapter.
More About Plug and Play • Fully supported by Windows 95, 98, 2000 Professional, and XP. • Windows NT only provides minimal support and may require extra steps for plug and play configuration. • Older adapters must still be configured manually. • If a plug and play adapter is required to boot the computer (such as a video adapter), it starts up in an active mode with a power-on default configuration that allows startup and must be customized for the system. Conflicts with other adapters can occur. • Other adapters that don’t activate during boot-up will stay inactive until the operating system activates them. • Again, different vendors handle the process different ways; consult the documentation and don’t assume anything.
Configuration of PCI and AGP Adapters • Easiest adapters to configure. • Don’t have interrupt conflicts because of the interrupt sharing of the PCI standard. • Configured through the BIOS and system Setup software, as well as with software that comes with the adapter. • In the Windows environment, the operating system detects the PCI adapter and add the configuration information to the registry. • Registry – A central database that holds hardware information and other information.
Configuration of Adapters Using Windows 9x, 2000 Professional, and XP • Each version of Windows operating system, whether it’s 9X, NT Workstation, 2000, or XP have software utilities called wizards that assist with configuring adapters, both manually and through plug and play. • Refer to the specific operating system documentation for the appropriate method of installing and configuring adapters. • Always use the specific operating system device driver provided with the adapter when installing new hardware devices. If the driver is missing, check the adapter manufacturer’s website for the latest version of the device driver. • Instructions for configuring adapters in Windows NT can be found on 3-35.
Configuration of PC Cards • Socket Services – Allow each PC Card type to co-exist in the same system. It also allows the detection of PC Card insertion and removal. • Device Driver – A small piece of software that allows an operating system to access a piece of hardware. • Card Services – The second software layer that allows PC Cards to operate. • Hot Swapping – Allows the PC Card to be inserted into the slot when the computer is powered on.
Configuration of PC Cards • Generic enabler – A driver that can operate with different PC Cards and allows assignment of interrupts and I/O addresses. • Vendor-specific enablers – A driver that operates with one specific PC Card and requires socket services and card services software. • Point enabler – Similar to vendor-specific enabler, but doesn’t require socket services or card services software. This a good feature if memory management is a problem. • Some common problems that can occur with PC Cards are listed in your book on page 3-39.
Configuration of PC Cards PC Card Software Overview Configuration – Figure #13
Installing a USB Device • In order to use USB devices you must: • Have an operating system that supports USB (Windows 95 OSR2, Windows 98, Windows 2000, or Windows XP. • Have a USB port on the computer (adapters can be added with USB ports if the are not already integrated into the motherboard). • Once connected, USB devices act like plug and play adapters and are configured in similar fashion. Have the device’s driver disk handy and follow all onscreen directions. • Many USB devices require the driver to be installed prior to connecting the device. • USB allows up to 127 devices to be connected together using hubs. USB hubs have two types of ports: upstream and downstream. The Upstream port is used to connect to the computer or another hub. The Downstream port is used to connect a USB device.
Installing a USB Device USB Hub Connectivity Configuration – Figure #15
USB Troubleshooting • To troubleshoot USB device problems, always check the obvious first: cabling, connection, and power. • Restart the computer and retest the USB device. • Swap the USB device with a known working device. • A list of other USB troubleshooting tips can be found on 3-41
Installing an IEEE 1394 (FireWire) Device • IEEE 1394 devices can connect to a port built into the motherboard, an IEEE 1394 port on an adapter, another IEEE1394 device, or a hub. • Always follow the manufacturer’s instructions when connecting a FireWire device. • If one or more FireWire devices connect to a FireWire port, the devices use one IRQ and I/O address. • Installation steps for a FireWire adapter can be found on 3-42
IEEE 1394 Troubleshooting • Use the Device Manager to verify the IEEE 1394 installation. • If a question mark appears by the host controller, remove the driver and reinstall. • If a yellow or red symbol appears by the host controller, the driver is corrupt or is using the wrong driver. A resource conflict could also be causing the problem. • FireWire has two types of connectors – a 4-pin and a 6-pin.