Download
1 / 28
280 likes | 511 Views
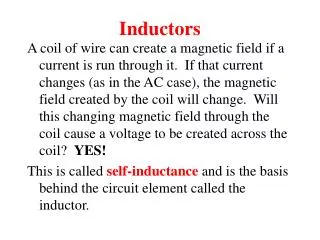
Windows Movie Maker. Created by: Ian Osborn. Possibilities Of Movie Maker. Windows Movie Maker allows users to organize and add effects to media clips that ordinarily would be impossible. Check out this video clip created using this software. YouTube - ghost effect windows movie maker.

E N D
Windows Movie Maker Created by: Ian Osborn
Possibilities Of Movie Maker • Windows Movie Maker allows users to organize and add effects to media clips that ordinarily would be impossible. • Check out this video clip created using this software. YouTube - ghost effect windows movie maker
Movie Maker Usage • There are many disadvantages to not using media editing software. • Windows Movie Maker focuses on utilizing user friendly applications to customize your imported video and audio files. • It also allows you to format your finished product to a file type applicable to your situation.
Ease of Usage • This software can easily be utilized by any person, with a basic understanding of how Windows based operating systems work. • With this tutorial you will soon be a movie creating addict.
Tutorial Goals • Importing video and audio into Windows Movie Maker • Input video and audio in movie timeline • Be able to edit media clip times within the timeline • Add titles, credits, and transitions between media clips • Add effects to media clips • Format finished project into usable video file • Burn or transfer finish product to desired storage device
Learning Objective By the end of my presentation members of the College of Education will have the ability to complete the following task: • Locate Windows Movie Maker program on their computer • Access Windows Movie Maker program • Import a pre planned video and audio files to program • Organize video and audio clips on a storyboard • Edit clips to desired time lengths • Create transitions between media frames • Add effects to media clips • Add title page and end credits • Format finished product to usable form • Save finished product to storage device Above learning objectives can be completed by trainees if given a topic and target audience intended for. Such objective should be completed with little to no help from instructor or online help.
Similar Programs Windows Movie Maker is a type editing software and is similar to Adobe Photoshop used earlier in the semester. It utilizes cropping tools to trim media files to desired length to fit within your storyboard. Also much like Photoshop you have the ability to add effects to the video files to change how they play or appear visually.
Locate Movie Maker Program • Windows Movie Maker is standard software on Windows 7 and icon should be located on desktop • If not, enter a search in start menu under your programs; to see if it has been moved to another location
Access Movie Maker • Go ahead and click on the icon to open the Windows Movie Maker program.
Importing Media Opening software will bring you to this screen. The first step to starting your project is to import all the media you would like to utilize. You can do this by selecting the appropriate heading.
Selecting Media To Import • Select desired media from files. Once selected click “import.” • Note: This must be done each time for each individual clip of media. • This will then bring you back to original page with newly imported media files.
Organizing Storyboard • Click “Show Timeline,” to see where all imported media can go. • Notice how the format of the storyboard changes to timeline format.
Organizing Storyboard • Now you can drag desired media into labeled areas on the timeline. • i.e. Video clips go in Video section of the timeline.
Editing Media Clip Lengths • You can edit clip lengths by clicking the left or right side of the clip while in the timeline and dragging left or right. New extended length
Creating Clip Transitions • Select the drop down box and select the “video transitions” icon. • This should take you to this screen. • From here transitions can be dragged and added between two clips on the timeline.
Adding Effects to Clips • Select that same drop down box we used in the previous slide and select the “Video effects” icon. • Just as before we can drag video effect down to the time line, but this time we add them directly to the video clip.
Entering Title and Credits • First select the “Tools” drop down box at the top of the tool bar. • Then select “Titles and Credits” icon, which should bring you to this menu. • From here select one of the options applicable to your situation. These two are most common.
Entering Title and Credits • Selecting “title at beginning of movie,” takes you to this menu. • Enter your desired title into the text box provided. • Once completed click “Done, add title to movie.” You should see it added before your first media clip on your timeline. • Same steps for entering credits.
Formatting and Saving Movie Project • You have two options for saving you work in Movie Maker • If you are not finished and want to come back to work on your movie. • Your are finished and want to save it in a format that it will only play the movie when the file is opened.
Saving Unfinished Movie • Select the “File” drop down box at the top of your tool bar. • Within the drop down box select “save project as…” option which will bring up this menu. • From this menu select what location you would like to save your a file and what you would like to name it. • Then click “Save.”
Saving Movie To Play Only • Once again select the “File” drop down box at the top of your tool bar. Now select the “Save movie file…” • You should arrive at this menu. • From this menu you decide which device you would like to save it to. We will choose “My computer” for this application. • Now click next.
Conti • Next we enter a name for our saved movie. • Then choose a more specific location within the device that you would like to save the movie. • After clicking “next” we arrive at this menu used for formatting video quality. We will keep the default settings and click “next.”
Conti • The next menu shows the progress of the movie saving to the device chosen earlier. • The final menu of the saving process will pop up automatically • Simply click “Finish” and the movie will be saved to the specified device and a preview of the movie should begin playing if done correctly.
Conti • For reference: If a user wanted to save their finished movie to another device (usb, dvd, or cd) they would insert the device into the computer and select that device from this menu.
Items Covered In Presentation • Locate and Access Windows Movie Maker • Import Files into Movie Maker program • Organize imported files into timeline • Edit lengths of media clips • Add transitions and effects to media clips • Add title and credits to movie • Difference in saving formats and how to conduct both.
Trainee Assessment • Create your own sample movie, with your choice of audio background. • Trainees should utilize all skills acquired during this presentation.
Similar Applications There are endless amounts of video editing software available. • Almost all utilize the timeline or storyboard fashion of organizing media files. • Importing media files are very much the same as well. • Most differences can be noticed in the visual effects section as well as audio effects that can be enhanced in more detailed applications. • I have found that Windows Movie Maker is the most user friendly, although it is getting harder to find since it was only offered standard on Windows 7 operating system.
Image Citations • http://www.engadget.com/2005/03/02/bill-gates-getting-knighted/ • http://www.google.com/imgres?imgurl=http://www.terrafirmatechnologies.net/windows_SYMBOL.gif&imgrefurl=http://www.terrafirmatechnologies.net/ • http://mattcastille.com/me/2007/05/mac2sell-offers-online-estimates-for-used-apple-macs/ • http://eu.fotolia.com/id/5642471 • https://cid-9ccef58d5c6c994c.office.live.com/self.aspx/EDUC%20370/Assignment%201/ferrariflash.jpg • https://cid-9ccef58d5c6c994c.office.live.com/self.aspx/EDUC%20370/Assignment%201/ist1^_7075751-old-projector.jpg • http://ubarblog.blogspot.com/2009/07/spotlight-on-ubar-regular.html • http://en.wikipedia.org/wiki/File:Windows_Movie_Maker_icon.png • http://www.trewaudio.com/i/rentals/us_bullhorn.jpg