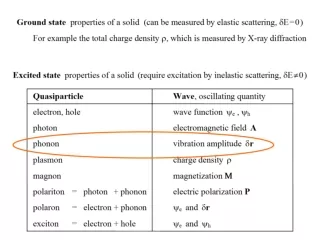
Download
1 / 18
180 likes | 300 Views
Exposure Modes. If you've read (and digested) the “Exposure Triangle” presentation (or PDF text) and you're still putting your camera to 'Auto' or 'P'..... read on..... Some revision first.......

E N D
Exposure Modes • If you've read (and digested) the “Exposure Triangle” presentation (or PDF text) and you're still putting your camera to 'Auto' or 'P'..... read on..... • Some revision first....... • The three elements of the exposure triangle (how much light and for how long, for a given sensitivity of the sensor) impact one another. This is particularly the case when it comes to aperture and shutter speeds. As you increase the size of your aperture you let more light into your image sensor. As a result you will need a shorter shutter speed. In the opposite way, if you increase the length of time your shutter is open you decrease the aperture that you’ll need to get a well exposed shot.
Exposure Modes Program (P) • This is another fully-automatic mode but the camera only sets the aperture and shutter speed, leaving you to choose other settings such as the AF mode, drive mode, metering pattern and so on. • The aperture and shutter speed combination is chosen at random by the camera (usually starting at around f5.6) but you can change them simultaneously using one of the the camera's dials (see your owners' manual) if you need to. For instance, set a faster shutter speed and it will widen the aperture or a slower shutter speed for a narrower aperture, depending on your subject. • Program is fast and convenient and aimed at beginners but, if you're the type that keeps a camera ready in the car for all events it's not a bad setting – you're ready to go at a moment's notice.
Exposure Modes • There are, apart from 'Auto' and 'Program', at least three main methods of obtaining and using the 'right' exposure in your photography. • Fully Manual • Aperture Priority • Shutter Priority • It's worth looking at these modes in an historical order.... First there was fully manual, with a separate light meter, then a light meter built into the camera, then a method for balancing the exposure in-camera, then the two Priority modes and, later, full Auto or Program modes.
Exposure Modes • Manual (M) • Before light meters were installed in cameras, the user had to either guess the lighting situation (the reflected light on the subject) or use a light meter. The light meter would give a light reading – the film speed was set on it and the meter would show which pairs of parameters – shutter speed and aperture – would be good for a normal exposure (bearing in mind that meters will always give the exposure value which would give a grey result – whether it's snow or coal). • Eventually, the light meter was built in to the camera (though not as long ago as you might think). • To set a manual exposure, you usually have to set the camera to your required aperture or shutter speed (based on the result you require), then match its reciprocal value – e.g. you decide on an aperture and then you have to move your shutter setting to give the correct, matched reading. Or you set a shutter speed and move the aperture to give a match. It's a matter of balance. These pairings are, of course, governed by the ISO or film speed. The settings are usually 'dialled in' from controls on the camera body.
Exposure Modes • Manual (Continued) • It can be seen, then, that this is a fairly slow method of setting up your camera for correct exposure – and it also requires some knowledge of the properties of the apertures and shutter speeds set. How else would you know what aperture or shutter speed you want to start with? • Check out the “Exposure Triangle” again if this doesn't make sense, but let's have a quick refresher on the properties of the Shutter and the Aperture...... • Shutter Speed..... slow to blur the action, fast to freeze movement. • Aperture..... • Small for a 'deep' depth of field (the amount in focus), usually good for landscapes, it will force slower shutter speeds (or it would be under-exposed). • Large for a narrow depth of field (throwing almost everything blurred except the part focused on, usually good for portraits, it will force a faster shutter speed (or it would be over-exposed)
Exposure Modes • Most beginners to photography will start out by using the camera's automatic modes, letting the camera sort out the exposure so that they only have to worry about capturing the moment and composing properly. • However, as you become more confident, it's time to take more control of the camera and it's at this point that a fuller understanding of the camera's controls becomes crucial. • Take shutter speeds, for example: not only do you need to understand the relationship that shutter speeds have with apertures, but you also need to be able to read a situation to decide which shutter speed is the right one to select. • One of the first considerations when setting a shutter speed is to choose one that is fast enough to prevent the dreaded blur caused by camera shake. Camera makers have invented several ways to minimise this, most notably in the form of image stabilisation systems. • Clever use of your shutter speed will allow you to not only get sharp images - it will increase your creativity and take you further up the ladder of photographic progress.
Exposure Modes • After a while where Manual Exposure control (or the semi-automatic version) had become the norm, camera manufacturers started to put one or another of the 'semi-automatic' modes into cameras. You could get a camera that had Manual and either Aperture Priority (the most common) or Shutter Priority. • Aperture Prioritythe user selects the aperture required, depending on the effect required (remember the properties of small and large apertures). The Shutter speed will do the automatic part, setting itself at the reciprocal point where a 'normal' exposure should be, with the information provided by the light meter. • Shutter Prioritythe user sets the required shutter speed, depending on the effect required – to freeze action or to deliberately blur. The Aperture will set itself at the reciprocal point for a 'normal' exposure, using the information from the light meter.
Exposure Modes Aperture Priority (commonly uses a symbol of ‘A’ or Av’) • Set the aperture required and the camera calculates what shutter speed is appropriate for a 'normal' exposure in the lighting conditions. Larger aperture = faster shutter speed. Smaller aperture = longer shutter speed. • When to use Aperture Priority Mode? – the main impact that aperture has on images concerns Depth of Field (DOF), so use Aperture Priority Mode when you are attempting to have some control in this area. It can also be used to obtain a slower shutter speed for creative purposes. • If you want a shallow DOF (with the background blurred and therefore not distracting) select a large aperture and let the camera choose an appropriate shutter speed. Portrait photographers normally want a 'fast' lens, opening to at least f2, to get a narrow depth of field, keeping sometimes just the nose and eyes of the subject in best focus. • If you want an image with everything in focus, pick a smaller aperture and let the camera choose an appropriate, longer shutter speed – often one that requires a tripod to eliminate camera shake.
Exposure Modes Aperture Priority (Av) continued • Set the aperture required and the camera calculates what shutter speed is appropriate for a 'normal' exposure in the lighting conditions. Larger aperture = faster shutter speed. Smaller aperture = longer shutter speed. • When selecting an Aperture, keep in mind that the camera will be choosing faster or longer shutter speeds and that there comes a point where shutter speeds get too long to continue to hand hold your camera (usually around 1/60th). You’ll need to consider using a tripod – or increasing the ISO. Also, if you’re photographing a moving subject, your shutter speed will impact how it’s captured and a slow shutter speed will mean your subject will be blurred..... but that's not necessarily a bad thing. • This is all starting to sound like the smallest apertures are going to be best for sharpness (because, in theory, the Depth of Field covers everything in front of the lens). Many lenses will 'stop down' to a smallest aperture of f.22 or a higher number (smaller aperture, remember). Some will show that they go even smaller, like f.32. However, lens performance drops off sharply past, usually, about f.16..... so any smaller apertures that that will definitely show a poorer image resolution. Use f.22 as the absolute smallest aperture.
Exposure Modes Aperture Priority(continued) Summary: • Aperture Priority is a semi-automatic exposure mode whereby you select the aperture (f/number) that you want to control depth-of-field and the camera automatically sets the shutter speed to give you a 'correct' exposure. • The aperture and shutter speed will be shown on the top-plate LCD, and/or in the viewfinder, or the LCD screen. No other camera settings are changed when using this mode and the camera has access to the full range of shutter speeds – usually around 1/4000th to 30 seconds, in 1/3rd stop increments. • In low light, the shutter speed for a correct exposure might be slow, increasing the risk of camera shake. Be aware of this and use a tripod if possible, or increase the ISO so that the camera selects a faster shutter speed.
Exposure Modes • Shutter Priority (commonly uses a symbol of ‘T’, 'S' or Tv’) • Set the shutter speed you require and the camera calculates the aperture appropriate to the lighting conditions to give a 'normal' exposure. Fast shutter = larger aperture; Slow shutter = smaller aperture. • When to use Shutter Priority Mode? – different shutter speeds determine how ‘movement’ is captured in your images. As a result most people switch to shutter priority mode when they want more control over how to photograph a moving subject. Photographers of sports or any other 'action' shots use this mode most frequently. • If you want to photograph a fast-moving racing car but want to completely freeze it so there is no motion blur, you’d choose a fast shutter speed. The camera would take into account the available light and set an appropriate aperture. If instead you wanted to photograph the car but have some motion blur to illustrate how fast it's moving you might like to choose a slower shutter speed and the camera would choose a smaller aperture as a result. Conversely, you may want to slow down the action – waterfalls and rivers can benefit from a slower shutter speed (even if this technique is now a little 'old hat'). • As the camera chooses different apertures, reciprocating the shutter speed, it will impact the Depth of Field in your image. A fast shutter speed will choose a wider aperture and, as a result, give a narrower DOF.
Exposure Modes Shutter Priority continued..... • If you select a Shutter Speed and then find that the camera cannot find an Aperture to suit – because it would need to go outside its 'range' - then you will have to think about adjusting the ISO until the camera finds a suitable aperture. • There's nothing worse than coming home with loads of pictures only to find out that they all have camera shake because the shutter speed you used was too slow. It's best to know your limits before you go out, so why not use this little test? • Stick a newspaper up on the wall and stand in front of it with your camera (with a standard lens) hand-held without leaning on anything for stability. Set your camera to shutter-priority and select a speed of 1/125th sec and take a few pictures, checking your LCD carefully or putting them all on a computer later. Hopefully all of them will be sharp, so select 1/60th sec and try again. Keep using increasingly slower shutter speeds until you reach the point where you can only get one out of three sharp. This is the absolute slowest setting you should try to handhold in the field with that lens, while the lowest speed with consistently shake-free images would be better. • Try again with a longer lens. Generally, it's a good rule to never have a hand-held shutter speed that is longer than the focal length of your lens (If you see what I mean. Don't be too disheartened by the results – practice with a good technique for hand-holding and things will gradually improve.
Exposure Modes Full Auto (A) • Also known as 'fool-proof' mode, as all you need to do is point and shoot – the camera takes care of everything else. • As well as setting the aperture and shutter speed, it also sets the autofocus mode, single shot firing and multi-zone metering. • In low light, the flash will automatically fire and your camera may even set the image format to Jpeg. • It's a complete beginners' mode, aimed at newcomers with no knowledge of, or interest in, the technical side of photography who want the camera to control focusing and exposure. • The fact that you're even reading this suggests you don't fall into that category, so this mode is best avoided.
Exposure Modes • Practice • Shutter and Aperture Priority modes give you more control over your images but they can take a little practice to get used to. As you use them you need to not only think about the setting that YOU set but also keep an eye on the setting that the camera selects for you. • When shooting in Av or Tv modes shoot a number of images of the same subject at different settings. Experienced photographers using digital cameras often use the histogram facility that the camera has. • The best way to learn about Shutter priority and Aperture Priority modes is to grab your camera and go play! Switch to Av or Tv and try the different settings (taking lots of shots as you go). Particularly watch how the camera makes changes to compensate for your selections and what impact it has upon the shots that you take. Think of your subject – do you want to freeze the action, and have some blurring in front of or behind? Or see how much you can get in focus. See what happens to the histogram and you'll soon be expert at that as well. • In Av, take some shots at large apertures and see how it blurs the background (but also increases the shutter speed) and then head to the other end of the spectrum to take some shots at the smallest aperture you can. • In Tv Mode play with fast and slow shutter speeds and see how that affects DOF.
Exposure Modes Frequently Asked Questions Which exposure modes suit which subjects? • Full Auto and Program modes are fine for snapshots but best avoided for those attempting creative photography. • Aperture-priority is the best choice for subjects where you need control over depth-of-field because it's the lens aperture that gives you the control. In most cases, it's depth-of-field that you'll be most concerned with. For landscapes and any kind of scenic photography, for example, you will usually want a lot of 'dof' to record the whole scene in focus. This is achieved by setting a smaller aperture such as f/11 or f/16. • For portraits and candids the norm is tothrow the background out of focus so your subject is prominent. This is achieved by setting a larger aperture, such as f2, f/2.8, f/3.5. By using aperture priority mode you can always ensure the lens is set to the required aperture and leave the camera to set the correct shutter speed. If you're using a tripod, you needn't worry too much about the slower shutter speeds. • Shutter-priority is the best choice for subjects where the photographer needs to control the amount of movement captured. If you're shooting fast-moving action you need to know that the camera is set to a suitably high shutter speed to freeze it (if you want to freeze it) or if you want blurred movement you'll need to be setting an appropriate shutter speed first. • With experience, your exposure mode doesn't really matter – you'll know how to get the best out of the camera whatever settings you're on.
Exposure Modes Frequently Asked Questions (Continued) I've heard certain exposure modes are better for use in tricky light than others – is this true? • No, not really, There's a common misconception among some photographers that a camera's metering system is more reliable in certain exposure modes. Some think that manual mode is the best option in tricky light as it gives you more control, but this is a myth. Your camera measures light to determine 'correct' exposure in exactly the same way no matter what exposure mode you're using. • The most reliable metering pattern in DSLRs is multi-zone (check what it's called in your camera). Even in full auto, program and subject-based exposure modes, this metering pattern is set automatically by the camera, so it's wrong to think that Av, Tv or M modes are more accurate – they're not. In fact, you're more likely to mess up the exposure in manual exposure mode because if you change camera position or the light levels change and you don't adjust the exposure accordingly, it will be wrong, whereas the semi-autmatic and fully-automatic exposure modes will change the exposure to match any altered light levels.
Exposure Modes Frequently Asked Questions (Continued) Does my camera's exposure compensation facility work the same with each exposure mode? In a word, NO. If you shoot in full auto or any of the subject0based exposure modes, you usually cannot access exposure compensation at all. In program mode and aperture-priority mode, any exposure compensation you dial in is applied by changing the shutter speed while the aperture remains unchanged. In manual mode you don't need exposure compensation because you have the freedom to adjust the aperture and shutter speed at will to over-ride what the camera tells you is 'correct'. Are the subject-based exposure modes on my camera worth bothering with? They're good for beginners, but the restricted control you have using them makes them limiting for more experienced photographers. Have a think about what it is that they're doing – e.g. A 'snowy scene' setting will be adding some exposure compensation, to let the snow be white instead of grey; a 'portrait' setting will be widening the aperture, to throw the background out of focus; 'Sport' is obviously going to try to raise the shutter speed, etc. They don't do anything you cannot do using other exposure modes and other functions, so you're better off reading your manual and learning about your camera – in the long term it will help you understand the basics and make you a better photographer.
Exposure Modes Auto modes (or 'Program') • After all this technical stuff about Manual, Aperture and Shutter Priorities, you can be forgiven for feeling confused. So you want to stick with 'Auto'? Well, it's not all bad news... there are some perfectly good reasons for using Auto...... and several good reasons against. • For..... it saves you ever looking at your camera's controls, leaving you free to concentrate on the composition of the image. • Against..... all (or very nearly all) the creative uses of the camera come from a good working knowledge of its basic parts. Those parts cannot be controlled in Auto or P. • Then there are those special settings you sometimes find.... 'Sport', 'Snow', 'Landscape', 'Portrait' etc. What do you think is going on there? Essentially, the camera is choosing the 'right' aperture or shutter speed to suit. You'd do the same to some extent but did you really want to 'freeze' that skater or did you want to show some blur to indicate his speed? You may want a smaller aperture for the landscape but not necessarily. Similar with other settings.... it sets a large aperture for portraits, while snow may get some extra exposure. But when the camera runs out of its normal confines it will adjust the ISO to suit. It's taking charge of YOU! So it might suit drivers of automatic cars or Mac users, but the rest of us want to take charge of the camera!