Download
1 / 42
420 likes | 428 Views
Oct 2017. PowerCube 2.0 Installation Guide - Australia. V1.3. Contents. 1. System Introduction 2. Unpacking the products 3 . System Installation Steps 4 . WIFI Monitoring Setup Guide. System Introduction. 01. System Topology Power Box PowerCube 2.0. PowerCube System Topology.

E N D
Oct 2017 PowerCube 2.0 Installation Guide - Australia V1.3
Contents • 1. System Introduction • 2. Unpacking the products • 3. System Installation Steps • 4. WIFI Monitoring Setup Guide
System Introduction • 01 • System Topology • Power Box • PowerCube 2.0
PowerCube System Topology Power Box (AC – “Inverter”): DC/AC bi-directional Power Conversion Equipment (PCE) Mainly applied and developed for the renewable energy generation system The interface between the grid and the battery storage Designed for lithium-ion batteries PowerCube– Battery Energy Storage: Lithium Iron Phsophate (LiFePO4) Contain at most 4 battery packs Capacity: 4.8kWh – 9.6kWh Voltage range: 44.5V – 54V
PowerCube (Battery Storage) Advantages: The PowerCube and accessories are designed for simplicity and convenience Can be completed by one person Integrated Isolator design to reduce the cost and time required for installation Outdoor rating – IP54 PowerCube 2.0 Casing: Battery Pack:
Upacking the products • 02 • Battery Packs • PowerCube 2.0 Casing • Power Box
PowerCube A B C D E F G H
System Installation Steps • 03 • Installation tools and accessories • Single Line Diagram • Powercube installation • Powerbox installation • System Connection • System Start-up • System Setting
Installation Accessories Depending on the site-specific situation and local electrical compliance requirements, some if not all of the following parts will be required: AC circuit breakers – Minimum one 20A circuit breaker is required next to the powerbox and extra ones for extended distance away from switchboard/distribution board Automatic Transfer Switch (25A Contactor) – For automatic switching to critical load only. Minimum requirements: Auxiliary Contacts + 1NC + 1NO AC cables (≥4mm2) – From powerbox to Switchboard/Distribution board DC cables (≥25mm2)– From powercube to powerbox (2 to 5 metres) Ethernet/CAT5 cables – To extend the communication cable, distance between the powercube and the powerbox. Or to extend the CT sensor cables.
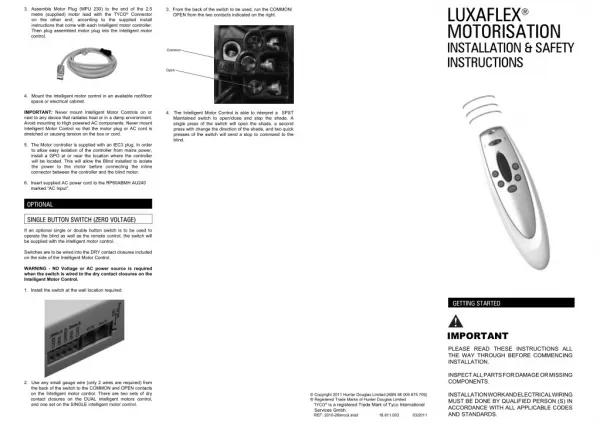
Powercube installation – PowerCube Mounting Step 1: Remove the enclosure cover Step 2: Remove the Circuit Breaker cover Step 3: Use the cardboard template provided to do wall-mount hole “marking” and drill holes accordingly Step 4: Insert wall plug and drive the M8 bolts Note: Place two anti-theft bolts in the middle hole Step 5: Hook on the PowerCube enclosure before securing & tightening the bolts. Pedestal (Optional): cardboard Printed hole markings for quick markings prior to drilling
Powercube installation – Battery Packs Once the Powercube enclosure have been secured with bolts. Step 1: Insert the packs into the mounted casing Step 2: Turn the baffle to secure the battery packs
Powerbox installation – Power Box Mounting Step 1: Put the mounting bracket on the wall and mark the 8 drill holes by using a marker pen. Drill 8 holes (drill bit 6mm) on the wall. Step 2: Insert the wall plug vertically into the hole, note the insertion depth. Note: Not too shallow or too deep Step 3: Fix the mounting bracket on the wall by using screws & flat washers Step 4: Put the POWER BOX on the mounting bracket. Step 5: Ground the POWER BOX by using the grounding hole on the heat sink. Step 6:OPTIONAL: you can lock the POWER BOX
System connection – Powercube Battery modules overview Communication cable between PCE & Master Battery Pack Connection Points (CP) Communication cable between eachBattery Pack (master always end in “Link Port 1”)
System Connection – Powerbox Overview Waterproof cover
System connection - Battery Modules (3 Packs) Connection - Wire Powerbox DC isolator (supplied) Master Powercube battery packs
System connection - Battery Modules (4 Packs) Connection - Wire Powerbox DC isolator (supplied) Master Powercube battery packs
System Connection – Power Cube 2.0 Removing waterproof covers Step 1: Loosen 4 screws (part A), remove the waterproof cover (B), loosen the cable gland (C), and then remove the stopper (G) Connecting the wires Step 2: Route the PowerCube wires (F) through the cable gland, then connect PowerCube wires using Crimp Ring terminal (E)
System Connection – Grid terminal Removing the waterproof cover Step 1: Loosen 4 screws (part A) using a screwdriver Step 2: Remove the waterproof cover (part B), loosen the cable gland (part C), then remove the stopper (part G) Connecting the wires Step 3: Route 3-core cable through GRID cable gland, then connect 3 wires to corresponding terminal blocks. (Brown/Red – L, Blue/Black – N, Yellow/Green– PE) Step 4: Fasten the waterproof cover using 4 screws.
System Connection – Critical Load terminal The connection terminal procedure to LOAD port is the same as grid connection. Brown/Red to Live (L), Blue/Black to Neutral (N), Green & Yellow to Earth (PE). Note: LOAD port is only for critical load connection. Please make sure that you’ve have the AC contactor accessory for Automatic Transfer capability. Only connect Inductive load or capacitive load that are in total no more than 1kW. Maximum critical load is 3.0kVA.
System Connection – Automatic Transfer Switch (Contactor) sample wiring Powerbox (EPS) – L terminal To meter Powerbox (EPS) – N terminal ATS Relay/Contactor Grid Main Circuit Breaker Critical Loads
System Connection – CT sensors CT Sensors are used to measure the current flow in the circuit. It provide data to Powerbox for energy management. Step 1: Use network cable & terminal cap to extend the CT wire. Hint: keep network cable sheath for better connectivity Note: Network cable is not provided Step 2: Loosen 4 screws, remove the waterproof cover, loosen the cable gland, and then remove the stopper Step 3: Route CT cable through the cable gland and connect CT cable to CT terminal Step 4: Insert CT terminal into corresponding ports: • Connect Grid CTto CTaport; • Connect PV CTto CTpvport;
System Initialization Note: Please double check the connections before operation. Power on the POWER BOX per the following steps: Turn OFF the solar inverter. Make sure there’s no power generation in the Power Box’s phase. Turn ON all the battery packs by pressing any one of the red softstart button on the pack Turn ON DC circuit breaker/isolator between PowerCube 2.0 & Power Box Turn ON AC circuit breaker between Power Box Grid port & Grid. The Power Box should start to operate now. Turn ON some home appliances or load. Make sure power consumption in the Power Box’s phase is greater than 200W. You should be able to read the data on the screen. Turn ON the solar inverter. (power generation > 100W)
System menu keys Buttons: press “Back” to the previous screen or enter the main interface; press “Up” to the upper menu option or value plus 1; press “Down” to the lower menu option or value minus 1; Press “OK” to select the current menu option or switch to the next digit.
System Setting – Changing the time for the first time Time Setting: Usually during the first initialization, the time need to be changed. At the standard interface, press the “back” button to enter the main menu. The main menu includes five options: Enter settings, event list, system information, software upgrade, and energy statistics. Select “8.Set Time”, press “OK” to enter into time setting interface, the format of the time is YYYY-MM-DD HH:MM:SS. Press “Up” or “Down” to change the 1st digit, press “OK” to switch to next digit, after inputting the current time, press “OK”
WIFI Monitoring Setup Guide • 04 • Establish WLAN (Wi-Fi) Connection • APP Installation • System Monitoring Set-Up
Establish WLAN (Wi-Fi) Connection - Open the WLAN Interface Step 1: Open the WLAN Interface of Inverter Identify Inverter SSID Open up an internet browser using a computer PC or from any smart device. Enter the inverter IP address in the address bar (URL) to open up its settings and configurations: 10.10.100.254. Default username ; Password: admin / admin
Establish WLAN (Wi-Fi) Connection - Set-up the WLAN Monitoring Step 2: Set-up the WLAN Monitoring Click Start Button under Wizard Select Wireless connection,click NEXT
Establish WLAN (Wi-Fi) Connection - Set-up the WLAN Monitoring Step 2: Set-up the WLAN Monitoring Then, select your current wireless network: enter your WLAN/Wi-Fi password and re-enter it again,Click NEXT
Establish WLAN (Wi-Fi) Connection - Set-up the WLAN Monitoring Step 2: Set-up the WLAN Monitoring Select ‘Enable’ for Obtain an IP address automatically, and click ’next’ Do not select any option under steps 6, click NEXT
Establish WLAN (Wi-Fi) Connection - Set-up the WLAN Monitoring Step 2: Set-up the WLAN Monitoring Click NEXT and wait for it to show ‘Configuration completed!’ then press OK to continue. Select ‘Status’ and under Device Information confirm that the inverter Wi-Fi is connected to selected router SSID (WI-FI name). Also make sure ’Remote server A’ is configured to ‘Pingable
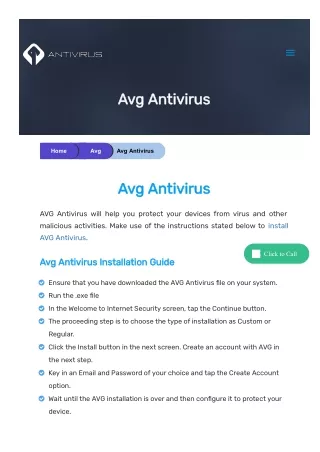
APP Installation For IOS system:Search “solarman” in APP Store and install, or via this link https://itunes.apple.com/au/app/solarman-the-best-use-of-pv-owners-app/id1269498647?mt=8 Or simply scan the QR code below: For Android system:Search “Solarman” in Google Play and install, or via this link https://play.google.com/store/apps/details?id=com.igen.rrg Or simply scan the QR code below:
System Monitoring Set-Up – Register and Login Open the APP: If you already have an account, please click “Login”: Input account and password: If you do not have an account, please click“Register”: 1 Click “Register” 2 Input username 3 Input email or phone number as account name 4 Set password 5 Choose “Register” to finish registration 6 After registration, choose “Login” to start using the APP Note: Please use email to register in Australia area. Only one account is allowed to be set up per inverter (once the inverter WiFi has binded with an account, the user must delete the plant profile/WiFi logger to unbind the connection). It is suggested the installer sets up the account on behalf of the end user.
System Monitoring Set-Up – Plant Setting 1 Clickon the left bottom to visit “Homepage” 2 Create plant 3. c. Scan/Enter WiFI serial number (SN) 4. Enter plant info 5. Locate the plant on the maps
System Monitoring Set-Up – Plant Setting 6. Name the plant and put in installer/person who manages the app 7. Check and ensure the correct WiFi SN has been entered.
System Monitoring Set-Up – Plant Setting 8. Choose «Complete» to finish configuration. After configuration has successfully completed, please wait for 10-20min (depend on network speed) for the WiFi logger to establish connection and upload data to the server. You should see the following screen and a green tick once inverter has established the connection. Please note that the data uploads frequency is every 5 minutes. If configuration fails, please ensure inverter WiFi is connected to local router and there's established internete connection. If problem persists, please contact customer service.