Download

1 / 21
210 likes | 214 Views
Learn the basics and advanced techniques of mail merge to effectively communicate student data to families. Discover how to personalize letters, add symbols, and customize information based on gender or performance. Enhance parent engagement and strengthen the connection between home and school.

E N D
Mail Merge: A Powerful Tool for Communicating Data to Families Katie Newmark – DC Data Summit – July 14, 2016
Agenda Introductions Why is it important to communicate student data to families? Exemplar data letters Mail merge: the basics Mail merge: a little fancier
Why is it important to communicate student data to families? • Objective basis for discussing students • Inform families about student achievement, growth, goals, next steps • Educate families about assessment, content, teaching strategies • Increase parent engagement – how they can help at home • Strengthens alignment between home and school – united front • Opens dialogue • Parents want to know!
Exemplar data letters: what features did you like? • Narrow focus • Limited jargon, explanations for key terms • Ways to help at home • Personalized • Targeted
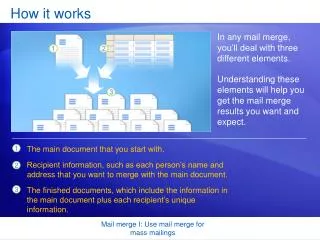
Mail merge: the basics Mail merge is used to create a set of documents for many people. Each document has the same information, but the content is personalized.
Mail merge: the basics • STEP 1: Create Excel file • One row for each student • One column for each bit of data • Label each column • You try! • In the sample Excel workbook, • Add data for another student. • Add data about the homework completion rate for all students (ex: 82).
Mail merge: the basics • STEP 2: Create Word document • Write and format letter as usual • Put a placeholder word where you want the personalized information to go (ex: “NAME”, “SCORE”) • You try! • In the sample Word document, • Add a sentence below the table that will include personalized information about each student’s homework completion.
Mail merge: the basics • STEP 3: Mail merge • Mailings > Start Mail Merge > Step-by-Step Mail Merge Wizard
Mail merge: the basics • Summary of mail merge steps (in Word) • Select document type: Letters • Select starting document: Use the current document • Select recipients: Use an existing list • Browse: select Excel file • May want to sort or filter • Write your letter: insert merge fields • Preview your letter • Complete the merge: Edit individual letters
Mail merge: a little fancier FANCY TRICK #1: Use if/then logic in Excel to further customize the data Create new fields with formulas in this format: =if(logical test, value if true, value if false) Statement using =, <, or >
Mail merge: a little fancier EXAMPLE: Add gender-specific pronouns In Excel In cell J2: =if(logical test, value if true, value if false) =if(d2=“M”, “his”, “her”) Fill down by dragging or double-clicking bottom right corner of the cell. Save!
Mail merge: a little fancier EXAMPLE: Add gender-specific pronouns In Word Go back to selecting recipients – select again Revise letter Insert the new merge field Complete mail merge again
Mail merge: a little fancier ANOTHER EXAMPLE: Add student-specific descriptions or action steps
Mail merge: a little fancier ANOTHER EXAMPLE: Add student-specific descriptions or action steps In Excel In cell K2: =if(logical test, value if true, value if false) =if(i2>90, “Keep up the good work!”, “Homework is an important way to practice skills learned in class. Encourage your student to stay after school for extra help with homework.”) Fill down by dragging or double-clicking bottom right corner of the cell. Save!
Mail merge: a little fancier ANOTHER EXAMPLE: Add student-specific descriptions or action steps In Word Go back to selecting recipients – select again Revise letter Insert the new merge field Complete mail merge again
Mail merge: a little fancier FANCY TRICK #2: Add check marks or other symbols
Mail merge: a little fancier FANCY TRICK #2: Add check marks or other symbols In Excel In cell L2: =if(logical test, value if true, value if false) =if(g2>90, “J”, “”) Fill down by dragging or double-clicking bottom right corner of the cell. Save!
Mail merge: a little fancier FANCY TRICK #2: Add check marks or other symbols In Word Go back to selecting recipients – select again Revise letter Insert the new merge field in the correct font Complete mail merge again
Mail merge: a little fancier • You try! • Pick one of our fancy tricks: • Add gender-specific pronouns • Add student-specific descriptions or action steps • Add check marks or another symbol
Feedback & Questions • What did you find helpful from this presentation? • What would you have changed? • Any questions? (Include your contact info.) • Or contact me later: • Katie Newmark • katie.newmark@kippdc.org