Download

1 / 28
280 likes | 731 Views
No matter what cause your iPhone lost contacts, you still can retrieve your contacts back by using this omnipotent way: http://www.leawo.org/ios-data-recovery/ You can learn two ways to retrieve contacts from iPhone in this video guide: 1. Restore contacts from iPhone backup 2. Retrieve iPhone contacts without backup And now the latest iPhone data recovery also supports retrieve iPhone data from iCloud backup! This method for those people who meet the situation below on iPhone 6 /6/5S/5C/5/4S/4/3GS: * iPhone deleted all contacts for no apparent reason. * Contacts were deleted by you or other people accidently * Update to iOS 7/iOS 8 and lost all contacts * Lost all of your contacts after factory restore your iPhone * Contacts get erased on iPhone when you sync with a new library or new computer * Can't turn on crashed, damaged, broken or smashed iPhone and need the contacts * Lost all the iPhone data after jailbreak including the important contacts. The guide above is for windows users, if you are Mac user, go to http://www.leawo.org/ios-data-recover... to recover deleted iPhone contacts on mac My facebook: http://www.facebook.com/leawo My twitter: http://twitter.com/#!/Leawo_Software My channel: https://www.youtube.com/user/Leawosoft

E N D
Lost Contacts on iPhone -How to Retrieve Contacts on iPhone 6 Plus, 6, 5S, 5C, 5, 4S, 4, 3GS Leawo Software Website: www.leawo.org YouTube Channel: https://www.youtube.com/user/Leawosoft
Curious about the legendary data recovery master and want to have a try? Leawo iOS Data Recovery provides specific iPhone data recovery guide, iPad data recovery guide, and iPod data recovery guide to solve any data loss problems that have happened to the iOS devices. It offers quick solutions to recover multiple deleted, damaged, or lost data directly from iPhone, iPad and iPod touch. Besides data recovery, the tool can also quickly scan 12 types of data directly from the iOS devices or extract them from iTunes backup, and then export all of the data scanned to the computer as backup for further use. • Follow Leawo iOS Data Recovery user guide below to learn how to recover data from iPad/iPod/iPhone right away.
Solution 1. Recover by extracting iTunes backup
Step 1. Enter "Recover from iTunes Backup" mode When you have downloaded and installed the software on your computer, run the program on your PC. Then you’ll see the Home interface with 2 recovery modes provided. Click the second option --- "Recover from iTunes Backup" mode to begin the automatic scanning of the iTunes backups on your local PC.
Step 2. Select iTunes backup for scan After choosing recovery mode, you can see a list with all the backups of different iOS devices on your local PC and the backups are categorized by Name, Last Backup Date and Serial Number. If your iOS device is not listed here, it’s probably because iOS device has not been synchronized with iTunes.
Only after a few seconds, all the 12 kinds of file types and the specific file number on your device backup will be listed on the left column, including: Camera Roll, Photo Stream, Photo Library, Contacts, Messages, Message Attachments, Call History, Calendar, Notes, Reminders, Voice Memos, Safari Bookmarks. You can preview the files by selecting and ticking the file types on the left, or check all of the file categories for recovery by directly ticking your device name shown in the upper-left corner of the interface. As soon as the scanning ends, your device name, type, iOS version and serial number will be listed on the right of the program interface for your reference.
Step 4. Save files to be recovered After clicking "Recover" button in the last step, you’ll see a pop-up "Recover Files" window.
Solution 2. Recover by directly scanning iOS devices
Step 1.Click "Start" to scan your device There are 2 situations to start the scanning of your iOS device.
Situation 1: Launch the program first, and you’ll see the Home interface with 2 recovery modes available, click "Recover from iOS Device" mode, you’ll see the interface prompting you to connect your iOS device. Then just connect your iOS device with the computer. When your device has been detected by the program, you’ll see the "Start" interface shown in the second situation, click "Start" button to scan your device. If your device cannot be detected by the program, you can click "Device Cannot Be Detected" option on the bottom-right of the interface, which gives you tips to enter DFU mode manually and scan. Situation 2: Connect your iOS device to the computer using a USB cable first, and then run the iOS data recovery program on your PC. Once your device has been recognized by the program, you’ll see a "Start" interface shown as below, just click it.
Step 2. Scan the iOS device connected After clicking the "Start" button in the center of the interface, the program will begin analyzing and scanning the device connected to the computer automatically. Remember not to pull out the device connected while the program is scanning.
Step 3.Preview data files scanned • After scanning, you'll be able to see all the 12 kinds of files that have been found in scanning your iOS device listed in organized categories on the left column. Click the file types and you can preview the files in thumbnails on the right of the program interface.
Step 4.Choose saving location for files to be recovered • Click "Recover" button on the right corner of the program interface, then a "Recover Files" interface will pop up for you to specify a folder on your computer to save the files to be recovered and exported. You’d better tick "Automatically open the output folder after finishing recovery" option for convenience. • After choosing saving location, click "Go" button on the right corner of the pop-up window to start to recover data from iPhone/iPad/iPod touch right away.
Solution 3. Recover under DFU mode for iPhone 4 & iPod touch 4 This tutorial only applies to Leawo iPhone 4 Data Recovery and Leawo iPod touch 4 Data Recovery, so the devices to be connected should be iPhone 4 or iPod touch 4 respectively.
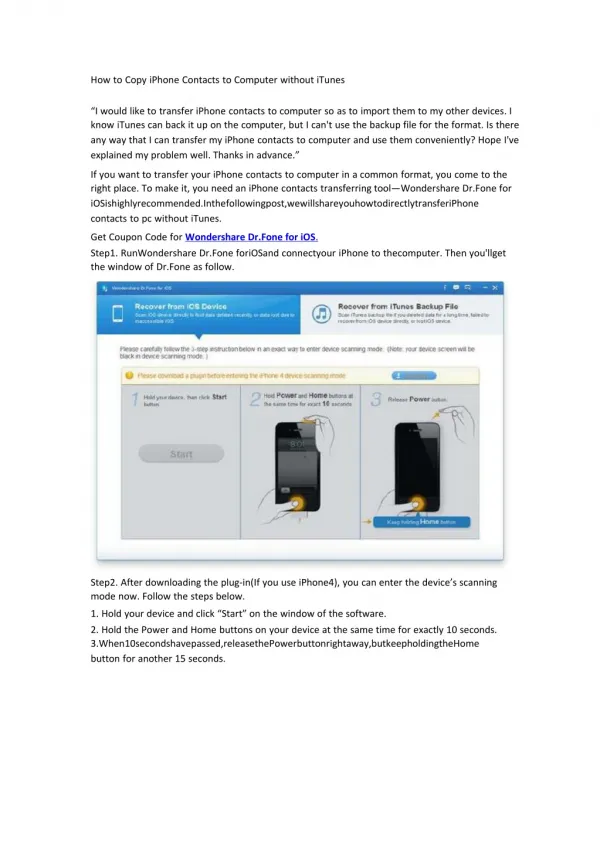
Firstly, connect your iOS device to the computer and run the program on your PC. When your device has been detected by the program, you’ll see a "Start" interface with 3 simple steps for you to enter DFU recovery mode of your device. • 1.Hold your device, then click "Start" button. After clicking "Start" button, the program will enter the second step automatically. • 2.Hold "Power" and "Home" buttons at the same time for exact 10 seconds. You can watch the count-down timing on the interface in case of missing or exceeding the time span. When the first 10 seconds passes, the screen of the device will go black. • 3.Release "Power" button. Keep holding "Home" button. When the device screen turns black or the timing passes, just release "Power" button slightly, but keep holding "Home" button for another 10 seconds until the message "You have successfully entered DFU mode, now you can release the Home button" prompts.
Step 2.Scan your iOS device • Once the DFU mode of your iOS device has been activated, the program will automatically start to analyze and scan your device.
Step 3.Preview data found in your device • After a few minutes scanning process, all the data on your iOS device will be present before you in various categories. You can select the file types on the left column and click them to preview in intuitive thumbnails. • By clicking the given parameters for different file types, you are sure to filter and pick out the files you desire for quickly.
Step 4.Save and recover data from iOS device • After preview, tick the files you want and click "Recover" to start to recover deleted data from iPod/iPad/iPhone. Then on the pop-up window, choose the specific saving location on your PC by clicking "Open", and tick "Automatically open the output folder after finishing recovery" checkbox if you need. Finally, just click "Go" to start to recover data from iPod/iPhone/iPad.
Solution 4. Extract Files from iCloud Backup
Step 1.Choose Recovery Mode • Run Leawo iOS Data Recovery, and you’ll see the 3 recovery modes in the main interface. Choose “Recover from iCloud Backup” in the window.
Step 2. Enter Apple ID • The software will ask you to log in iCloud with your Apple ID. Enter the Apple ID and click the Enter button (Right Arrow in a Circle), or hit Enter on your keyboard to move to next step.
Step 3.Select iCloud Backup • The iPhone data recovery software will scan the backup(s) in your iCloud and display one backup in the main interface. Double-click the backup or click “Download” at the right bottom to scan the iCloud backup. If you don’t want to scan the backup under this Apple ID, you can click “Log out” at the left bottom.
Step 4.Download iCloud Backup • After clicking the “Scan” button, Leawo iOS Data Recovery will start to download the iCloud backup if you are using the iCloud backup for the first time. The time of the download depends on the size of the backup. You can click “Cancel” to stop downloading the backup.
Step 5.Select Files • When the software finishes downloading the iCloud backup, it will start to scan the contents in the backup. When the scan is done, you can choose a category in the left sidebar, and then check the files in the right part to extract. Then click “Recover” at the right bottom to move to next step.
Step 6.Choose Target Folder • A dialog pops up after the recover button is clicked. Hit “Open” in the dialog to choose a folder on your computer to save the exported files, and then click “Go” to start extracting files from iCloud backup.
For more details,welcome to visit www.leawo.org or https://www.youtube.com/user/Leawosoft Thank you!