Download
1 / 46
530 likes | 854 Views
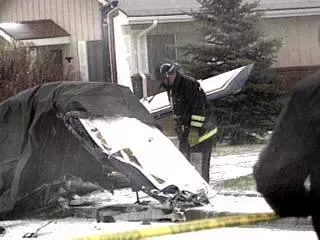
Controlled Flight into Terrain (CFIT) . Controlled Flight into Terrain (CFIT). Causes of CFIT need to be understood by instructors and explained to students. The FAA has found four discrete CFIT concerns which affect gliding operations. Failure to maintain situational awareness.

E N D
Controlled Flight into Terrain (CFIT) • Causes of CFIT need to be understood by instructors and explained to students. • The FAA has found four discrete CFIT concerns which affect gliding operations. • Failure to maintain situational awareness. • Landouts; Ridge flights. • Failure to avoid distractions. • Traffic pattern issues leading to failure to make a safe landing on the airport.
Maintaining Situational Awareness • As it relates to operating a glider, situational awareness elements include: • Maintaining awareness of height/position required to reach a safe landing area. • Keeping a mental picture of the location of other traffic. • Maintaining awareness of physical obstructions such as wake turbulence, lee turbulence, potential for windshear etc. • Keeping a “safe angle” (especially when in the traffic pattern).
Maintaining Situational Awareness • Failure to maintain situational awareness typically involves: • Uncertainty of position. • Loss of awareness of parameters necessary for continued safe flight. • Impaired physical and/or mental ability to plan ahead, or follow the existing plan, prejudicing a safe conclusion of the flight.
Landouts • From an instructing standpoint, teaching landouts is a requirement of the Practical Test Standards (Emergency Operations Area, Off-airport Landing Task) and is one of the requirements for initial student solo (FAR§61.87(i)(19).
Landouts • The common feature in dealing successfully with landouts is the requirement to plan ahead. • The more time and height available, the more effective the planning is likely to be. • Aiming/reference point technique for decision making allows an early decision whether the glider is likely to make it to its intended destination. • If that appears unlikely, the pilot should focus primarily on planning for the landout. • Detailed landout procedures can be found on the SSF webpage (www.soaringsafety.org) - On-Line Learning button - see the Master Instructor Cross-Country Program, details are set out in Section 2 of the Cross-Country Handbook.
Ridge Flights • Ridge flights typically run into CFIT issues from failure to maintain safe margins - • - distance. • - airspeed. • - failure to avoid turbulence, especially lee turbulence. • Additionally, it is essential to - • - turn in the correct direction. • - pass on the correct side. • Lastly, the possibility of changing conditions requires always knowing where escape routes are, and using them while time still remains.
Avoiding Distractions • Distractions cause pilots to focus on non-essential issues to the detriment of safely flying the glider. • Distraction is a common problem – have you ever missed an item on a checklist? • Why was that? • The primary solution is to have an understanding or awareness of the problem – pay better attention and focus on what is important/essential and apply personal discipline to avoid interruption.
Avoiding Distractions • In situations of imminent danger, the primary remedy is usually to ‘fly the glider’ – it may even be helpful for the pilot to repeat to him/herself ‘fly the glider’. • Doing so may avoid potentially dangerous actions like grabbing for an open canopy during the early stages of the tow, to the detriment of properly controlling the glider.
Avoiding Distractions • Lastly, where time is a premium, with risk of pilot overload, it may be useful to first deal with the problem by rote, or as a drill. • An example would be a low level rope break – • Fly the glider (regain/maintain a safe airspeed). • Pull the release (get rid of hazardous rope) • Check height and position (with insufficient information, the pilot can’t make rational decisions about what to do next). • Decide safe course of action.
Complacency & CFIT • Complacency is often found in high-experience pilots and instructors who have had many prior successful flights without serious trouble. • Complacency erodes situational awareness. • Complacency delays problem recognition.
Replacing Complacency With Situational Awareness • Train your students to continually assess: • how the flight is going • what they want to have happen in the future • what they should do to make the desired future become reality • Train your students to extend their time horizon, as follows:
Extending The Time Horizon: Questions To Ask: • Where do you want to be two minutes from now? • What are you doing to get yourself there? • Where do you want to be five minutes from now? • What are you doing to get yourself there? • And so on!
CFIT & The Traffic Pattern • Look at the statistics again - • Year ’05 ’06 ‘07 • Total (100%) 33 35 44 • Takeoff/tow 3/9% 7/20% 8/18% • Free-Flight 5/15% 5/14% 5/11% • Ground/Unknown 5/15% 0/0% 2/5% • Landing/Go around20/61%23/66%29/66% • The focus needs to be on CFIT in the pattern!
CFIT in the Traffic Pattern • Takeoffs, landings and low altitude maneuvering are a FIRC core topic. • Recalling the accident statistics, in 2005, only 9% of total were in the takeoff/tow phase; 61% were in the landing phase. • Relative emphasis needs to be on landing, but continued issues on self-launch sailplanes – • - adequate monitoring of takeoff power • - identification of potential obstructions • - low climb rate/angle in some makes/models • - field length and density altitude issues are priorities.
CFIT in Pattern • Turning to reducing the 60+% landing accident statistic - • How do you teach your student to make it to the runway and not be a land-short statistic? • Turn left at the red barn? • Check the altimeter to ensure there is enough height? • Make him learn TLAR [That Looks About Right]
CFIT in Pattern • How does TLAR work – on what principle is it based? • How is it applied? • Choosing an angle which is safe means the glider has sufficient energy to safely complete the pattern, absent catastrophic sink.
CFIT in Pattern • Do you find it easy to judge a straight line distance – say 1,000 feet? • Do you find it easy to judge an angle – say 30 degrees? • Can you easily perceive when an angle changes? • Can the ability to see instantly an angle which is changing help us as pilots?
CFIT in Pattern • The dip angle is the Angle between (1) an imaginary line drawn from the pilot’s eye to a chosen point on the surface and (2) an imaginary horizontal line drawn from the same chosen point on the surface to the point on the surface which is directly below the glider. • The prime example for flying the pattern is the dip Angle to the aiming, or Reference, point on the ground – for example, the numbers at the end of the runway – where the pilot will look on final approach.
CFIT in Pattern • Let’s look and see how the Angle changes as the glider flies downwind, parallel to the runway, assuming still air – no lift or sink. • If the glider maintained height on downwind, the Angle would increase as the glider gets closer to the Reference Point. • But the glider is descending, and the descent cancels out the increase. • So, as the glider flies downwind parallel to the runway, the ANGLE REMAINS CONSTANT.
CFIT in Pattern • How can this information be applied to avoid CFIT in the pattern – failing to make it to the Reference Point and landing/crashing short? • As the glider is flying back toward the field, pick a safe Angle. • The Angle will be less steep in a higher performance glider e.g. a Grob G 103, than it would be in a lower performance glider like a 2-33. • The Angle should be steeper if the wind is stronger.
CFIT in Pattern • To conform with other traffic and give predictability, the Angle can be picked up at the Initial Point. • BUT THIS IS NOT ESSENTIAL – the Safe Relationship implied by selecting and maintaining a safe Angle can begin anywhere.
CFIT in Pattern • From the Initial Point, fly downwind at best speed-to-fly, parallel with the runway. If there is no lift or sink, the Angle will stay constant. • If the Angle starts to change, make a corrective heading change. • if the Angle starts to get flatter (sink), turn in slightly towards the runway until the Angle gets back to a safe value, then fly parallel again. • If the Angle starts to get steeper (lift), turn slightly out/away from the runway until the Angle gets back to the correct value, then fly parallel again. • BE FLEXIBLE – be prepared to change heading to keep the angle constant.
CFIT in Pattern • When the glider continues straight downwind and passes abeam the Reference Point, what happens? • 1. The instructor gets the “leans”. • Why? Because the Angle is getting rapidly flatter, and the instructor feels increasingly uncomfortable as a result. • 2. In most 2-place gliders, the wing nearer the field obscures the view of the Reference Point.
CFIT in Pattern • How do we avoid the “leans” and losing sight of the Reference point? • Once the glider has passed abeam the Reference Point, turn gently towards the extended center line of the chosen runway, continuing to maintain the Angle.
CFIT in Pattern • As the glider continues to turn and reaches the base leg (90 degrees to the line of final approach), the Angle will start to increase. • The sight of the Angle starting to increase is the signal that, absent encountering catastrophic sink, the glider really has sufficient energy to make it to the field and make good the Reference Point.
CFIT in Pattern • Some comments – • When abeam the Reference point going downwind, make a final check (LAST) – • LOOKOUT – no conflicting traffic • ANGLE – remains safe • SPEED – increase to minimum safe approach speed required on final for the prevailing conditions (should have been calculated as part of the pre-landing checks). • TRIM – for that speed.
CFIT in Pattern • If the wind is strong, consider turning in a little more rapidly – the Safe Landing Cone will be more steeply inclined to the the horizontal – so the glider will be closer in to the field when the middle of the Cone is reached.
CFIT in Pattern • If the wind is light, turn in a little more slowly because the Safe Landing Cone will be flatter to the ground.
CFIT in Pattern • Is this too complicated for a student to learn easily? • NO! Practical experience has shown that identifying and maintaining the Angle is a simple skill. • Before introducing the Angle in flight, explain in the classroom and ensure the student understands the concept. • In flight, cover the altimeter. Do this from the start of training – use the law of primacy to help! • When you are ready to introduce the pattern, have the student watch only the Angle while you fly the glider – this lets the student acquire the correct sight picture more rapidly.
CFIT in Pattern • At the Initial Point, as the downwind leg is reached, explain the Angle is now safe, and if maintained, the glider will have sufficient energy to safely complete the flight. • Fly downwind at best speed-to-fly, then demonstrate how the Angle changes – the zig-zag downwind leg.
CFIT in Pattern • Turn slightly towards the runway until the Angle is clearly steeper. • Ask the student what is happening to the Angle. • When the correct answer is received [it’s getting steeper], turn out/away from the runway until the Angle is flatter than necessary, then repeat the question. • After the correct answer is received, turn in slightly, and ask the student to say when the original safe Angle has been resumed.
CFIT in Pattern • Once the glider has passed abeam the Reference Point, turn gently towards the extended center line of the chosen runway, continuing to maintain the Angle – ask the student if the Angle has changed to emphasize the fact that it hasn’t. • Doing the complete exercise a few times will result in the student maintaining the Angle as if second nature. • As time passes, check the student retains the correct sight picture for the safe Angle. • As a separate stage, the student can be introduced to the base to final turn, and interception of the Safe Landing Cone and proper approach control.
CFIT in Pattern • Notice how the Angle methodology does not depend on use of the altimeter, and does not require accurate information on the glider’s height above the surface. • This means exactly the same methodology can be used for off-field landing, where accurate height information is (also) unavailable.
CFIT in Pattern • Lastly – what word has not been mentioned at any time during this session? • AIRBRAKES! • Opening the airbrakes before the Safe Landing Cone has been entered merely dissipates potential energy which might still be needed to avoid CFIT and make good the field. It also guarantees that the time to landing will be shorter giving, less time to respond to any adverse conditions encountered. • Particular local conditions may predicate a different pattern requiring early airbrake use.