Download
1 / 120
1.2k likes | 1.36k Views
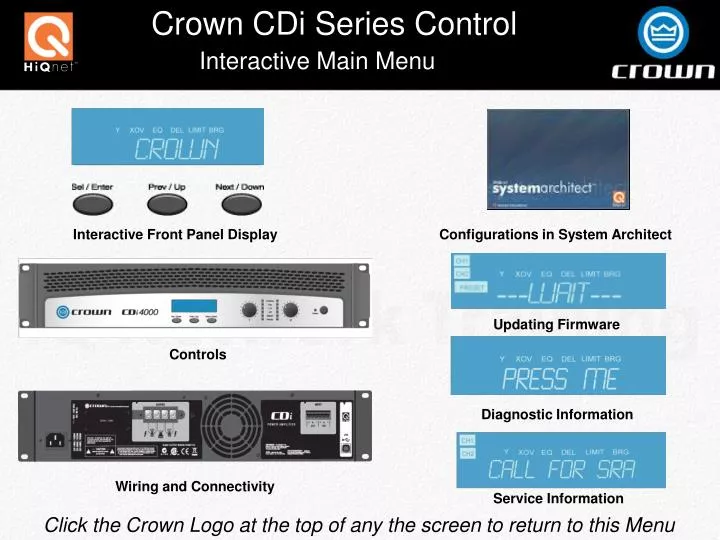
Interactive Main Menu. Interactive Front Panel Display. Configurations in System Architect. Updating Firmware. Controls. Diagnostic Information. Wiring and Connectivity. Service Information. Click the Crown Logo at the top of any the screen to return to this Menu.

E N D
Interactive Main Menu Interactive Front Panel Display Configurations in System Architect Updating Firmware Controls Diagnostic Information Wiring and Connectivity Service Information Click the Crown Logo at the top of any the screen to return to this Menu
Welcome to the CDi Front Panel Use your mouse to navigate the front panel as if you were pressing the actual buttons
As The Amp Powers Up Click The Sel / Enter Button
Factory Default Screen Click on the Sel / Enter Button To Begin
Presets Or Configuration Use The front Panel Buttons to Navigate Choose Presets Or Configuration Menu
Click to View Setup In System Architect Amplifier Set for 70 Volt Both Channels
Stereo Input Channel 1 And Channel 2 Inputs Are Independent And Controlled By Individual Gain Controls
CH1 + CH2 Input Channel 1 And Channel 2 Inputs are Summed Together And Controlled By Channel 1 Gain Control
Input “Y” Enabled Channel 1 Input Is Paralleled to Channel 2’s Input Path And Both Are Controlled By Channel 1 Gain Control
Click to View Crossover In System Architect Amplifier Crossover At 90 Hz
Click to View Crossover In System Architect Amplifier Crossover At 100 Hz
Click to View Crossover In System Architect Amplifier Crossover At 1.2kHz
Click to View Crossover In System Architect Amplifier Crossover At 1.5k Hz
Click to View Crossover In System Architect Amplifier Crossover At 2.0kHz
Click to View Crossover In System Architect Amplifier Crossover At 90Hz Both Channels Output for Subs
Click to View EQ In System Architect Channel 1 EQ Enabled Enables Channel 1 EQ Created In System Architect
Channel 1 EQ Disabled Disables Channel 1 EQ Created In System Architect
Click to View EQ In System Architect Channel 2 EQ Enabled Enables Channel 2 EQ Created In System Architect
Channel 2 EQ Disabled Disables Channel 2 EQ Created In System Architect
Channel 1 Delay 0.0ms Channel 1 Delay In Milliseconds
Channel 1 Delay 1ms Channel 1 Delay In Milliseconds
Channel 1 Delay 2ms Channel 1 Delay In Milliseconds
Channel 1 Delay 3ms Channel 1 Delay In Milliseconds
Channel 1 Delay 4ms Channel 1 Delay In Milliseconds