Download
1 / 6

E N D
Editing By Phoebe Farrington
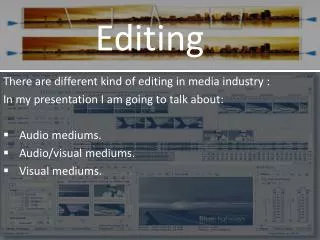
To edit our work together we used Adobe Premier Pro. To begin with we edited our piece together by importing all of our footage into Adobe Premier Pro and sorted through it to decide which shots were our best and gradually began to add them to our sequence – however we were careful to keep all the footage, even if we were not going to use it, just in case we did need it as backup footage. Once we had carefully created our final rough cut sequence, we did start to add in titles, which you can see in the screenshot above. We decided carefully on what font we wanted for out titles, and began to edit the titles to fade in and out, using transition effects.
Once we had began adding in our titles, we wanted to use the edit even more effectively by really emphasising the CCTV effect. We did this by desaturing and adjusting the colour and pixel levels. By doing this we could create a blurry, pixellated effect on all of our CCTV shots. We then furthered this by adding black and white tints over the shots and by adding titles that looked like camera information. We then copied and pasted this effect into all the shots we wanted to have the same effect.
Next we focussed on sound. We started by importing our chosen tracks onto our project. We then needed to make sure the sound levels were right and matched the sound effects we already had on our edit. This took quite a while to correct and to ensure it sounded right and not to quiet or loud. It was particularly challenging as we had to layer our tracks so that they were loud enough because on their own they were too quiet. The sound effects weren’t to hard to add, we just needed to make sure they were imported properly and matched the soundtracks so that they weren’t louder or quieter than the soundtrack itself. Again, we used lots of camera sound effects to add to the CCTV effect.
We then went through and cut up some of our titles to make them look like they were flickering on and off screen. We did this in order to show the difference in pace within our opening title sequence. The titles at the beginning fade in, in order to show the state of mind of the protagonist, which is at a calmer rate. Then the music changes to a much more upbeat pace and then the titles also become much more rapid and flicker. We made the titles flicker using the razor tool which enable us to cut and paste the title over each other, hence creating the flickering effect.
This last screenshot shows when we were making the finishing touches. For example making sure the sound levels were right and also checking all the titles were accurate. Additionally, we made sure that we that all the shots were not overlapping or have gaps in between the shots. Lastly we decided to double check all the titles to make sure they were all the same size and look effective.