Download
1 / 26
260 likes | 494 Views
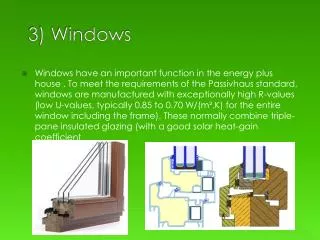
Windows Tutorial 3 Personalizing Your Windows Environment. Objectives. Access common tools on the desktop Customize Windows Sidebar Create and use shortcuts on the desktop Use Control Panel Customize the desktop. Objectives. Activate a screen saver Change display settings

E N D
Objectives • Access common tools on the desktop • Customize Windows Sidebar • Create and use shortcuts on the desktop • Use Control Panel • Customize the desktop New Perspectives on Microsoft Windows Vista
Objectives • Activate a screen saver • Change display settings • Modify the taskbar • Customize taskbar toolbars • Change Start menu settings • Pin items on the Start menu New Perspectives on Microsoft Windows Vista
Accessing Common Tools on the Desktop New Perspectives on Microsoft Windows Vista
Displaying Standard Desktop Icons • Right-click an empty area of the desktop, then click Personalize on the shortcut menu • In the left pane of the Personalization window, click Change desktop icons • In the Desktop Icon Settings dialog box, click to select a check box for each icon you want to add to the desktop • Click the OK button New Perspectives on Microsoft Windows Vista
Displaying Standard Desktop Icons New Perspectives on Microsoft Windows Vista
Using the Windows Sidebar • Windows Sidebar is a long vertical bar displayed by default on the right side of your desktop New Perspectives on Microsoft Windows Vista
Using Shortcuts • You can create shortcuts to access drives, documents, files, Web pages, programs, or other computer resources such as a printer New Perspectives on Microsoft Windows Vista
Using Shortcuts New Perspectives on Microsoft Windows Vista
Using Control Panel • The Control Panel is a window that contains specialized tools you use to change the way Windows Vista looks and behaves • To open the Control Panel window, double-click the Control Panel icon on your desktop New Perspectives on Microsoft Windows Vista
Using Control Panel New Perspectives on Microsoft Windows Vista
Using Control Panel New Perspectives on Microsoft Windows Vista
Changing the Desktop Background • Open the Control Panel window and switch to Category View, if necessary • Click Change desktop background in the Appearance and Personalization category • Select an image in the Desktop Background window or click the Picture Location arrow or the Browse button to select images stored in a different location • Select a positioning option, if necessary • Click the OK button New Perspectives on Microsoft Windows Vista
Changing the Desktop Background New Perspectives on Microsoft Windows Vista
Changing the Appearance of Desktop Elements • A color scheme is a set of colors you apply to Windows elements • Window Color and Appearance New Perspectives on Microsoft Windows Vista
Activating a Screen Saver • A screen saver blanks the screen or displays a moving design whenever you haven’t worked with the computer for a specified period of time New Perspectives on Microsoft Windows Vista
Changing Display Settings • The Display Settings dialog box has a Resolution slider bar that lets you change the size of the desktop area New Perspectives on Microsoft Windows Vista
Moving and Resizing the Taskbar • Make sure the taskbar is unlocked. To do so, right-click any blank spot on the taskbar, and then click Lock the Taskbar on the shortcut menu to remove the check mark • To move the taskbar, click a blank spot on the taskbar, hold down the left mouse button, and drag the taskbar to a new location (the top, bottom, left, or right edge of the desktop) • To resize the taskbar, point to a taskbar border until a resize pointer appears, and then drag the border to a different height or width New Perspectives on Microsoft Windows Vista
Moving and Resizing the Taskbar New Perspectives on Microsoft Windows Vista
Working with Taskbar Toolbars • One way to customize the taskbar is to use it to display toolbars New Perspectives on Microsoft Windows Vista
Customizing the Quick Launch Toolbar New Perspectives on Microsoft Windows Vista
Creating a Custom Taskbar Toolbar • To create a custom toolbar, right-click a blank area of the taskbar, point to Toolbars, and then click New Toolbar • In the New Toolbar − choose a folder window, click the folder or object you want to turn into a toolbar, and then click the Select Folder button New Perspectives on Microsoft Windows Vista
Customizing the Start Menu • To customize the Start menu, right-click Start button on the taskbar, then click Properties; click the Customize button New Perspectives on Microsoft Windows Vista
Pinning an Item to the Start Menu New Perspectives on Microsoft Windows Vista
Selecting Start Menu Settings New Perspectives on Microsoft Windows Vista
Selecting Start Menu Settings New Perspectives on Microsoft Windows Vista