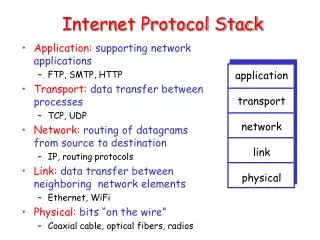
Download
1 / 11
110 likes | 224 Views
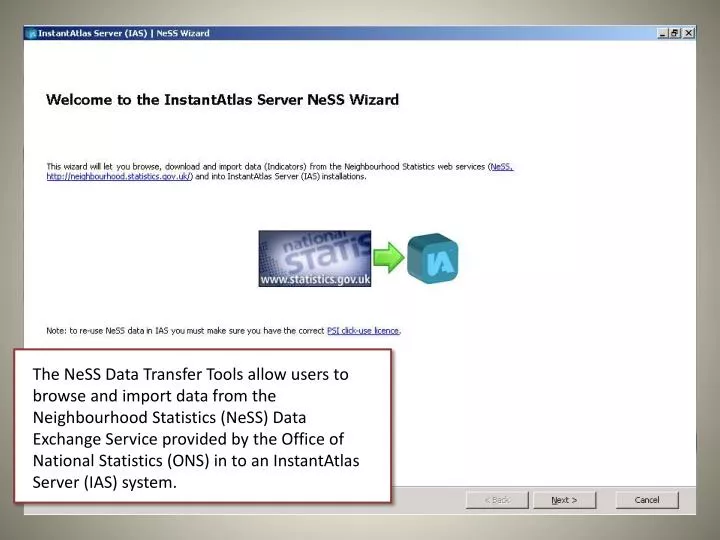
The NeSS Data Transfer Tools allow users to browse and import data from the Neighbourhood Statistics (NeSS) Data Exchange Service provided by the Office of National Statistics (ONS) in to an InstantAtlas Server (IAS) system.

E N D
The NeSS Data Transfer Tools allow users to browse and import data from the Neighbourhood Statistics (NeSS) Data Exchange Service provided by the Office of National Statistics (ONS) in to an InstantAtlas Server (IAS) system.
Enter details to connect to NeSS Data Exchange service. This screen is pre-populated with the current details which can be changed by users if they change in the future.
Enter details to connect to NeSS Data Exchange service. This screen is pre-populated with the current details which can be changed by users if they change in the future. Choose Geographical Areas in NeSS. You can only choose one level of geographical area at once, e.g. Ward or LSOA or MSOA etc., but there is no limit to the number of features you can select.
Browse and select the datasets available in NeSS for the geographical areas selected on the previous screen for example if you selected Ward features on the previous screen this screen would only show you data that is available at Ward level.
Connect to your destination IAS system. Note you must be an IAS system administrator (a member of the IAS_Administrators, or IAS_DataManagers groups) to be able to import data from NeSS in to your IAS system.
Define Geo-Type relationships between the features in NeSS and the features in your IAS system. Where you have existing Geo-Types with matching features you define the relationships between the NeSS features and those in your IAS system to ensure data consistency and to avoid the creation of duplicates. If you do not have a corresponding Geo-Type in your IAS system the wizard will create a new one.
Define Data relationships to select which Theme in your IAS system the NeSS data will be imported in to. If you have existing Indicators in your IAS system that match those in NeSS then you can define the relationships between the two and the data will be imported against the existing Indicators. However if the NeSS Indicators do not already exist on your IAS system they will be created by the wizard.
Define Date/Time relationships to control which IAS Date/Time periods are used for the data imported from NeSS.
The Standard and Advanced data import settings replicate the settings available in IAS giving users of the NeSS wizard the same flexibility when importing data from NeSS as you have when importing through the IAS Admin Website.
Task Scheduler allows you to import the data immediately, schedule tasks to import at a specific date/time in the future, or schedule tasks to import on a user defined period. In this example screen grab the task has been set to run on the first of every month at 1am which would ensure that any new data made available through NeSS for the Indicators selected on slide 4 was automatically imported in to my IAS system without any user input.
Completion screen shows all success/failure messages, for tasks set to run immediately this screen includes links to the raw data imported from NeSS.