Download
1 / 6

E N D
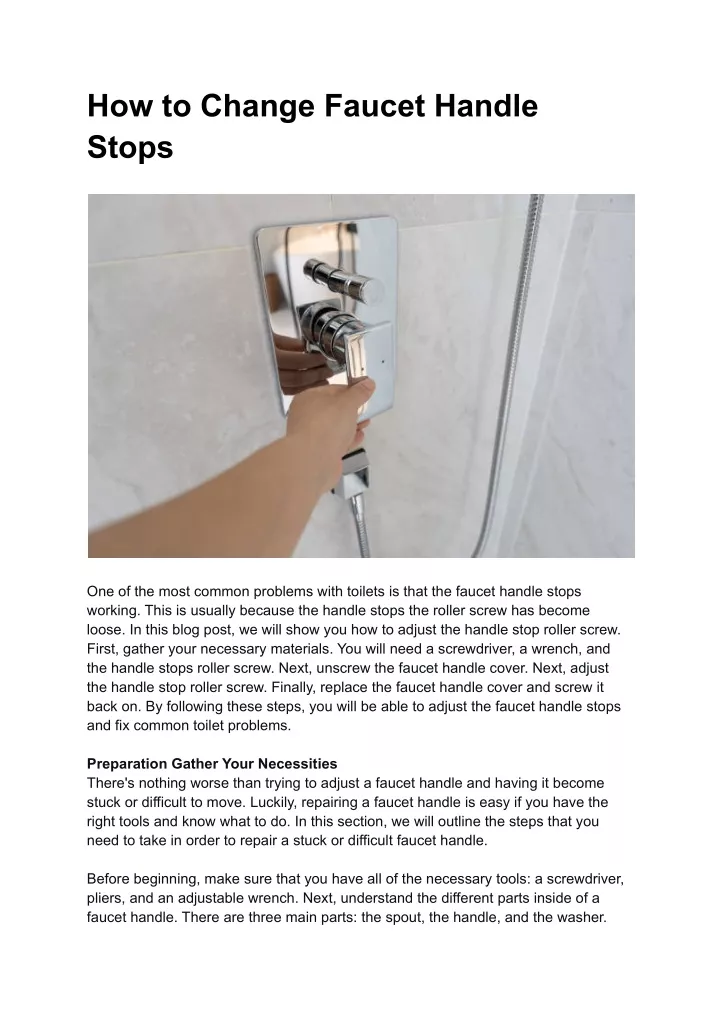
How to Change Faucet Handle Stops One of the most common problems with toilets is that the faucet handle stops working. This is usually because the handle stops the roller screw has become loose. In this blog post, we will show you how to adjust the handle stop roller screw. First, gather your necessary materials. You will need a screwdriver, a wrench, and the handle stops roller screw. Next, unscrew the faucet handle cover. Next, adjust the handle stop roller screw. Finally, replace the faucet handle cover and screw it back on. By following these steps, you will be able to adjust the faucet handle stops and fix common toilet problems. Preparation Gather Your Necessities There's nothing worse than trying to adjust a faucet handle and having it become stuck or difficult to move. Luckily, repairing a faucet handle is easy if you have the right tools and know what to do. In this section, we will outline the steps that you need to take in order to repair a stuck or difficult faucet handle. Before beginning, make sure that you have all of the necessary tools: a screwdriver, pliers, and an adjustable wrench. Next, understand the different parts inside of a faucet handle. There are three main parts: the spout, the handle, and the washer.
The spout is where water comes out of the faucet, while the handle is where you put your hand to turn it on or off. The washer sits between these two parts and helps to keep them together. If you want premium quality faucet at a reasonable price. so visit Dupont plumbing. When attempting to repair a stuck or difficult faucet handle, first try rotating it in either direction by hand. If that doesn't work, then try using your adjustable wrench to loosen one of the screws that hold onto the washer. Once loosened, carefully remove the washer with your pliers and replace it with a new one from your supplies. Make sure that both screws are tightened before replacing the handle itself. Finally, test out your new handles by turning on the water at full flow – make sure they move smoothly and don't stick! Once everything seems to be functioning correctly, make sure to tighten all of the screws once again and turn off the water from your main water supply before completing the installation instructions below! Step 1 Unscrew The Faucet Handle Cover There's nothing worse than a broken faucet – especially one that's hard to fix. Thankfully, adjusting your faucet handle is a relatively easy task that can be done by anyone with little know-how. In this blog, we're going to walk you through the steps necessary to adjust your faucet handle. First and foremost, you'll need to unscrew the faucet handle cover. This cover is located on the outside of the handle, and it will usually have two screws on it. Once it's unscrewed, you'll need to locate the faucet handle set screw. This screw is located inside the handle near where the water flows out. You will need to loosen or tighten this screw as needed in order to adjust your faucet handle. Be sure not to overtighten the screw – this could damage your faucet! Once you've adjusted your faucet handle as needed, replace the cover and tighten all of the screws once again. Now you're ready for another day of refreshing drinks! Step 2 Adjust The Handle Stop Roller Screw It's important to know how to adjust your faucet handle correctly in order to keep your plumbing system functioning properly. Improperly adjusted handles can lead to leaks, clogs, and even the need for a plumber. In this section, we will outline the steps necessary to adjust a faucet handle. First, it's important to understand the anatomy of a faucet handle. The handle consists of two parts – the spout and the body. The spout is where you put your hand to pour water or other liquid out of the faucet, and the body is where the water flows out of the faucet. The stop roller screw is located on top of the spout, and it controls how fast water flows out of the faucet.
To adjust a handle properly, you first need to identify and access the stop roller screw. This screw is usually hidden behind some Plumbing Tape or by oxidation on its surface. Once you've located it, gently remove any obstructions so that you can see it clearly. Next, use a wrench or Allen key (the same size as your set screw) to loosen (but not remove) the set screw from its hole in the top roller shaft. Be careful not to over-tighten this screw; too much force could cause damage or even breakage in later stages of maintenance. Once you have loosened (but not removed), set the screw from the stop roller shaft carefully unscrewed by the turner head until the stop roller shaft comes off completely from the stem, then re-installed with new stop roller screws being sure not to tighten too much as above instructions must be followed exactly otherwise damage may result. Conclusion It's easy to fix a leaky faucet handle. All that is required is a few basic tools, a bit of patience, and the willingness to follow some simple steps. With these tips and tricks, you should be able to quickly replace that old handle and get your faucet back in proper working order. Now it's time for you to take action - go ahead and try it yourself! How to Improve the Style of Your Medicine Cabinet
Introduction: If you’re like most people, you probably have a medicine cabinet in your bathroom that’s tired and dated. It doesn’t look very inviting. And if you don’t have time to redecorate your bathroom this year, you might as well forget about it and move on. That’s why we wanted to share some tips with you on how to improve the style of your medicine cabinet in a small bathroom. We start by discussing the importance of having an organized and accessible medicine cabinet—not just for your personal needs but also for the health and safety of others. Next, we talk about creating an attractive and inviting Medicine Cabinet Design that will make people want to use your bathroom rather than dread it. Finally, Dupont plumbing provide you with some easy instructions on how to improve the appearance and function of your medicine cabinet. So next time you find yourself feeling outdated or uninviting in your bathroom. Improve the Style of Your Medicine Cabinet. When you’re traveling, you may want to consider packing a few more medicines than you would if you were staying at home. Not only will this increase your chances of having enough medication on hand, but it can also help improve the style and organization of your medicine cabinet. Try to pack at least 8-10 different kinds of medications in a single cabinet, and make sure they are located in cool, dry locations. Keep Medicines in a Cool, Dry Location.
If you’re not comfortable keeping medicines in a warm or moist location, look for places that offer air-conditioning and climate-sensitive shelves that can be cooled down during the day or heated during the night. This will help keep your medications safe and organized. Keep All Medicines in One Place. Please make sure all of your medications are kept in one place so that you can easily find them when needed. This will help ensure that you have everything you need when traveling and that you don’t have to search through multiple cabinets for your medication assortment. Improve the Function of Your Medicine Cabinet. One of the most important aspects of keeping your medicine cabinet functional and neat is making sure all of its bottles are kept clean. By keeping each bottle in a clean, organized space, you can reduce the chances of bacteria getting on medications and other medical supplies. Another important aspect of keeping your medicine cabinet functioning properly is keeping drinks cold. Not only will this help to keep medications cold and safe, but it can also help to prevent any potential problems with expirations or spills. Keep Medicine Sheets Clean When it comes to hygiene, it’s important to make sure all of your sheets are kept clean. This includes ensuring that both the bedding and sheets are free of dirt, dust, and other allergens. Keep Medicine Boxes Spacious If you have a small bathroom, consider investing in large medicine boxes that can hold all of your medication and supplies comfortably. This will make organizing your medicine cabinet much easier and ensure that everything is at hand when you need it most! Improve the Organization of Your Medicine Cabinet. To find your medicine cabinets quickly and easily, place all of your medications in one spot. Make sure that the medicines are stored in a cool, dry place—not near any heat or open windows. So they will stay fresh and organized. Keep Medicines in a Cool, Dry Place. One way to keep medicines cold and fresh is to place them in an ice Tray or water bottle. Another option is to put them into a small zip-top baggie. Keep these ideas in mind when designing your Medicine Cabinet to make sure they are stored at a safe and regulated temperature. Keep All Medicines in One Place.
Another great way to organize your medicine cabinet is by keeping all of the medication in one place. This can be done by putting each medication into its own container or jar, packing it tightly with paper or plastic wrap, or placing it on a shelf behind a cabinet door so it’s easy to find and reach when you need it. Conclusion Improving the style of your medicine cabinet can help you increase the functionality and organization of your cabinet. By keeping all medicines in one place, you can make it easier to find what you need and keep your cabinet clean. Additionally, increasing the space available in your medicine cabinet can also help you improve its organization. Keep medicine bottles clean and drink cups cool while keeping medicine sheets and box spacious. In conclusion, improving the style of your medicine cabinet can help you drastically improve the function and organization of your cabinet.