Download

1 / 41
410 likes | 556 Views
Disks. Outline. Interfaces Geometry Add new disks Installation procedure Filesystem check Add a disk using sysinstall RAID GEOM Appendix – SCSI & SAS. Disk Interfaces. SCSI Small Computer Systems Interface High performance and reliability IDE (or ATA)

E N D
Outline • Interfaces • Geometry • Add new disks • Installation procedure • Filesystem check • Add a disk using sysinstall • RAID • GEOM • Appendix – SCSI & SAS
Disk Interfaces • SCSI • Small Computer Systems Interface • High performance and reliability • IDE (or ATA) • Integrated Device Electronics (or AT Attachment) • Low cost • Become acceptable for enterprise with the help of RAID technology • SATA • Serial ATA • SAS • Serial Attached SCSI • USB • Universal Serial Bus • Convenient to use
Disk Interfaces – ATA & SATA • ATA (AT Attachment) • ATA2 • PIO, DMA • LBA (Logical Block Addressing) • ATA3, Ultra DMA/33/66/100/133 • ATAPI (ATA Packet Interface) • CDROM, TAPE • Only one device can be active at a time • SCSI support overlapping commands, command queuing, scatter-gather I/O • Master-Slave • 40-pin ribbon cable • SATA • Serial ATA • SATA-1 1.5Gbit/s, SATA-2 3Gbit/s, SATA-3 6GBit/s
Disk Interfaces – ATA & SATA Interfaces • ATA interface and it’s cable • SATA interface and it’s cable
Disk Interfaces – USB • IDE/SATA to USBConverter
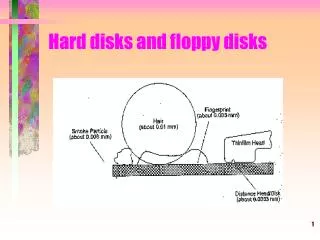
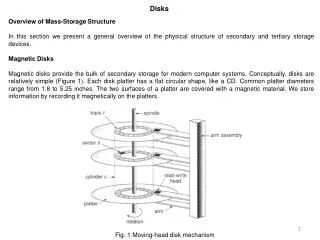
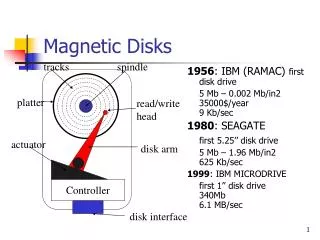
Disk Geometry (1) • sector • Individual data block • track • circle • cylinder • circle on all platters • Position • CHS • Cylinder, Head, Sector
Disk Geometry (2) • 40G HD • 4866 cylinders, 255 heads • 63 sectors per track, 512 bytes per sector • 512 * 63 * 4866 * 255 = 40,024,212,480 bytes • 1KB = 1024 bytes • 1MB = 1024 KB = 1,048,576 bytes • 1GB = 1024 MB = 1,073,741,824 bytes • 40,024,212,480 / 1,073,741,824 ≒ 37.275 GB
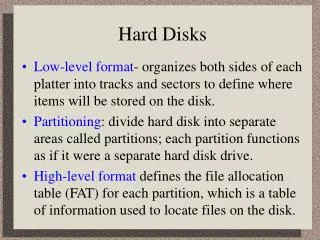
Disk Installation Procedure (1) • The procedure involves the following steps: • Connecting the disk to the computer • IDE: master/slave • SATA • SCSI: ID, terminator • power • Creating device files • Auto created by devfs • Formatting the disk • Low-level format • Address information and timing marks on platters • bad sectors • Manufacturer diagnostic utility
Disk Installation Procedure (2) • Partitioning and Labeling the disk • Allow the disk to be treated as a group of independent data area • root, home, swap partitions • Suggestion: • /var, /tmp separate partition • Make a copy of root filesystem for emergency • Establishing logical volumes • Combine multiple partitions into a logical volume • Software RAID technology • GEOM: geom(4)、geom(8) • ZFS: zpool(8)、zfs(8)、zdb(8)
Disk Installation Procedure (3) • Creating UNIX filesystems within disk partitions • Use “newfs” to install a filesystem for a partition • Filesystem components • A set of inode storage cells • A set of data blocks • A set of superblocks • A map of the disk blocks in the filesystem • A block usage summary
Disk Installation Procedure (4) • Superblock contents • The length of a disk block • Inode table’s size and location • Disk block map • Usage information • Other filesystem’s parameters • sync • The sync() system call forces a write of dirty (modified) buffers in the block buffer cache out to disk. • The sync utility can be called to ensure that all disk writes have been completed before the processor is halted in a way not suitably done by reboot(8) or halt(8).
Disk Installation Procedure (5) • mount • Bring the new partition to the filesystem tree • mount point can be any directory • # mount /dev/ad1s1e /home2 • Setting up automatic mounting • Automount at boot time • /etc/fstab • % mount –t ufs /dev/ad2s1a /backup • % mount –t cd9600 –o ro,noauto /dev/acd0c /cdrom liuyh@NASA:/etc> cat fstab # Device Mountpoint Fstype Options Dump Pass# /dev/ad0s1b none swap sw 0 0 /dev/ad2s1b none swap sw 0 0 /dev/ad0s1a / ufs rw 1 1 /dev/acd0 /cdrom cd9660 ro,noauto 0 0 /dev/ad2s1a /backup ufs rw,noauto 2 2 csduty:/bsdhome /bsdhome nfs rw,noauto 0 0
Disk Installation Procedure (6) • Setting up swapping on swap partitions • swapon, swapoff, swapctl • swapinfo, pstat
fsck – check and repair filesystem (1) • System crash will cause • Inconsistency between memory image and disk contents • fsck • Examine all local filesystem listed in /etc/fstab at boot time. (fsck -p) • Automatically correct the following damages: • Unreferenced inodes • Inexplicably large link counts • Unused data blocks not recorded in block maps • Data blocks listed as free but used in file • Incorrect summary information in the superblock • fsck(8)、fsck_ffs(8) • ffsinfo(8): dump metadata
fsck – check and repair filesystem (2) • Run fsck in manual to fix serious damages • Blocks claimed by more than one file • Blocks claimed outside the range of the filesystem • Link counts that are too small • Blocks that are not accounted for • Directories that refer to unallocated inodes • Other errors • fsck will suggest you the action to perform • Delete, repair, …
Adding a disk to FreeBSD (1) • Check disk connection • Look system boot message • Use /usr/sbin/sysinstall to install the new HD • Configure Fdisk Label • Don’t forget to “W” the actions • Easiest approach, but has some problems. • fdisk(8), bsdlabel(8), newfs(8) • Make mount point and mount it • # mkdir /home2 • # mount –t ufs /dev/ad3s1e /home2 • # df • Edit /etc/fstab ad3: 238475MB <Hitachi HDS722525VLAT80 V36OA6MA> at ata1-slave UDMA100
Adding a disk to FreeBSD (2) • If you forget to enable soft-update when you add the disk • % umount /home2 • % tunefs –n enable /dev/ad3s1e • % mount –t ufs /dev/ad3s1e /home2 • % mount /dev/ad0s1a on / (ufs, local, soft-updates) /dev/ad1s1e on /home (ufs, local, soft-updates) procfs on /proc (procfs, local) /dev/ad3s1e on /home2 (ufs, local, soft-updates)
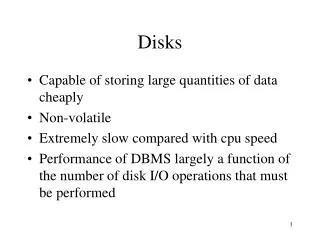
RAID – (1) • Redundant Array of Inexpensive Disks • A method to combine several physical hard drives into one logical unit • Depending on the type of RAID, it has the following benefits: • Fault tolerance • Higher throughput • Real-time data recovery • RAID Level • RAID 0, 1, 0+1, 2, 3, 4, 5, 6 • Hierarchical RAID
RAID – (2) • Hardware RAID • There is a dedicate controller to take over the whole business • RAID Configuration Utility after BIOS • Create RAID array, build Array • Software RAID • GEOM • CACHE、CONCAT、ELI、JOURNAL、LABEL、MIRROR、MULTIPATH、NOP、PART、RAID3、SHSEC、STRIPE、VIRSTOR • ZFS • JBOD、STRIPE • MIRROR • RAID-Z、RAID-Z2、RAID-Z3
RAID 0 • Stripped data intro several disks • Minimum number of drives: 2 • Advantage • Performance increase in proportional to n theoretically • Simple to implement • Disadvantage • No fault tolerance • Recommended applications • Non-critical data storage • Application requiring high bandwidth (such as video editing)
RAID 1 • Mirror data into several disks • Minimum number of drives: 2 • Advantage • 100% redundancy of data • Disadvantage • 100% storage overage • Moderately slower write performance • Recommended application • Application requiring very high availability (such as home)
RAID 0+1 • Combine RAID 0 and RAID 1 • Minimum number of drives: 4
RAID 2 • Hamming Code ECC Each bit of data word • Advantages: • "On the fly" data error correction • Disadvantages: • Inefficient • Very high ratio of ECC disks to data disks • Recommended Application • No commercial implementations exist / not commercially viable
RAID 3 • Parallel transfer with Parity • Minimum number of drives: 3 • Advantages: • Very high data transfer rate • Disadvantages: • Transaction rate equal to that of a single disk drive at best • Recommended Application • Any application requiring high throughput
RAID 4 • Similar to RAID3 • RAID 3 V.S RAID 4 • Byte Level V.S Block Level • Block interleaving
RAID 5 • Independent Disk with distributed parity blocks • Minimum number of drives: 3 • Advantage • Highest read data rate • Medium write data rate • Disadvantage • Disk failure has a medium impact on throughput • Complex controller design • When one disk failed, you have to rebuild the RAID array • “write hole”
RAID 6 • Similar to RAID5 • Minimum number of drives: 4 • 2 parity checks, 2 disk failures tolerable.
GEOM Modular Disk Transformation Framework
GEOM – (1) • Support • ELI – geli(8): cryptographic GEOM class • JOURNAL – gjournal(8): journaled devices • LABEL – glabel(8): disk labelization • MIRROR – gmirror(8): mirrored devices • STRIPE – gstripe(8): striped devices • … • http://www.freebsd.org/doc/handbook/geom.html
GEOM – (2) • GEOM framework in FreeBSD • Major RAID control utilities • Kernel modules (/boot/kernel/geom_*) • Name and Prodivers • “manual” or “automatic” • Metadata in the last sector of the providers • Kernel support • {glabel,gmirror,gstripe,g*} load/unload • device GEOM_* in kernel config • geom_*_enable=“YES” in /boot/loader.conf
GEOM – (3) • LABEL • Used for GEOM provider labelization. • Kernel • device GEOM_LABEL • geom_label_load=“YES” • glabel • # glabel label -v usr da2 • # newfs /dev/label/usr • # mount /dev/label/usr /usr • # glabel stop usr • # glabel clear da2 • UFS label • # tunefs -L data /dev/da4s1a • # mount /dev/ufs/data /mnt/data
GEOM – (4) • MIRROR • Used for GEOM provider labelization. • Kernel • device GEOM_MIRROR • geom_mirror_load=“YES” • gmirror • # gmirror label -v -b round-robin data da0 • # newfs /dev/mirror/data • # mount /dev/mirror/data /mnt • # gmirror insert data da1 • # gmirror forget data • # gmirror insert data da1 • # gmirror stop data • # gmirror clear da0
GEOM – (5) • STRIPE • Used for GEOM provider labelization. • Kernel • device GEOM_STRIPE • geom_stripe_load=“YES” • gstripe • # gstripe label -v -s 131072 data da0 da1 da2 da3 • # newfs /dev/stripe/data • # mount /dev/stripe/data /mnt • # gstripe stop data • # gstripe clear da0
Appendix SCSI & SAS
Disk Interfaces – SCSI Interface • Daisy chain on SCSI bus • Most external devices have two SCSI ports • Terminator • Each SCSI device has a SCSI ID
Disk Interfaces – SAS • SAS – Serial Attached SCSI • SAS vs parallel SCSI • SAS uses Serial transfer protocol to interface multiple devices hence lesser signaling overhead than parallel SCSI, resulting in higher speed. • No bus contention as SAS bus is point-to-point while SCSI bus is multidrop. Each device is connected by a dedicated bus to the initiator. Connection through expanders may appear to cause some contention, but this is transparent to the initiator. • SAS has no termination issues and does not require terminator packs like parallel SCSI. • SAS eliminates skew. • SAS supports higher number of devices (> 16384) while Parallel SCSI limits it to 16 or 32. • SAS supports higher transfer speed (1.5, 3.0 or 6.0 Gbps). The speed is realized on each initiator-target connection, hence higher throughput whereas in parallel SCSI the speed is shared across the entire multidrop bus. • SAS supports SATA devices. • SAS uses SCSI commands to interface with SAS End devices.