Download

1 / 66
660 likes | 822 Views
Nikon D200 Training. Civil Air Patrol TX-413 Nighthawk Squadron. This training outline is designed to provide a moderate level of understanding and skill to members who plan to use the Nikon D200 camera for missions involving aerial photography. Outline: Basic Formula for Photography ISO

E N D
Nikon D200 Training Civil Air Patrol TX-413 Nighthawk Squadron
This training outline is designed to provide a moderate level of understanding and skill to members who plan to use the Nikon D200 camera for missions involving aerial photography.
Outline: • Basic Formula for Photography • ISO • Aperture • Shutter Speed • White Balance/Metering • Focusing
Basic Photography Imaging & Composition
Basic Formula for Photography • The basic formula for taking pictures: • Sensitivity x Light x Time = Image • Or • ISO x Aperture x Shutter Speed = Image
Basic Camera Concepts Exposures: It takes a certain amount of light for a certain amount of time to capture an image. You can adjust the amount of light required (ISO-Film Speed) You can adjust the amount of light let in (Aperture) You can adjust the amount of time (Shutter) All of these adjustments are directly related, and will have a direct effect on each other.
Photography Basics • Think of the formula as a Bucket, Pipeline, and Valve Combination. Shutter Speed Aperture ISO
ISO settings/changing ISO is the Film Speed (or the size of the bucket) In other words, it determines how much light is required to make a picture show up on the film/processor Concept: A larger bucket takes more water to fill ISO film speeds generally range from 100 - 6400 The higher the ISO number: The more sensitive the film The less light is required to expose the image The higher the “grain” The numbers are proportionate. ISO 100 requires twice (2x) the light as ISO 200
ISO settings/changing cont’d High ISO “Grain” Although we have a very high quality camera, we need to be aware of “grain” while using high ISO settings Try to use the lowest ISO setting possible to get the highest quality results.
How to set ISO on the D200 How to set ISO on the D200: Auto Mode - Go to the Menu Manual Mode- Hold the ISO button, and spin the rear dial
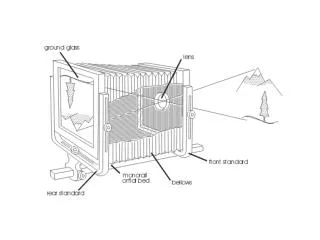
All About Aperture • Aperture is the size of the opening in the camera lens • Aperture controls the amount of light coming into the camera • Think of it as a “pipeline for light” • The larger the pipeline…the more light can come in.
All About Aperture • Larger Aperture settings will require lower ISO and higher Shutter speeds. • Smaller Aperture settings will require higher ISO and lower Shutter speeds. • Uses: • Larger Aperture settings allow for higher shutter speeds • Smaller Aperture settings allow for more depth of field.
All About Aperture • Aperture settings are referred to as: “F stops” • F5.6, F8, F2.8, F16, F22, etc…. • Larger numbers equal smaller openings. • The F# is actually 1/f • Aperture settings are proportional. F8 is 2x the size of F16. • Depth of field concept: Fire Hose vs. Straw
All About Shutter Speed • Shutter speed is how fast the shutter stays open to capture the image. • Shutter Speed is the “valve” – the longer it stays open, the more light can come through the pipeline and into the bucket. • Higher shutter speeds “freeze” movement • Lower shutter speeds add “blurr” effect • Shutter speeds listed as:125, 250, 500,etc • Actual is: 1/125th, 1/250th of 1 second
All About Shutter Speed • In the aircraft, you will need a minimum of 1/250 shutter speed to eliminate vibration and movement from the airplane, 1/500 is optimal if possible. • Try to balance shutter speed needs with ISO and aperture settings.
All About Shutter Speed • High vs. Low Shutter Speed
Priority for Settings • More Important • Shutter Speed • Aperture • ISO • Less Important • It is better to sacrifice ISO settings to keep aperture and speed settings up
Composition/Aiming • Focus on the subject • “Fill the Frame” – use zoom and position to crop
Composition/Aiming • You will typically be farther away from the subject than you need to be. Ask the pilot to fly closer if necessary to get the shot. • The ideal angle to the ground is 45 degrees. • 1,000’ AGL, and 1,000’ from target
Under/Over Exposure Examples of Under/Over Exposure Over Exposed Under Exposed
Correcting Exposure Issues • Aim the camera at the subject • Use the Pre-Focus Metering to lock in settings • Remember: The camera is a computerized machine…it will do EXACTLY what you tell it to do.
Exposure Correction Examples of Under/Over Exposure correction by proper aiming and metering
Things to remember about exposure issues: • Photoshop can’t fix bad shots • Color and definition are lost at both extremes • Some images can be salvaged, but the image quality will be sacrificed • It’s much easier to get a good shot than to fix a bad one • It’s ok to go back and reshoot
Reducing Glare with Polarizing Filters With Filter Without Filter • Notice the difference in the glare on the water. The polarizing filter “cuts through” the glare, and creates good color and definition
Additional Exposure/Glare Techniques • Make sure the horizon is above the top of the frame. • Haze and glare are more likely to occur at horizontal angles • Get up close to your subject • The more haze between you and the subject, the worse the photo will be. • Use the “glare hood” • Prevents “flare” and “stray light” from affecting lens glass
Glare/Flare Example of lens “flare”
Lens Hood Warning • Warning!!!!! • Make sure the lens hood is “snapped” in place • The lens hood can be pulled off the camera by the wind • Keep the camera inside the aircraft
Technique Review • Aim at the target • Fill the frame • Get up on it • 45 degree angle • No horizon • Shoot “down light” if possible • Review photos BEFORE you RTB
Review Questions Questions?
Review Questions • What is ISO? • What is the optimal setting for our missions? • How do you adjust ISO settings? • If you adjust ISO, what else do you need to consider? • What are the problems associated with high and low ISO settings?
Review Questions • What is Shutter Speed • What is the minimum speed for our missions? • What is the optimal speed for our missions? • How do you adjust Shutter Speed? • If you adjust Shutter Speed, what else do you need to consider? • What are the problems with high and low shutter speeds?
What is Aperture? • What does the Apeture control? • How do you adjust Aperture? • If you adjust Aperture, what else do you need to consider? • What are the problems with large and small Aperture settings?
Review Questions • If you keep having the wing and the strut show up in your pictures, what should you do? • If your pictures aren’t in focus, what settings should you check? • What other issues should you consider? • If your pictures are very “white” and bright, what should you do? • If you have a lot of glare in your photos, what should you try? • What is the maximum # of pictures you can take of a target on a mission?
Camera Functions & Setup
Formatting vs Deleting Works the same way as your PC Formatting the CF card resets the file numbering system and reduces the chances of a file error. Deleting the images simply erases them. The file numbering system does not reset.
Auto-Focus Modes There are 3 Auto Focus modes: Servo, AF, M • Servo mode provides constantly variable focusing • AF mode allows you to temporarily “lock” the focal distance during the “pre-focus” • Manual mode – the name says it all…
Shutter Modes • There are 5 Shutter modes: S, CL, CH, Clock, Mup • Single Shot – Works like a semi auto gun • Continuous Low – Full auto @ 2.5 fps • Cont. High – (Rambo Mode) Full auto @ 6 fps • Clock – For taking pics of yourself • Mirror Up – Night photos
Shooting Modes • There are 4 shooting modes: P, S, A, M • Program Mode – (Dummy Mode) Everything done for you • Shutter Priority – Mandated Shutter Speeds • Aperture Priority – Mandated Aperture Size • Manual – You set everything on your own
Issues with Program Mode • A few issues with P mode: • Factory Settings may not be ideal for our missions • Color • Saturation • Sharpness • Contrast
Image Size/Quality • File Formats : JPEG, RAW • JPEG is the standard file format for images • RAW is the file format for Nikon, Canon, etc • RAW images are significantly higher quality • Thus, the file sizes are substantially larger • RAW file formats can only be read by special software
Image Compression • Image Compression helps reduce file size • RAW- No compression • JPEG Fine – 1:4 • JPEG Normal – 1:8 • JPEG Basic – 1:16 Higher Quality Lower Quality