Download
1 / 57
580 likes | 595 Views
Beginning your joint journey: Preparation for hip and knee replacement surgery. Via Christi Joint Replacement Center Joint Journey Program. Our Dedicated JRC Team. Orthopedic Surgeon Physician Assistant/Nurse Practitioner Hospitalist Nursing Physical/Occupational Therapy

E N D
Beginning your joint journey: Preparation for hip and knee replacement surgery Via Christi Joint Replacement Center Joint Journey Program
Our Dedicated JRC Team • Orthopedic Surgeon • Physician Assistant/Nurse Practitioner • Hospitalist • Nursing • Physical/Occupational Therapy • Care Management • Joint Program Coordinator • Others connected with your experience from housekeeping to our administrators
Role of Program Coordinator • Collaborates with Team • Pre-op Education • Continuous Resource • Patient Advocate • Program Feedback Shannon Wilson, PT, MPT Joint Program Coordinator
Objectives for Today • Understanding your procedure • What to expect before, during, and after the hospital stay • Physical / Occupational therapy • Pain management • How to care for yourself at home • Role of your “Coach” • Discharge planning
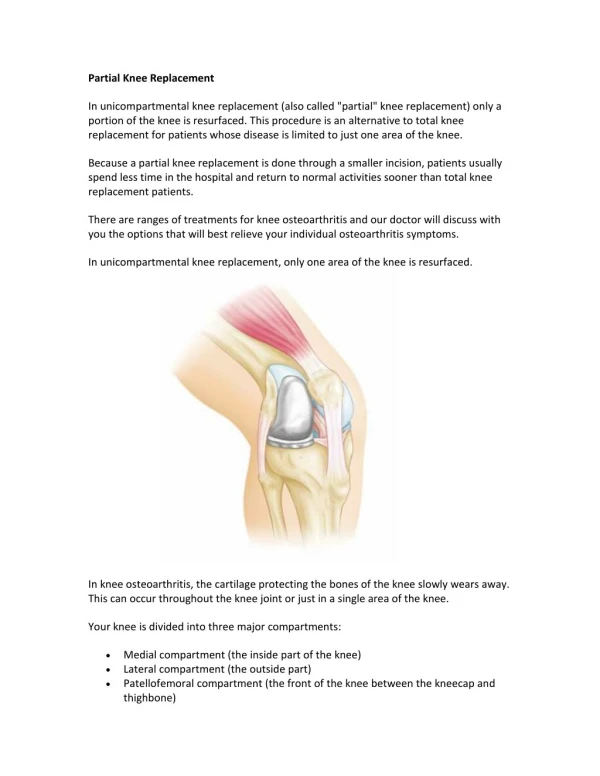
Understanding the Procedure • Total Knee / Hip Replacement • Unicondylar (Partial) Knee Replacement • Hip Resurfacing Goal with surgery is to lessen pain and Restore function
Procedures Total Knee Replacement • removal of damaged bone and cartilage from your thighbone, shinbone and kneecap with insertion of an artificial joint (prosthesis)
Procedures Total Hip Replacement: • removal of damaged bone and cartilage from your thighbone and hip bone with insertion of an artificial joint (prosthesis)
Procedures Unicondylar Knee Replacement: • replaces only half of the knee joint with a prosthesis
Procedures • Hip Resurfacing: • Total – ball is resurfaced and a plastic or metal cup is inserted into hip • Hemi - ball is resurfaced only
Preparing for Surgery The Guidebook • Resource for • what to expect • Helps answer • FAQs • Bring the Guidebook with you • to hospital and all doctor appointments! NOTE: If you did not receive a guidebook, one will be provided at the hospital following surgery.
Medical Clearance • Instructions regarding needs for medical clearance will come from your surgeon’s office: • Appointment with your primary care doctor • Instructions to stop or change any medications • Lab work • EKG • Chest X-ray • Additional Consults (i.e. Cardiologist) NOTE: It is important to have control over chronic health conditions such as diabetes, hypertension, heart conditions BEFORE considering surgery. Surgeries can and will be cancelled even on the day of.
Pre-Admissions Team (PAT) • All patients should either have an pre-operative appointment with our PAT or a phone call 1-3 days before surgery (at minimum) for discussing the following: • Medical Clearance • Insurance • Health History • Medication History • Advanced Directives • Consent Forms NOTE: For those unable to attend the combined PAT & Pre-op Class appointment, you may call 316.719.3020 to expedite your registration process.
Role of the COACH • It is important to select a COACH— • someone willing/able to assist you • as you begin your Joint Journey! • Assist with mobility • Dressing changes (if needed) • Assist with Home Exercise Program • Assist with meals and other household chores • Observe & encourage patient Note: Depending on your progress, you may not need assistance with all these items.
Preparing your Home • Chair with arm rests • Recliner chairs OK • Special bed not necessary • Remove throw rugs • Nightlights • Clear paths for walking with your walker • Prepare frozen or easy to prepare meals • Arrange for someone to care for pets
What to Bring to the Hospital • Insurance card, photo ID, any co-payment required • Loose - fitting clothes (shorts, T-shirts) • Flat shoes with a back (tennis shoes preferred) • Any shoe or leg orthotics • Walker* • Care essentials (toothbrush, deodorant, etc) • Battery-powered items only • Guidebook • List of medications taken regularly • Advanced Directives (as applicable) • Please leave all valuables at home! For billing questions, call 316.268.5178
Preparing for Surgery: • Shower as recommended with special anti-microbial soap (i.e. Hibiclens) • Note: Try this soap on your forearm first if you have sensitive skin. • Plan to arrive to the hospital 2 hours before your scheduled surgery time (unless otherwise instructed) • Do not eat or drink anything after midnight, even water, unless otherwise instructed.
Arrival to the Hospital: Day of Surgery • Check in at Admissions • Medication Review • Advanced Directives Reminder
Day of Surgery • Report to the surgery waiting room • Check in at the desk • Families wait here until called back to the prep room • Surgeon will speak with your family here once surgery is completed*
The Pre-op Area (ACU) • Hospital Gown • IV Started • Antibiotic
Meet Anesthesiologist and Surgeon • Review Health and Medication History • Discuss Nausea / Pain Management Concerns • General Anesthesia - IV Sedation - Mild Sore Throat • Regional Anesthesia - Blocks*
Operating Room • Operating Room table • Surgery 1- 1.5 hrs* • When surgery completed, • transferred onto your hospital bed • Surgical time varies based on factors such as type of surgery, • medical/surgical history, comorbidities.
Recovery Room (PACU) • 1-2 Hour Stay • Stabilize Vital Signs • Neuromuscular Assessment • Comfort Measures (i.e. pain, nausea)
Types of Discomfort Incisional • Soreness, Pressure • Treat with pain medications Swelling / Bruising • Tightness around the incision/joint • Treat with compression and elevation Note: Pain is normal and expected after surgery. It is our body’s natural “alarm system” and as the pain decreases is our way of gaging our healing process.
Pain Scale • 0 = No Pain • 4 = “I am comfortable” • >4 = Discomfort prevents: - sleeping - conversation - mobility
On-going Pain Management • Transition to Oral Pain Medication • Available every 3-4 hours or every 4-6 hours • Time dependent upon type of medication being used • YOU MUST ASK FOR PAIN MEDICATION WHEN NEEDED! Pain medications are ordered “as needed” so we DO NOT bring them on a schedule. • Can cause constipation
Additional Comfort Measures • Cold therapy • Polar Pak • Ice packs • Position Changes • Get up and walk Note: If you already have a Polar Pak from a prior surgery, you are welcome to re-use it. You MUST bring it into surgery with you (as it is placed in surgery) and MUST have all the parts with you (i.e. cord, cooler, wrap).
Patient Responsibility • Intercept the pain; ask for medication when the pain starts to escalate – do not wait. • Take your pain medication on a regular basis!!!! • Communicate with your nurse on a system to keep track of when you had your last pain medication and when you can have it again (i.e. use the white board, set a timer on your phone, etc) • Tell the nurse if the medication is not effective. • Ask questions; be sure you understand the pain management efforts that are in place.
Remember… • We can’t make the pain go completely away • We aim to manage the discomfort so that you can eat, sleep and move around • We will do all we can to ensure your comfort and safety
The Joint Replacement Center • WELLNESS MODEL: • Our patients are NOT SICK! Unlike most in the hospital, you have chosen to come. • Focus on mobility • Dressed in own clothes • Up for meals • Group therapy & Group Lunch • Advanced Exercises • Typical stay is 2 days, then home with follow-up therapy
Coaches are encouraged to be here! • Family member or friend • Provides comfort, motivation • Observe therapy sessions • Gain confidence for discharge to home • If you do not have a coach, one of our dedicated volunteers may be available to help.
Patients…how are you feeling? • Sleepy but awake • Regular diet • order off menu • Positioning • out of bed for meals • Bowel/Bladder • Wound drain • Bulky dressing
General Positioning & Mobility • Heels off bed • Out of bed to chair • Walk in the halls • Knees – no pillow under operative knee • Hips – do not cross legs
SAFETY IS A PRIORITY! • We consider EVERYONE a fall risk initially after surgery! • We require the use of gait belts to be worn around your waist any time you are up. • Our team will let you know when it is safe for you to be up without our assistance. We still want you to put your gait belt on (just in case). • In the event you need assistance, gait belts allow our team to best assist you with less risk of injury to you or our team.
Preventing Post-op Complications • Blood Clots / Pulmonary Embolus • Anticoagulation/Blood Thinners • Circulatory Exercises (i.e. Ankle Pumps) • Early Ambulation • Leg Pumps (SCDs) • Pneumonia • Incentive Spirometer • Cough & Deep Breathing
Preventing Complications • Infection • Frequent Vital Signs • Inspect Incision • Antibiotics • Nausea and Vomiting • Medications • Constipation • Medications (i.e. stool softener) • Water • Frequent Mobility • High Fiber Diet
Physical Therapy: Day of Surgery Evaluation at the bedside • Getting in/out of bed • Getting in/out of a chair • Walking-Goal of 100 feet • day of surgery! • If therapy does not see you, nursing will get you up to walk and therapy will see in you in morning!
Get Ready for a BUSY FIRST DAY! • It is normal to not sleep well the first night, so expect to be tired! Regardless…. • Day starts around 4am with lab work, vitals, and removal of your bulky dressing • Plan to bathe, get dressed, and up to your recliner for breakfast • Ensure you take pain medications before therapy! • Therapy Eval (if not completed already) • 2 sessions of Group Therapy today and every day until you leave our doors • Look forward to sleeping much better tonight!
Daily Homework: • Circulatory Exercises • Heel Prop • Dangling Feet • Cold Therapy • Sleeping Positions • Walking • Exercising Your Lungs
Track Your Progress! • Day of Surgery Goal = 100 feet • Use our Ambulation Board* to track your progress • Tell our team how far you walked (if not with our staff) • Goal for Discharge = 300 feet continuously at least once
Group Therapy*If group therapy is not available, therapy is done in your patient room • Two sessions every day starting the day after your surgery: • Morning: • 9:00am or 10:30am • Afternoon: • 1:30pm or 3:00pm • Group times will be written • on your white board. • Coaches are encouraged to • attend!
Group Lunch*Not available at all locations and dependent upon number of patients participating • Opportunity to socialize with others also going through Joint Journey • Offered on your post-op day 1 only (POD 1) • Order lunch from menu in room at breakfast time • Coach welcome to bring own food or order from menu ($10 cash required) • Have delivered by 11:30am to Group Room
Occupational Therapy • Bathing • Dressing • Hygiene Assistive Devices • Reacher • Sock Aide
Hip Precautions • Posterior Approach • Do not bend past 90° • Some physicians limit to 70° • Do not twist • Do not cross legs • Anterior Approach • Do not open legs past shoulder width
Equipment • Our team will assist in determining what equipment you need for home. Some commonly needed items are: • Rolling Walker • Raised Toilet or • Bedside Commode • Hip Kit ($35 due upon receipt) • Shower Bench • Grab Bars • Cane • Check insurance coverage for equipment as bathroom items are typcially NOT COVERED. • Our Care Management Team will assist in arranging for any needs • before you go home.
Transition to Home Making the discharge plan: • Patient and family interview • Program Coordinator • Surgeon • Physical Therapist • Nurse • Care Management Team
Transition to Home Discharge planning options: • Home with Outpatient Services • Home with Home Health PT • Sub-acute Facility: • Rehab • Skilled Nursing Unit • Insurance plans and authorizations required. • Specific criteria must be met for approval based • on type of post-acute service.
Rehab vs Skilled Nursing Facilities • Rehab Facilities in Wichita Area: • There are ONLY 3 true REHAB FACILITIES- • Via Christi Our Lady Of Lourdes (Rock Rd) • Via Christi St. Teresa • Wesley Rehabilitation Hospital • To qualify for one of the above Rehab facilities, you generally must meet the following criteria: • Be 85 years old or older • Undergoing surgery for bilateral joint replacements • Have a Body Mass Index (BMI) greater than 50 NOTE: If you do not meet this criteria, you should be looking at Skilled Nursing Facilties or making arrangements for home care.
Caring for Yourself at Home • Change positions often • Follow your joint precautions • Walk daily and steadily; increase your distance • Limit stair use to twice a day for the first week at home
Role of the COACH • Assist with mobility • Dressing changes • (if needed) • Assist with • Home Exercise Program • Observe & encourage patient