Download
1 / 53
530 likes | 558 Views
Pulmonary Radiology. Rui Domingues, MD Lincoln Mental and Medical Center September 2008. Pulmonary Imaging. Imaging techniques used to investigate pulmonary pathology include: Plain film Computed Tomography Magnetic Resonance Imaging Ultrasound Angiography. Keys to reading X-rays well.

E N D
Pulmonary Radiology Rui Domingues, MD Lincoln Mental and Medical Center September 2008
Pulmonary Imaging • Imaging techniques used to investigate pulmonary pathology include: • Plain film • Computed Tomography • Magnetic Resonance Imaging • Ultrasound • Angiography
Keys to reading X-rays well • A good understanding of normal anatomy • A good search pattern But before we can do this we need to understand how x-rays are produced.
Things to cover… • Radiographic basics • How to approach a chest x-ray • Normal radiographic anatomy
What causes the blacks, whites and grays of an x-ray image? • X-ray beams contains x-ray photons of differing energies • As these photons pass through a patient… • Some are absorbed completely • Some penetrated directly to the plain film • Some are absorbed partially, and • While others are deflected (Scatter)
TissueDensity • A product of the type of tissue and the thickness of that tissue • Results in differential absorption
Differential Absorption • Penetration of the x-ray beam is dependent on tissue density • Denser object = less penetration • Less beam striking the film (more absorption) = WHITER • More beam striking the film = BLACKER
Air Fat Glass Test Tube Water Metal Bone + Water
Differential Absorption Black Air (Lungs / Trachea / Outside the body) Fat (Perirenal fat / Fascial plane) Water (Muscle / Organs) Bone (Bone / Atherosclerotic plaquing) White Metal (Fillings / Markers / Ortho devices)
Radiographic Image • Adjacent structures of similar densities are not visualized • Kidney (water density) against liver (water density)
Radiographic Image • Adjacent structures of different densities are visualized • Liver (water density) next to Bowel (air density)
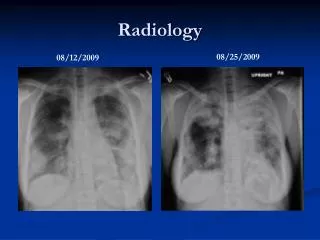
Chest Films • Minimum Diagnostic Series • PA • Left Lateral • Additional Views • Apical Lordotic • Inspiration / Expiration
PA CXR Left Lateral CXR
Apical Lordotic CXR Allows for better visualization of the Apices of the lungs
Expiration Inspiration Inspiration study Normal positioning for PA Chest Expiration study Helps visualize: - Small Pneumothorax - Air Trapping Dz (Emphysema) - Bronchial obstruction Visualizes respiratory excursion
Reading a Chest X-ray • First thing: • Correctly put of the film • Then perform your search pattern • which you always follow when looking at any film • this way you will miss fewer findings
Reading a radiograph • Start reading every radiograph by scanning the areas of least interest first, working your way to the more important areas. • You will be less likely to miss important secondary findings.
ABCs Abdomen Bone Chest Soft tissues ATMLL Abdomen Thorax Mediastium Lung Lung Chest Film Search Patterns These are the two main search patterns that people use when evaluating a chest film.
“ATMLL” Search Pattern • Remember • A = Abdomen • T = Thorax • M = Mediastinum • L = Lungs (unilaterally) • L = Lungs (bilaterally)
Searching the “Abdomen” • Scan across the upper abdomen several times • Evaluate normal gas containing structures: • Stomach • Hepatic flexure of the colon • Splenic flexure of the colon • Evaluate the liver and on occasion one can visualize the spleen
Structures Visualized: Stomach gas bubble Splenic flexure Liver Hemidiaphragms Abdomen dz that can mimic Lung disease include: Subphrenic abscess Diaphragmatic hernia Hiatal Hernia
Searching the Bony “Thorax” • Start at the right base, look at the soft tissues of the chest wall, ribs, spine and shoulder girdle • Go up one side and come down on opposite side • Remember: • Posterior ribs descend medial to lateral • Anterior ribs descend lateral to medial
Structures Visualized: Breast Tissue Posterior Ribs Anterior Ribs Scapula Clavicle Spine Thorax cage dz that may stimulate chest dz: Bony metastasis Rib / Clavicle fractures
Searching the “Mediastinum” • An organized search of the mediastinum is complicated because of all the overlapping structures. • Start with a global look for contour abnormalities, then follow with a more detailed search
Three searches of the mediastinum: 1. Trachea and carina 2. Aorta and the heart 3. Hilum Three searches of the mediastinum: 1. Trachea and carina 2. Aorta and the heart 3. Hilum Three searches of the mediastinum: 1. Trachea and carina 2. Aorta and the heart 3. Hilum Three searches of the mediastinum: 1. Trachea and carina 2. Aorta and the heart 3. Hilum
Searching the “Lungs” • Since most chest x-rays are ordered to evaluated for lung disease, so the lungs are examined last. • They are important, so their evaluation should be more through, therefore we evaluate them twice. • Once individually • Second time comparing right and left
Structures Visualized: Costophrenic angles Lung fields Pulmonary vasculature Right minor fissure
Left Lateral Chest Film • Valuable radiographic study • Helps to better localize lesions • Allows to visualize overlapping tissues • Allows the visualization of hidden pathology
Searching the Lateral Chest Film • The pattern is the same: • Abdomen • Thoracic cage strutures • Mediastinum • Lungs
Search Pattern: Abdomen Thoracic cage and bones Mediastinum Lungs Search Pattern: Abdomen Thoracic cage and bones Mediastinum Lungs Search Pattern: Abdomen Thoracic cage and bones Mediastinum Lungs Search Pattern: Abdomen Thoracic cage and bones Mediastinum Lungs Search Pattern: Abdomen Thoracic cage and bones Mediastinum Lungs
What to look for… • Abnormal density • Usually air versus water • Abnormal shape • Lung field • Mediastinum • Abnormal size • Lung field • Mediastinum • Abnormal location • Hemidiaphragm, hila, mediastinum, trachea, fissure, vasculature
But before that we need to have a good understanding of Normal Radiographic Anatomy
Left Hemidiaphragm Stomach gas bubble Let’s look at some of the visual abdominal structures Splenic flexure of the large intestines Right Hemidiaphragm Liver
Let’s look at the Bony thorax Ribs Spine Clavicle Scapula Chest wall
Let’s look at the Bony thorax Ribs Spine Clavicle Scapula Chest wall
Trachea on CXR Hilum Let’s look at the normal Mediastinal Structures
Superior Vena Cava Vessels Aortic Arch Ascending Aorta Pulmonary Artery Right Atrium Left Atrium Left Ventricle Inferior Vena Cava
Aortic Knob/Arch Descending Aorta Ascending Aorta Left Atrium Right Ventricle Left Ventricle Inferior Vena Cava
Lung Fields Upper Let’s look at the normal Lung Structures Middle Lower
Retrosternal Clear Space Retrocardiac Clear Space
Lateral Costophrenic Sulci (Recesses, Angles) Cardiophrenic Sulci (Recesses, Angles
Posterior Costophrenic Sulci (Recesses, Angles)
What are the Pulmonary Fissures? • They are the coming together of the visceral pulmonary pleura. • Right lung • Oblique (major) fissure • Horizontal (minor) fissure • Left Lung • Oblique (major) fissure