Download
1 / 42
620 likes | 1.33k Views
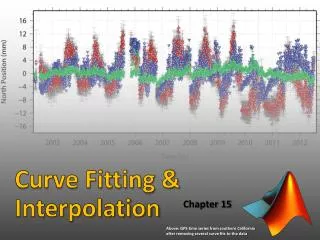
Curve Fitting Toolbox. Dr. Mohammed Alsayed. Introduction. Curve Fitting Toolbox™ software is a collection of graphical user interfaces (GUIs ) and M-file functions that operate in the MATLAB technical computing environment. . Introduction.

E N D
Curve Fitting Toolbox Dr. Mohammed Alsayed
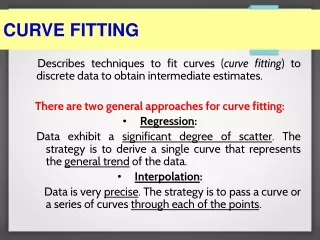
Introduction • Curve Fitting Toolbox™ software is a collection of graphical user interfaces (GUIs) and M-file functions that operate in the MATLAB technical computing environment.
Introduction • The Curve Fitting Tool is a graphical user interface (GUI) that allows you to: • Visually explore one or more data sets and fits as scatter plots. • Graphically evaluate the goodness of fit using residuals and prediction bounds.
Introduction • Access additional interfaces for • Importing, viewing, and smoothing data • Fitting data, and comparing fits and data sets • Marking data points to be excluded from a fit • Selecting which fits and data sets are displayed in the tool • Interpolating, extrapolating, differentiating, or integrating fits You open Curve Fitting Tool with the cftool command.
Importing Data • Before you can import data into Curve Fitting Tool, the data variables must exist in the MATLAB® workspace. • Example: >> load census • The workspace now contains two new variables, cdate and pop: • cdate is a column vector containing the years 1790 to 1990 in 10-year increments. • pop is a column vector with the US population figures that correspond to the years in cdate.
Importing Data • Click the Data button on Curve Fitting Tool. • Import predictor (X) data, response (Y) data, and weights. If you do not import weights, then they are assumed to be 1 for all data points. • Specify the name of the data set. • Preview the data.
Interactive Fitting • Click the Fitting button on Curve Fitting Tool. • The Fitting GUI consists of two parts: the Fit Editor and the Table of Fits. The Data Fitting Procedure • For this example, begin by fitting the census data with a second degree polynomial. • Then continue fitting the data using polynomial equations up to sixth degree, and a single-term exponential equation. • The data fitting procedure follows these general steps:
Interactive Fitting • From the Fit Editor, click New Fit. Note that this action always defaults to a linear polynomial fit type. • Because the initial fit uses a second degree polynomial, select quadratic polynomial from the Polynomial list. Name the fit poly2. • Click the Apply button or select the Immediate apply check box. The library model, fitted coefficients, and goodness of fit statistics are displayed in the Results area. • Fit the additional library equations.
Interactive Fitting • For fits of a given type (for example, polynomials), you should use Copy Fit instead of New Fit because copying a fit retains the current fit type state thereby requiring fewer steps than creating a new fit each time.
Interactive Fitting • The data, fit, and residuals are shown below. You display the residuals as a line plot by selecting the menu item View > Residuals > Line plot from Curve Fitting Tool.
Interactive Fitting • The residuals from a good fit should look random with no apparent pattern. A pattern, such as a tendency for consecutive residuals to have the same sign, can be an indication that a better model exists. • When you fit higher degree polynomials, the Results area displays this warning:
Interactive Fitting • The warning arises because the fitting procedure uses the cdate values as the basis for a matrix with very large values. The spread of the cdate values results in scaling problems. To address this problem, you can normalize the cdate data. Normalization is a process of scaling the predictor data to improve the accuracy of the subsequent numeric computations. A way to normalize cdate is to center it at zero mean and scale it to unit standard deviation.
Interactive Fitting • To normalize data with Curve Fitting Tool, select the Center and scale X data check box. • Note Because the predictor data changes after normalizing, the values of the fitted coefficients also change when compared to the original data. However, the functional form of the data and the resulting goodness of fit statistics do not change. Additionally, the data is displayed in Curve Fitting Tool using the original scale.
Determining the Best Fit • To determine the best fit, you should examine both the graphical and numerical fit results. • Examining the Graphical Fit Results. Your initial approach in determining the best fit should be a graphical examination of the fits and residuals. The graphical fit results shown in the next slide indicate that • The fits and residuals for the polynomial equations are all similar, making it difficult to choose the best one. • The fit and residuals for the single-term exponential equation indicate it is a poor fit overall. Therefore, it is a poor choice for extrapolation.
Determining the Best Fit • Use the Plotting GUI to remove exp1 from the scatter plot display.
Determining the Best Fit • Because the goal of fitting the census data is to extrapolate the best fit to predict future population values, you should explore the behavior of the fits up to the year 2050. • You can change the axes limits of Curve Fitting Tool by selecting the menu item Tools > Axes Limit Control. • The behavior of the sixth degree polynomial fit beyond the data range makes it a poor choice for extrapolation.
Determining the Best Fit • Examining the Numerical Fit Results. • Because you can no longer eliminate fits by examining them graphically, you should examine the numerical fit results. • There are two types of numerical fit results displayed in the Fitting GUI: goodness of fit statistics and confidence intervals on the fitted coefficients. • The goodness of fit statistics help you determine how well the curve fits the data. • The confidence intervals on the coefficients determine their accuracy.
Determining the Best Fit • Some goodness of fit statistics are displayed in the Results area of the Fit Editor for a single fit. • Allgoodness of fit statistics are displayed in the Table of Fits for all fits, which allows for easy comparison. • In this example, the sum of squares due to error (SSE) and the adjusted R-square statistics are used to help determine the best fit. • The SSE statistic is the least-squares error of the fit, with a value closer to zero indicating a better fit. • The adjusted R-square statistic is generally the best indicator of the fit quality when you add additional coefficients to your model.
Determining the Best Fit • You can modify the information displayed in the Table of Fits with the Table Options GUI. You open this GUI by clicking the Table options button on the Fitting GUI. As shown below, select the adjusted R-square statistic and clear the R-square statistic. • The numerical fit results are shown. You can click the Table of Fits column headings to sort by statistics results.
Determining the Best Fit • The SSE for exp1 indicates it is a poor fit, which was already determined by examining the fit and residuals. • The lowest SSE value is associated with poly6. However, the behavior of this fit beyond the data range makes it a poor choice for extrapolation. • The next best SSE value is associated with the fifth degree polynomial fit, poly5, suggesting it may be the best fit. • However, the SSE and adjusted R-square values for the remaining polynomial fits are all very close to each other. • Which one should you choose?
Determining the Best Fit • To resolve this issue, examine the confidence bounds for the remaining fits. • By default, 95% confidence bounds are calculated. You can change this level by selecting the menu item View > Confidence Level from Curve Fitting Tool. • The p1, p2, and p3 coefficients for the fifth degree polynomial suggest that it overfits the census data. • However, the confidence bounds for the quadratic fit, poly2, indicate that the fitted coefficients are known fairly accurately. • Therefore, after examining both the graphical and numerical fit results, it appears that you should use poly2 to extrapolate the census data.
Determining the Best Fit • Note: The fitted coefficients associated with the constant, linear, and quadratic terms are nearly identical for each polynomial equation. However, as the polynomial degree increases, the coefficient bounds associated with the higher degree terms increase, which suggests overfitting.
Saving the Fit Results • By clicking the Save to workspace button, you can save the selected fit and the associated fit results to the MATLAB workspace. The fit is saved as a MATLAB object and the associated fit results are saved as structures. • This example saves all the fit results for the best fit, poly2. • fittedmodel1 is saved as a Curve Fitting Toolbox™ cfit object.
Analyzing the Fit • You can evaluate (interpolate or extrapolate), differentiate, or integrate a fit over a specified data range with the Analysis GUI. • You open this GUI by clicking the Analysis button on Curve Fitting Tool. • For this example, you will extrapolate the quadratic polynomial fit to predict the US population from the year 2000 to the year 2050 in 10 year increments, and then plot both the analysis results and the data. To do this:
Analyzing the Fit • Enter the appropriate MATLAB vector in the Analyze at Xi field. • Select the Evaluate fit at Xi check box. • Select the Plot results and Plot data set check boxes. • Click the Apply button.
Analyzing the Fit • The extrapolated values and the census data set are displayed together in a new figure window.
Saving the Analysis Results • By clicking the Save to workspace button, you can save the extrapolated values as a structure to the MATLAB workspace.
Saving Your Work • Curve Fitting Toolbox software provides you with several options for saving your work. • You can save one or more fits and the associated fit results as variables to the MATLAB workspace. • You can then use this saved information for documentation purposes, or to extend your data exploration and analysis. • In addition to saving your work to MATLAB workspace variables, you can: • Save the Session • Generate an M-File
Saving Your Work • Before performing any of these tasks, you may want to remove unwanted data sets and fits from Curve Fitting Tool display. An easy way to do this is with the Plotting GUI. The Plotting GUI shown below is configured to display only the census data and the best fit, poly2.
Save the Session • The curve fitting session is defined as the current collection of fits for all data sets. • You may want to save your session so that you can continue data exploration and analysis at a later time using Curve Fitting Tool without losing any current work. • Save the current curve fitting session by selecting the menu item File > Save Session from Curve Fitting Tool.
Save the Session • You can load a saved session by selecting the menu item File > Load Session from Curve Fitting Tool.
Generate an M.file • You may want to generate an M-file that captures your work, so that you can continue your analysis outside of Curve Fitting Tool. The M-file can be used without modification, or it can be edited as needed. • To generate an M-file from a session in Curve Fitting Tool, select the menu item File > Generate M-file.