Download
1 / 21
210 likes | 333 Views
Surface Area Training. Storyboards. Pam Guest Post EDU623 Dr. Moskowitz 4/13/14. Surface Area Training.

E N D
Surface Area Training Storyboards Pam Guest Post EDU623 Dr. Moskowitz 4/13/14
Surface Area Training • These storyboards describe a 48 minute lesson intended to help high school geometry students solve mathematical and real-life problems involving surface area and lateral area of cylinders consistent with Common Core State Standards (CCSS) 7.G.B.6 and HSG-MG.A.3 (Common Core State Standards Initiative [CCSI], 2014) • This lesson would be preceded by a lesson on surface and lateral area of prisms and followed by a lesson on surface area and lateral area of pyramids and cones. • A project intended to enable students to authentically demonstrate their understanding of both volume and surface area is also referenced. • The instructor should review the slides and associated notes in detail prior to preparing to conduct this lesson. REFERENCE: Common Core State Standards Initiative [CCSSI]. (2014). Mathematics standards: Kingergarten-K12. Retrieved from http://www.corestandards.org/Math/
Preparation • A pre-test should have been conducted prior to the entire Surface Area unit. The instructor should reference the cylinder-specific results of the pre-test prior to conducting the training in order to identify students who may need more assistance and pre-assign learning pair partners, and learning group partners/leaders. • The computer and Smartboard should be turned on, all slides and videos should be queued up, and a timer should be available. • The objectives should be written on the whiteboard (see Notes) • A “TodaysMeet” session should be opened before class starts. The room name should be filled in on the “Think About It” slide in the red box provided for this purpose (see the Notes Page of Storyboard slide 2, “Think About It”, of this deck for access to a video on how to use TodaysMeet). • Calculators, graph paper, rulers, cylinder models with plastic surface area inserts (1 per 4 person group), formula sheets and handouts should be accessible at the front of the room. Graph paper, rulers, cylinder models, and formula sheets should be pre-sorted for 4-person learning groups. • Student “Do Now” books should already be under student desks.
Slide # 1 Do Now – 5 mins. Onscreen Content Show Slide One of the PowerPoint presentation on the Smartboard, entitled “Do Now”. This slide is intended to help students “connect . . . to prior learning” (Hodell, 2011, pp. 118-120) by reviewing how to find the surface area of a rectangular prism and how to find the area of circles given a radius and a diameter. Detailed Script Welcome students as they enter the room, telling them it’s time to get their brains in gear for today’s lesson. Alert students to the Do Now posted on the board and reminding them, as necessary, of the calculator box at the front of the room and their Do Now books under their desks. Interactivity / Navigation As students are completing their Do Now, take attendance in PowerSchool (1 min). Then begin to circulate and check progress. Encourage students to discuss the Do Now problems with their neighbors if they are having any difficulty. About 2 minutes in, select three students with correct answers to put those answers on the board while you help others as needed. At the 4 minute mark, ask for and address any questions. Navigate to Slide 2 in PowerPoint presentation entitled “Think About It”. REFERENCE: Hodell, C. H. (2011). ISD from the ground up: A no-nonsense approach to instructional design (3rd ed.). Alexandria, VA: ASTD Press.
Slide # 2 Think About It – 5 mins. Onscreen Content Show Slide Two of the PowerPoint presentation, entitled “Think About It”. This slide is intended to “generate (student) interest” (Hodell, 2011, pp. 118-120) by referencing the Volume/Surface Area project previously announced to students (see Appendix for Project details). The instructor will facilitate a brief “think/pair/share” activity to enable this connection. Detailed Script “We have four objectives for today (REFER TO OBJECTIVES WRITTEN ON WHITEBOARD). Before we step into today’s lesson, I want to help you make a connection to the Surface Area/Volume project we introduced at the beginning of our Surface Area unit. As you’ll recall, you will be designing a container for a new beverage for Coca-Cola, striving to use as little packaging as possible to hold 355 square centimeters of liquid. You may have noticed that many beverages are packaged in cylindrical cans. Why do you think this is? I’m going to give you a minute to jot some thoughts down in your Do Now book. While you do so, I will inform you of your learning partner assignment for today. When I tell you to, you will discuss your thoughts with your learning partner and post at least one idea on our TodaysMeet site using your device.” Interactivity / Navigation Circulate to alert students of learning partner assignments and ensure students are on task. Use a timer to transition students to the paired partner discussion and sharing via TodaysMeet, opening up the TodaysMeet page so you and students can review the postings. In the last minute of this activity, ask for a few students to share any observations. Summarize by encouraging students to consider implications of today’s lesson to their project design. You should be about 10 minutes into the lesson now; navigate to Slide 3 in the PowerPoint presentation entitled “Cylinder Nets”. REFERENCE: Hodell, C. H. (2011). ISD from the ground up: A no-nonsense approach to instructional design (3rd ed.). Alexandria, VA: ASTD Press.nta
Slide # 3 Cylinder Nets– 6:30 mins Onscreen Content • This segment is intended to address Objective 1: • “Given a demonstration, a physical model, graph paper, a ruler, and teacher support as needed, the high school geometry student should be able to accurately draw and label a two-dimensional net depicting the surfaces of a cylinder.” A video and group activity have been selected for this purpose. Detailed Script “You will remember from our lesson on surface area of prisms that one method we can use is to draw a net of the figure and calculate the total surface area from the area of the individual pieces. I am going to show you a short video that demonstrates how to draw the net of a cylinder. After I stop the video, I will show you the learning group assignments for today and will ask each learning group leader to collect the rulers, graph paper, and models needed so you can measure, draw, and label a net of a model cylinder. When I say, you will get with your group to create your net.” SHOW FIRST 1:06 OF THE “SURFACE AREA OF CYLINDERS” (Brightstorm, 2010) VIDEO, THEN PROJECT LEARNING GROUP ASSIGNMENTS “Leaders can get materials and you all can shift to your groups to draw your nets. Please take measurements in inches. I will be around to help.” Interactivity / Navigation After you stop the video, display the list of learning groups and leaders. Including transition time, there should be about 5 minutes for the activity. Leaders should quickly come up to the front to pick up the pre-sorted materials for their group (graph paper, ruler, and formula chart for each student, and one cylinder model with insert for the group). Students should be encouraged to move quickly into their learning groups to begin measuring and drawing their nets. Circulate and offer help. You should be about 16:30 minutes into the lesson now; navigate to Slide 4 in the Powerpoint presentation entitled “Surface Area” REFERENCE: Brightstorm. (2010). Surface area of cylinders. [Youtube Video]. Retrieved from https://www.youtube.com/watch?v=EnJXJPZUWxw
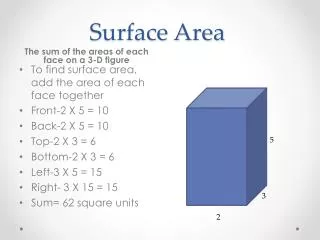
Slide # 4 Surface Area – 7 mins. Onscreen Content • This segment is intended to address Objective 2: • “Given an explanation, a chart including formulas for area and circumference of circles, a calculator, a learning group, and teacher support as needed, the high school geometry student should be able to accurately determine the surface area (total area of all of the surfaces) of a cylinder from its net, including appropriate units.” A video and group activity have been selected for this purpose. Detailed Script “Just as we did in our lesson on finding surface area of prisms, we will now work on calculating the surface area of our cylinder from its net. I’m going to show you the remainder of the video which explains how to do this. It is less than 2 minutes, so please give it your full attention and wait until it is over before you try to calculate your surface area” SHOW LAST 1:39 OF THE “SURFACE AREA OF CYLINDERS” (Brightstorm, 2010) VIDEO “You may now go ahead and try to calculate the surface area of your cylinder, discussing your approach with your learning group as needed. You have been provided formula charts if you need them. Please don’t forget to include your units!” Interactivity / Navigation After the video stops, students should have about 5 minutes for the activity. Circulate and offer help. Remind those who finish early to help others. Check to be sure all students are including units. The correct surface area of the model cylinders (1.5 inch radius, 3 inches high) is 42.39 square inches. You should be about halfway through the lesson now; navigate to Slide 5 in the Powerpoint presentation entitled “Lateral Area vs. Surface Area” REFERENCE: Brightstorm. (2010). Surface area of cylinders. [Youtube Video]. Retrieved from https://www.youtube.com/watch?v=EnJXJPZUWxw
Slide # 5 Lateral Area vs. Surface Area – 7 mins. Onscreen Content • This segment is intended to address Objective 3: • “Given an explanation of differences and a learning partner, the high school geometry student should be able to differentiate between surface area and lateral area (area of the surfaces of a solid excluding its bases) by citing at least one real-world example of each (e.g., a soup can as an example of surface area versus a soup can label as an example of lateral area).” By connecting to a prior lesson on surface area and lateral area of prisms, the video previously shown, and real-world examples, the student is expected to achieve this objective. Detailed Script “In working with prisms, we also discussed the concept of lateral area. Who can remind us how we defined lateral area? Raised hands please.” USE WAIT TIME. IDEAL ANSWER IS “EVERYTHING EXCEPT THE BASES”, THOUGH STUDENTS MAY EXPRESS THIS USING DIFFERENT WORDS. “So, the good news is that lateral area is also ‘everything except the bases’ when we’re talking about cylinders. I’m shading the net from the video to highlight the lateral area. Please do the same on the net you drew of your model” (CIRCULATE TO CHECK THIS IS HAPPENING). “Now, let’s see what real-world examples of surface area and lateral area we can come up with. I’ll give you a minute to brainstorm on your own in your Do Now book. When I say, you can then discuss your ideas with a partner and post your two best examples on TodaysMeet.” (TIME AND PROMPT ACTIVITY. LEAVE 1-2 MINS FOR DEBRIEF). “Any thoughts or questions about the posts?” (DISCUSS). Interactivity / Navigation Be sure to write in the TodaysMeet room number in the red box indicated and assist students in connecting if needed. Circulate as students are working independently and in pairs. Try not to give examples. Encourage them to look around the room or in their bags for ideas. Have some additional examples available to reference during the debrief (e.g., soup cans, coffee cans, frozen juice containers, etc.) You should be about 30:30 minutes into the lesson now; navigate to Slide 6 in the Powerpoint presentation entitled “Wrap-Up” REFERENCE: Brightstorm. (2010). Surface area of cylinders. [Youtube Video]. Retrieved from https://www.youtube.com/watch?v=EnJXJPZUWxw
Slide # 6 Wrap-Up– 2:30 mins. Onscreen Content The purpose of the Wrap-Up is to close out the lesson and transition to the exit ticket. Students will be given their homework and the stage will be set for the following day’s lesson. Detailed Script “We have covered a lot of ground today. Before I give you today’s exit ticket, I want to get you your homework and let you know where we’re headed next. Tonight you will have 4 problems to practice with at hone (PASS OUT HOMEWORK). Just in case you run into trouble, I will be posting the video we watched today and a related Khan Academy video on both Twitter and Edmodo. I will also be looking for your feedback on today’s lesson, so please respond to either my Twitter or Edmodo request for your input. Tomorrow, we’ll be continuing on with the topic of surface area and lateral area, but this time focusing on pyramids and cones. Remember, you may select any of the figures we’ve covered during Volume and Surface Area for your beverage container project!” Interactivity / Navigation Be sure to have copies of the homework for each student (see “Notes”). Students should already have the Twitter and Edmodo account codes, but you may want to write thes on the whiteboard just in case. You should be about 33 minutes into the lesson now; navigate to Slide 7 in the Powerpoint presentation entitled “Exit Ticket”
Slide # 7 Exit Ticket – 15 mins. Onscreen Content • The purpose of the Exit Ticket is intended to help assess whether or not the terminal objective, Objective 4, has been met: • “Given the formula for surface area and lateral area of a cylinder, a calculator, and a worksheet, the high school geometry student should be able to accurately calculate the surface area and lateral area of at least 3 out of 4 representations of cylinders including appropriate units.” Detailed Script “I am passing out your Exit Ticket now (PASS OUT TICKETS WHILE PROVIDING INSTRUCTIONS). It will help me determine whether my expectations for student mastery of today’s lesson have been met. You may use your calculator, formula sheet, and notes from today’s lesson as you work through these problems. Please calculate both the surface area and lateral area of each cylinder and be sure to include your units. You have the remainder of this class to complete the ticket. Please turn it into the bin when you are done. If you finish early, you may work quietly on your homework while you wait for the bell. Thank you for your efforts today. See you tomorrow!” Interactivity / Navigation Be sure to have copies of the exit ticket for each student (see “Notes”). Students should have until the bell to complete the lesson.
Do NowGet your calculator and complete the following in your Do Now book: Find the surface area of the rectangular prism: Find the area of the circle: Find the area of the circle:
THINK ABOUT ITWhy are carbonated beverages often packed in cylindrical cans? 1 min - stream of consciousness writing in your Do Now book. 2 mins– discuss your ideas with your neighbor and post at least one reason on Todaymeet Please use your device to log into: https://todaysmeet.com/
CYLINDER NETSOBJECTIVE: Accurately draw and label a net of a cylinderVIDEO: https://www.youtube.com/watch?v=EnJXJPZUWxw#aid=P-KJ6ZwQOpoGROUP ACTIVITY: • When I tell you to, please sit with the learning group leader you have been assigned. • You will work with your learning group to determine measurements and the approach necessary to draw the net of your model cylinder. • You may assign one person from the group to take measurements, but you should each draw and label your own net.
Surface AreaOBJECTIVE: Calculate the surface area of a cylinder from its netVIDEO: https://www.youtube.com/watch?v=EnJXJPZUWxw#aid=P-KJ6ZwQOpoGROUP ACTIVITY: • Using your net, the information from the video, and your formula chart if needed, calculate the surface area of your net. • Be sure to include units consistent with the measurements you labeled on your net. • If you finish early, please help others.
LATERAL AREA vs. SURFACE AREAOBJECTIVE: Differentiate between surface and lateral area LA • QUESTION: What are real-life examples of surface area and lateral area? • Take 60 seconds to write down ideas in your Do Now book • Next, pair up within your group; discuss your ideas with your partner. • Post your two best examples to TodaysMeet using your device. Please use your device to log into: https://todaysmeet.com/
WRAP-UP • Exit ticket up next (15 mins). • Tonight’s Homework: • Worksheet: find the surface and lateral area of 4 cylinders • Videos will be posted on Edmodo and Twitter for support. • Respond to Edmodo/Twitter request for feedback about today’s lesson. • What did you like? What didn’t you like? What questions do you have? • Tomorrow: surface and lateral area of pyramids and cones
EXIT TICKET • You have the remainder of the class to complete the exit ticket using your notes, formula sheet, and calculator. • When you are done, please turn the exit ticket into the bin and use any remaining time to start your homework. • Thanks for your attention today. Have a great day!
NAME ____________________________ DATE _____________________________ PERIOD ___________________________ Cylinder SA/LAHomework Find the surface area and lateral area of each of the following: 1. 2. 3. 4.
NAME ____________________________ DATE _____________________________ PERIOD ___________________________ Cylinder SA/LAEXIT TICKET Find the surface area and lateral area of each of the following: d = 9 cm, h = 11 cm 2. 3. 1. r = 2 cm, h = 12 cm r = 8 cm, h = 10 cm 4.