Download
1 / 15
150 likes | 263 Views
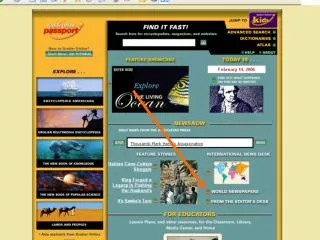
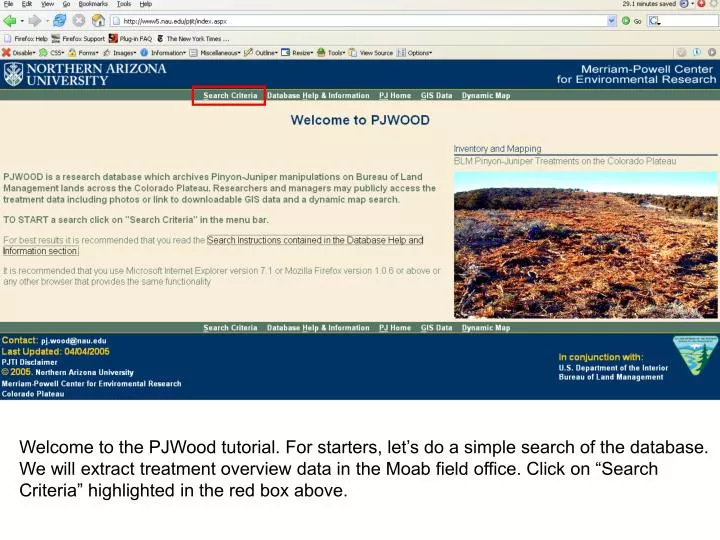
Welcome to the PJWood tutorial. For starters, let’s do a simple search of the database. We will extract treatment overview data in the Moab field office. Click on “Search Criteria” highlighted in the red box above.

E N D
Welcome to the PJWood tutorial. For starters, let’s do a simple search of the database. We will extract treatment overview data in the Moab field office. Click on “Search Criteria” highlighted in the red box above.
In the Field Office box above, scroll down until you reach Moab, UT. Click on this field office once. Just below, in “Treatment Identification”, a list of treatments from the Moab office will appear. We want the treatment “Amasa Back”. Click on “Treatment Name” to sort the treatments alphabetically (note: each header item is sortable, except the leftmost).
Now that we’ve sorted by treatment name, we can now select “Amasa Back”. Check the highlighted box above and click on “Submit” (highlighted in blue).
In this screen, we are shown some summary data. In order to see more detail, click in the highlighted box and press “Submit” just below.
The “Treatment Details” screen shows various categories for the given treatment – only one may be selected at a time. For this treatment, let’s select “Treament Application Overview” (click on the radio button circled in red). On the right-hand side sub-categories appear. Let’s now click on the box to the left of “Column Name” to select all (one or more individual categories may be selected as well). Click on “View Data”.
This screen shows the available data for this particular treatment. This data may be downloaded by clicking on the highlighted checkbox and then clicking on “Download Selected Records” just below.
This page collects some user data prior to downloading. Once you’ve entered the data, select the highlighted “Submit” button.
After pressing the submit button, a download dialog will appear. Press the OK button to save the file, pjit_download.txt, to your desktop.
This completes our introduction to the PJWood database. Let’s now get the data in a more useful form.For this part of the tutorial, MSAccess is required. Open up MSAccess and create a new blank database (red highlight). A dialog called “File New Database” will appear. In the file name field, enter “pjwood_amasa_back” (no quotes). Press the “Create” button.
Now that we’ve created the database, let’s grab our download file. In the menu bar, go to File->Get External Data->Import.
Now, navigate to your Desktop. Once there, move your mouse down to the “Files of type” field and click once inside this field. A drop-down menu should appear as shown above. Scroll down until you see “Text Files (*.txt;*.csv;*.tab;*.asc)” and click once on this field.
The file “Pjit_download.txt” should now appear in the dialog as shown above. Double-click on this file.
In this dialog, we want to select the “Delimited” radio button as shown above. Now click on the “Next” button.
For this dialog, we want to select the “|” delimiter. Click on the “Other” radio button and then press and hold the shift key down. Now press the backslash key just above the “Enter” key. Release both keys. Then click inside the box for “First Row Contains Field Names”. Now press “Finish”.
This is the final screen for our tutorial. Since we’ve downloaded a single record, analysis is limited to simply inspecting the data. However, we can build on this exercise and perform more sophisticated operations: narrowing treatment searches given certain search criteria; linking tables together for selected treatment data; and finally, performing simple SQL queries based on the imported data. Thanks for using the PJWood Research Database.