Download
1 / 38
380 likes | 574 Views
Create a Web Site with Frames. Objectives. Describe uses of frames in a Web site Layout frames within a browser window Display a document within a frame Format the appearance of frames with margin widths, removing scrollbars, and specifying resize frames

E N D
Objectives • Describe uses of frames in a Web site • Layout frames within a browser window • Display a document within a frame • Format the appearance of frames with margin widths, removing scrollbars, and specifying resize frames • Direct a link target to a specific frame • Direct a link target outside of a frame layout • Add page content for browsers that do not support frames • Incorporate an inline frame in a page
Introducing Frames • A frame is a section of the browser window capable of displaying the contents of an entire Web page. For example: • the frame on the left may display the contents of a Web page containing a list of hyperlinks • the frame on the right may display a Web page with product information
Advantages to Using Frames • Framescan give more flexibility in designing your Web presentation • You can place information in different Web pages, removing redundancy • Frames can make your site easier to manage • Frames allows you to update only a few files rather than the whole • Web designers advocate creating both framed and non-framed versions for a Web site and giving users the option of which one to use
Disadvantages to Using Frames • The browser has to load multiple HTML files before a user can view the contents of the site increasing the waiting time for potential customers • Some older browsers cannot display frames • Some users simply do not like using frames • Some web authors feel that frames are too constricting, limiting flexibility in designing the layout of a Web page • There is concern that frames can use up valuable screen space • The source code is removed from the user
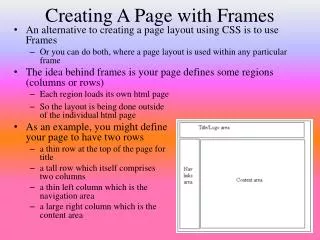
Planning Your Frames • Before you start creating your frames, it is a good idea to plan their appearance and how they are to be used. There are several issues to consider: • What information will be displayed in each frame? • How do you want the frames placed on the Web page? • What is the size of each frame? • Which frames will be static (always showing the same content)? • What Web pages will users first see when they access the site? • Should users be permitted to resize the frame to suit their needs?
Creating a frameset • A frameset describes how th frames are organized; they are defined by rows or columns, but not both. • You must choose to layout your frames in either rows or columns • To create a frame layout, you will use the rows and cols attributes of the <frameset> ta • the rows attribute creates a row of frames • the cols attribute creates a column of frames
Creating a Frameset • The <frameset> tag is used to store the definitions of the various frames in the file. These definitions will typically: • include the size and location of the frame • include the Web pages the frames display • The <frameset> code does not include an opening and closing <body> tag • the reason for this is that this HTML file displays the contents of other Web pages; technically, it is not a Web page
Frames Defined in either Rows or Columns Frames laid out in columns Frames laid out in rows
The Frame Syntax • The syntax for creating a row or column frame layout is: • <frameset rows=“row1,row2,row3, . . .”> </frameset> or • <frameset cols=“column1,column2,column3, . . .”> </frameset>
Specifying a Frame Source • To specify a source for a frame, use the <frame> tag with the syntax: <frame src=“url” /> • The URL is the filename and location of the page that you want to load. • You must insert the <frame> tag between the opening and closing <frameset> tags
Nesting Framesets • Remember that a frameset is defined by rows or columns, but not both • To create frames using both rows and columns, one frameset must be nested inside another • The interpretation of the rows and cols attributes changes slightly • for example, a row height of 25% does not mean 25% of the display area, but rather 25% of the height of the frame into which that row has been inserted (or nested)
Formatting a Frames • You can control three attributes of a frame: • scroll bars • the size of the margin between the source document and the frame border • whether or not the user is allowed to change the size of the frame
Hiding and Displaying Scroll Bars • By default, scroll bars are displayed when the content of the source page cannot fit within the frame • You can override the default setting using the scrolling attribute • The scrolling syntax is: scrolling=“type” • scrolling can either be “yes” (to always display scroll bars) or “no” (to never display scroll bars) • If you don’t specify a setting for the scrolling attribute, the browser displays scroll bars when necessary
Setting Frame Margins • The following should be consider for frame margins: • the browser determines the amount of space between the content of the page and the frame border • occasionally, the browser sets the margin between the border and the content too large • the margin should be big enough to keep the source’s text or images from running into the frame’s borders • the margin should not take up too much space, because you typically want to display as much of the source as possible
Specifying Margins Syntax • The syntax for specifying margins for a frame is: marginheight=“value” marginwidth=“value”> • marginheight is the amount of space, in pixels, above and below the content of the page in the frame • marginwidth is the amount of space to the left and right of the page • If you specify only one, the browser assumes that you want to use the same value for both • Setting margin values is a process of trial and error as you determine what combination of margin sizes looks best
height of the margin text for the logo frame will be 0 pixels height of the margin for the home page will be 0 pixels and the width of the margin will be 10 pixels Specifying the Margin Sizes for the Frames
Controlling Frame Resizing • By default, users can resize frame borders in the browser by simply dragging a frame border • Some Web designers prefer to freeze, or lock, frames, so that users cannot resize them • this ensures that the Web site displays as the designer intended • The syntax for controlling frame resizing is: noresize=“noresize” • The noresize attribute is included within the <frame> tag to prevent users from modifying the size of the frame
Working with Frames and Links • By default, clicking a link within a frame opens the linked file inside the same frame • You can display hyperlinks in many ways: • in a different frame • in a new window • in the entire window • When you want to control the behavior of links in a framed page, there are two required steps: • give each frame on the page a name • point each hyperlink to one of the named frames
Assigning a Name to a Frame • To assign a name to a frame, add the name attribute to the frame tag • The syntax for this attribute is: <frame src=“url” name=“name” /> • case is important in assigning names: “information” is considered a different name than “INFORMATION”
the frame name Setting the Frame Names
Specifying a Link Target • You can use the target attribute to open a page in a specific frame • The syntax for this is: target=“name” • When a page contains dozens of links that should all open in the same frame, HTML provides a way to specify a target frame for all the hyperlinks within a single page
the Web page will appear in the pages frame Specifying a Link Target
Using Reserved Target Names • Reserved target names are special names that can be used in place of a frame name as the target • They are useful in situations: • where the name of the frame is unavailable • when you want the page to appear in a new window • when you want the page to replace the current browser window • All reserved target names begin with the underscore character ( _ ) to distinguish them from other target names • Reserved target names are case-sensitive, they must be entered in lowercase
Using the <noframes> Tag • Use the <noframes> tag to allow your Web site to be viewable using browsers that do or do not support frames • When a browser that supports frames processes this code, it ignores everything within the <noframes> tags and concentrates solely on the code within the <frameset> tags. • When a browser that doesn’t support frames processes this code, it doesn’t know what to do with the <frameset> and <noframes> tags, so it ignores them • When you use the <noframes> tag, you must include <body> tags, this way, both types of browsers are supported within a single HTML file
The <noframes> Syntax • The syntax for the <noframes> tag is: <html> <head> <title>title</title> </head> <frameset> frames <noframes> <body> page content </body> </noframes> </frameset> </html>
Working with Frame Borders • There are additional attributes you can apply to the <frame> tag that allow you to change border size and appearance. For example: • you can remove borders from your frames to free up more space for text and images • you can change the color of the frame border so that it matches or complements the color scheme for your Web site
Setting the Border Color • To change the color of a frame’s border, use the bordercolor attribute • The attribute can be applied either to an entire set of frames, using the <frameset> tag, or to individual frames, using the <frame> tag • The syntax for this attribute is: • bordercolor=“color”>
Setting the Border Color • Applying the bordercolor attribute to the <frameset> tag affects all of the frames and nested frames within the set • If you apply the bordercolor attribute to a single <frame> tag, that particular color of the border changes in Internet Explorer, but in Netscape Navigator, all of the frame borders change • View the page using different browsers and browser versions
Setting the Border Width • Another way of modifying frame borders is to change their widths using the border attribute • The border attribute can be used only in the <frameset> tag, and not in individual <frame> tags • The syntax for the border attribute is: <frame frameborder=“value”> • value is the width of the frame borders in pixels
setting the width of the frame border to zero has the effect of removing the border Removing the Frame Borders Some Web designers prefer not to show frame borders in order to give the illusion of having a single Web page rather than three separate ones, while other Web designers believe that hiding frame borders can confuse users as they navigate the Web site.
Creating Inline Frames • Another way of using frames is to create a floating frame • An inline frame, or floating frame, is displayed as a separate box or window within a Web page • The frame can be placed within a Web page in much the same way as an inline image
The Floating Frames Syntax • The syntax for a floating frame is: <iframe src=“url”> alternate content</iframe> • URL is the name and location of the file you want to display in the floating frame • the alternate content is the content you want displayed in the browser that don’t support inline frames • in addition to these attributes, you can use some of the other attributes you used with fixed frames, such as the marginwidth, marginheight, and name attributes