Download

1 / 41
410 likes | 502 Views
NV TYPE 3 IMT’s. I – SUITE CRASH COURSE. Computer Set-up. Turn on wireless router first Turn on ‘Server’ Ensure you have a wireless connection Start I-Suite and create or restore the database Start all workstation Computers Ensure you have a network connection on all computers.

E N D
NV TYPE 3 IMT’s I – SUITE CRASH COURSE
Computer Set-up • Turn on wireless router first • Turn on ‘Server’ • Ensure you have a wireless connection • Start I-Suite and create or restore the database • Start all workstation Computers • Ensure you have a network connection on all computers
Shared Team Folders • Each Teams’ Computers are set-up with a ‘Shared Team Folder’ on the desktop • Store Narratives, write-ups, important data here • Data is stored on the Server computer • Is accessible by all team computers • Data should be burned to a CD along with the I-Suite database and turned over at the close of the incident
Naming Conventions • Database names and DB passwords should match • Example: Bigfire2009! • Password: Bigfire2009! • See Passwords File in Resources Folder for DB User Passwords and router passwords
The ‘SERVER’ Computer • Where the I-Suite Database is stored • Where the Shared Team Data is stored • Must be up and running before the workstations can connect and log-in • Must remain on and running at all times • Server Dialogue Box will read (LOCAL)\ISUITE2
The ‘WORKSTATION’ Computers • The connect to the server computer to access I-Suite data • Server Dialogue Box will read \\SERVER\ISUITE2 • Database: ‘Incident Name’ • Ensure that important data is stored in the ‘Shared Team Folder’
MAIN MENU MODULE BUTTONS ACTION BUTTONS INCIDENT I-SUITE Basics
I-Suite Security • Passwords must be 12 Characters • Capital and lowercase letters • A Number • A Special Character ( ! # % & * _ ) • Cannot be a dictionary word • Grant a user all rights • Be sure to set as active • Close I-Suite application if not in use • Be sure to protect PII
Getting Help • Refer to I-Suite Userguides • Refer to Quick Start Guide • Refer to Wireless Setup Guide • Click on help in the Isuite application • Contact the Isuite helpdesk
Database Admin • Attach / Detach Databases • Backup / Restore Databases • Create and Manage Databases • Manage Database Users • Import ROSS Data • Perform Financial / Injury – Illness Data Uploads • Perform Repository Uploads
Creating a new Incident • Click Copy / New DB • Click ‘Create New Database’ Button • Give the database the proper name and passwords • Database is automatically attached • Others will attach using the database name that you set
Provide Incident Data • Open the Data Admin Module • Fill in incident name, incident number, Location, State, Start Date • Provide Accounting codes (May be more than one) • All this information is on your resource order
Performing the ROSS Import • It is a good idea to download the import file before you arrive at the base camp • Click the import data button • Navigate to the import file • Follow the import steps on screen
Performing Backups • In the Database admin module click backup • Click Auto Backup • Enable Backup • Enable Auto Backup • Make sure your database is selected • Set the backup interval to 1 hour • Set a backup destination
Taking Over an Incident • The outgoing team should provide you with the most recent backup file • A database password • A database Username / Password for an admin user • Copy the backup to c:\program files\isuite\database\backup • In database admin Select ‘Restore’ • Navigate to the backup file • Provide the password given
Taking Over an Incident.. continued • Be sure to set a backup schedule • Go in a create your database users following the ‘passwords’ file • Be sure your database is up and running before the other team leaves
Transitioning an Incident • Create a new Admin User • Perform a manual backup of the database • Provide that backup file and the username and password of the user you created to the incoming team • Once they have the database up and running detach your database from ‘Database Admin’ select ‘Detach’
Transitioning an Incident.. continued • Enter your database password and click OK (Should be the same as the database name) • Close I-Suite • Navigate to c:\program files\isuite\database and delete the database files for your incident • Delete all files in c:\program files\isuite\database\backup
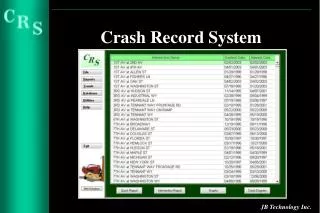
Resources Module • Add / Edit Resources • Set Check-In Status • Enter Contractor Information • Enter Cost Info • Track Demob Information • Information in ‘Resources’is used throughout the rest of the ISUITE application • Accuracy is important for ICS 209
Check-In • After initial ROSS import resources are entered by Plans Section • You may use ISUITE Check-In form • It is important to capture as much information as possible • Finance Section will enter Contract Information • Finance Section will Enter COST Information and Employee Type • Collect Resource Orders, Contracts, EERA’s, Manifests, etc.
Check-In.. Continued • Other Info… • Travel Arrangements • Home Unit Info • Last Day Off • Days on Previous Fire Assignment • Other Red Card Quals • Work / Rest / Travel Time • Capture Engine Number (not resource E#) • Number of People (corrections to manifest) • Information is important for ICS 209
IAP Module • Used to prepare Incident Action Plan • One IAP for every operational shift • Forms May be reused from shift to shift making only required adjustments • Must identify operational periods • Must create a Master Frequency List • Be sure to Mark Final and Lock the Forms to ensure no additional edits are made. (May be unlocked if necessary)
Creating an IAP • Define Shifts • Create a Master Frequency List • Create Incident Objectives (ICS 202) • Create Org Assignment List (ICS 203) • Create Div Assignment List (ICS 204) (One per division) • Create Comm Plan (ICS 205) • Create Medical Plan (ICS 206) • Create Air Ops (ICS 220) • Attach Map / Weather / Safety Message
ICS 209 (Incident Status Summary) • Must be input daily (if not more often) • Either entered electronically in FAM Web or provided to dispatch (Phone / Fax / Email) • This information is used in the SIT report and planning / prioritizing of resources
TIME Module • Cost Tab in RESOURCES module must be filled out • Employee Type must be set in RESOURCES tab • Enter time worked to create pay documents for employees and contractors • Enter Actual Cost data for incident • Track Work / Rest • Track lost work time • Allows posting of Additions / Deductions
Inputting Personnel Time • Includes single resources, Hand crews, engine crews, aircraft crews • Are they a Government Employee of AD • Crew Rosters allow crew posting • Must have signed CTR’s • Track H pay for regular Gov employees • Track Travel to and from incident
Entering EERA Data • Must have copies of contracts, resource order, inspections • Input on Contractor Tab in resources module • Enter Admin Office for Payment • Enter info on Cost tab of RESOURCES Module
Inputing Equipment TIME • Enter data as per contract • Hourly, Daily, or Guarantee Rate • Includes any Special Rates • Tracks Work / Rest • Must have signed CTR’s • Tracks both tactical and camp support equipment
COST Module • Tracks Incident Cost • Perform Cost Analysis • Information used in the ICS 209 • Management Support • Daily Accruals Sent to ISUITE • Provides Cost Projections
COST Functions • Perform a cost run replace cost estimates with actual cost • Manually replace estimated cost with actual costs • Generate a variety of reports and graphs for planning and documentation • Daily costs are required as part of the finance packet
Performing Nightly Uploads • Required to submit Cost Accrual and Injury data to ISUITE • Database Admin module click Export • Select Export Type, Database, and Incident, Click OK • File is exported to c:\program files\isuite\Data_Export • Either Finance / Repository / or Other
Finalizing Personnel Time • Ensure that all CTR’s are posted correctly • Open a column for travel • Have employee review for accuracy • Print Final and get signatures • Reg Gov Employee gets the original • AD’s get a copy (in most cases) • Staple to CTR’s
Finalizing Equipment Time • Ensure that all shift tickets are posted correctly • Estimate travel time home / or mileage • Add any adjustments • Have contractor review for accuracy • Print Final and obtain signatures • Provide contractor with a copy • Put original with equipment packet
Demob • Develop tentative demob plan daily and notify dispatch • Ensure proper check-out procedures are followed with all sections (Logistics, Finance, Plans) • Track resources for reassignments • Make travel arrangements if necessary • Notify dispatch of departure and eta to next stop
I-Suite Reports • ISUITE has a wide variety of Graphs and reports (Plans, Cost, Demob, Time, Injury Illness) • Is possible to create custom reports using report designer or SQL • Reports can be saved and reused • ISUITE also has a quick stats function to provide real-time information about resources and their status
Injury Illness • Used to track injuries or illnesses that occur on an incident • Information must be uploaded daily • Tracks both lost time and non-lost time injuries • Must provide information to Safety / Medical / COMP / Claims
Closing Out an Incident • Demob all incident resources that are no longer on the incident • Create a new admin user • Do a final manual backup of the database • Burn ISUITE backup file, Admin Username / Password, DB Password, and contents of shared team folder to a CD for final package
Database Repository • In DB Admin Module Click Purge SSN/EIN to remove PII, click yes • Click Create Repository • Select Incident and Click OK • Is this the end of the incident yes / no • File is exported to c:\program files\isuite\export\repository • Upload that file to ISUITE
Cleaning Server • Detach all databases • Close ISUITE • Open c:\program files\isuite folder • Databases folder, delete all databases but ISuiteBlank, ISuiteMSDE.adp and dsn • Delete all files in Backup Folder • Delete all export files in c:\program\files\isuite\Data Export
Cleaning Server.. Continued Delete all files in Finance Delete all files in Other Delete all files in Repository • Delete all files in c:\program files\isuite\data import • Delete or move all files in the shared team folder (Optional) • Check ISUITE website periodically for patches and updates
More Information • Review I-Suite Training Material http://isuite.nwcg.gov • Click ‘Help’ in the I-Suite application • Review I-Suite Userguides and Quick Start guides in the ‘Resources’ folder