Download
1 / 29
290 likes | 374 Views
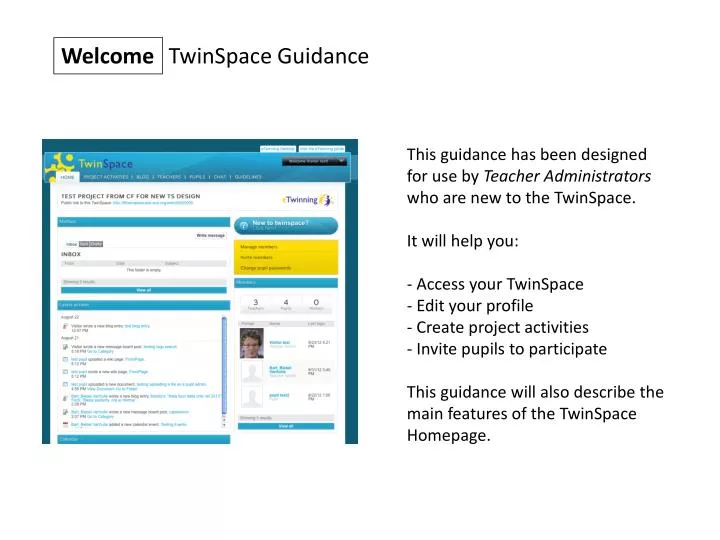
Welcome. TwinSpace Guidance. This guidance has been designed for use by Teacher Administrators who are new to the TwinSpace . It will help you: Access your TwinSpace Edit your profile Create project activities Invite pupils to participate

E N D
Welcome TwinSpace Guidance • This guidance has been designed for use by Teacher Administrators who are new to the TwinSpace. • It will help you: • Access your TwinSpace • Edit your profile • Create project activities • Invite pupils to participate • This guidance will also describe the main features of the TwinSpace Homepage.
Step 1 Sign in Go to www.plus.etwinning.netand click on the Sign in button
Step 2 Access your TwinSpace Once on the Desktop, click on the Projects tab
Step 2 Access your TwinSpace Choose a Project Click on the link to the project TwinSpace
Features on the TwinSpace Homepage Tip: It’s a good idea to use the orientation tabs along the top, if you want to move to different parts of the TwinSpace You can see the name of your TwinSpace You can log out of your TwinSpace or manage your TwinSpace profile by clicking on this button This is a public link to your TwinSpace, if you need it!
Features on the TwinSpace Homepage This is your TwinSpaceInbox, where you can send and receive messages related to your eTwinning project In the Latest Actions box, you can keep track of all activity on the TwinSpace, eg if someone publishes a new blog post or invites a new member This is your TwinSpacecalendar, where you can plan activities throughout the school year Tip: At the start of your project, it’s a good idea to find out when your partner schools will be on holidays. School holidays vary throughout Europe, so your partners may not be available for project work at the times you expect them to be
Features on the TwinSpace Homepage If you have never used a TwinSpace before, then it’s best to click on the New to TwinSpace? button and follow the recommended steps This section allows you to manage members, which includes inviting new TwinSpace members and changing pupils passwords Here you can see how many teachers, pupils and visitors are members of your TwinSpace You can also see TwinSpace members’ names and when they last logged in Tip: Click on the View all button to see a full list of your TwinSpace members
Features on the TwinSpace Homepage You can update your profile, by adding a photo of yourself or writing a text to introduce yourself and/or your class
Features on the TwinSpace Homepage You can also Create ‘Project Activities’ – Project Activities include things like file archives where you can keep your project work and image galleries where you can display any images related to the project
Features on the TwinSpace Homepage And you should, of course, invite others to participate in your project work Tip: The other ‘founder member’ of your project will automatically be a member of your TwinSpace and have administration rights. However, you might want to invite other project members, like pupils, teachers from non-eTwinning countries, parents or other ‘guests’ who are interested in seeing your project work. Please note: If you wish to invite colleagues or teachers from countries involved in eTwinning – they must be invited through the eTwinning Desktop, rather than through the TwinSpace
Step 3 Update your profile Click on the Go button to update your Profile
Step 3 Update your profile Upload a photograph to give your TwinSpace a more ‘personalised’ feel. This can be a photograph of yourself, your school or a famous landmark in your town/city. Write a description of yourself, the class you teach or your interests/hobbies
Step 3 Update your profile You can change your password by clicking on the Edit button Don’t forget to click Submit to make your changes
Step 3 Update your profile You can use your Profile Wall as a communication tool, to update people on your latest activities. You can also post messages on the walls of other members. Click on the Post button, to post a message to your Wall
Step 4 Create Project Activities Click on the Go button to Create “Project Activities”
Step 4 Create Project Activities Tip: This is what the Create Project Activities page looks like. Notice how the Project Activities tab is highlighted. What are Project Activities? Your project can be made up of different types of Activities. For example, it might involve use of digital imagery, a blog or collaborative writing. Project activities pages give you access to the tools you need to do the project, as well as a place to store your project work.
Step 4 Create Project Activities Give your Project Activities page a name – egGetting to know you or Pictures of our town Choose the type of activities you would like to have on each page
Step 4 What are the different activities? The Activity blog is a writing tool, which allows project members to write around a specific theme. The texts can be written by individual pupils or in pair/group work. Once the blog has been posted, it can be read by other project members.
Step 4 What are the different activities? The File archive is a place where you can store any Word documents, Excel sheets, videos or other files related to your project work. The maximum file size is 20MB.
Step 4 What are the different activities? The Forum is a place where you can create topics for discussion, set project tasks or focus on specific topic areas, egMy favourite colour is . . .
Step 4 What are the different activities? The Image Gallery is a place where you can store all of your photos and other digital images related to your project work, eg scanned images of artwork etc. Again, the maximum file size is 20MB.
Step 4 What are the different activities? The Wiki is a tool which is particularly useful for collaborative writing. Like a blog, you can create text which can be shared with project members. Unlike a blog, other project members can also ‘edit’ your text and add their own
Step 4 What are the different activities? The Web content activity allows you to upload content from the web by pasting in the code. For example, you could embed a video from YouTube, eg one created by your local tourist authority – or you could embed an application showing the time, or your local weather
Step 4 Create Project Activities You will know that you have chosen an activity because the activity box will be highlighted in yellow and you will see a green tick sign in the bottom right-hand corner Tip: You can create as many project activities as you like, but you must choose at least one. You will also be able to edit your choices and add/remove activities later To create a Project Activities page, simply click on the Create button
Step 5 Invite members Click on the Go button to Invite members
Step 5 Invite New pupils Type in the pupil’s first name and last name Tip: The Invite new pupils field defaults to 3 names, but you can add more by clicking on the small plus sign directly below the number 3 Click Submit
Step 5 Invite New pupils The system will propose a logon name and password for your pupil. Tip: You can edit the proposed logon name and password – it might be useful to change the password to something that is easier to remember When you are happy with the username and password click Submit
Step 5 Invite New pupils Tip: You can change your pupil’s role on eTwinning by clicking on the drop-down menu – there are two choices TS Pupil and TS Pupil Admin – see the boxed text for more information
Step 5 Invite New pupils Tip: You will receive an email confirmation with your pupils’ log in details – keep this email in a safe place, as you may need it again later. Many teachers also choose to write down the pupil usernames and passwords. You will see a message confirming that you have successfully invited your pupil or pupils to the TwinSpace Click Done to return to your TwinSpace