Download
1 / 49
820 likes | 1.45k Views
Microsoft Word 2013. Microsoft Word is a software application that allows the user to perform word processing and create beautiful and engaging documents

E N D
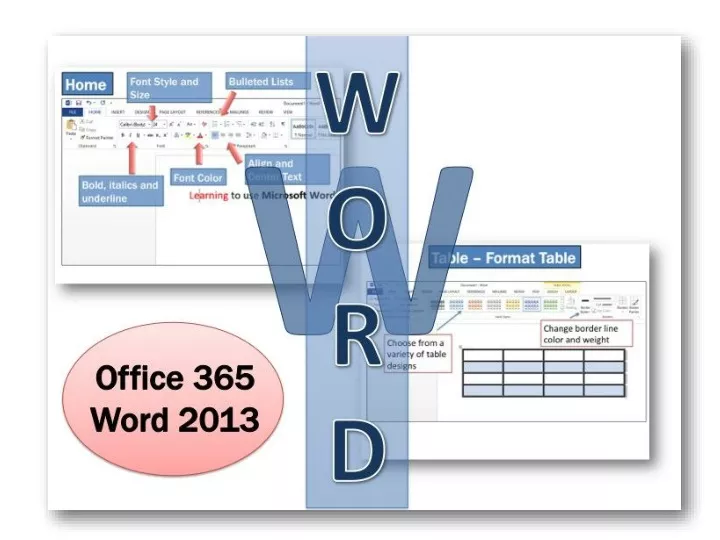
Microsoft Word 2013 • Microsoft Word is a software application that allows the user to perform word processing and create beautiful and engaging documents • This lesson includes instructions along with screen shots and text bubbles to demonstrate how easy it is to create high-quality documents using Microsoft Word 2013 • The following slides show some of the most commonly used features located under the menu bar
Select a Blank Document or choose from a variety of Templates
Home Font Style and Size Bulleted Lists Align and Center Text Font Color Bold, italics and underline
Bulleted Lists Numbered Lists
Insert SmartArt and Charts WordArt Pictures Shapes Header Text Box Table Note: The following slides show more details about Shapes, Tables, Pictures, WordArt, Text Boxes and Headers
Insert - Shapes • A variety of shapes can be inserted onto your document • The shapes can be formatted with many colors and line styles
Insert - Table Steps for creating a Table Select the Table icon Determine the appropriate number of rows and columns Enter your data Format the table with line and background colors
Table – Format Table Change border line color and weight Choose from a variety of table designs
Insert – Pictures – Clip Art • Word has a variety of Clip Art images pre-loaded into the program • Type a word to search through a category for images
Insert - WordArt Designate a WordArt style and color
Insert – Text Box Select from a variety of Built-in Text Box layouts
Insert – Header Adopt a Built-in Header and/or Footer layout
Insert – Video Steps… Select online video Type in a topic to search for a video Choose a video Select Insert
Page Layout Page Size Orientation Margins Note: The following slides explain margins, orientation, page color and page size in more detail
Divide the page into columns Portrait or Landscape for page orientation Page Layout - Orientation
Page Layout – Page Color Select a background color for the document
References Citation Table of Contents Endnote and Footnote
Mailings Labels Select the Vendor and Product Number for Labels and Word will create labels with the proper dimensions for each specific size
Review Thesaurus Check Spelling and Grammar
View • Change the view of your document • Zoom into a specific area to carefully examine smaller text or objects • Zoom out to view the whole document layout
Microsoft Word Activity 1. Create the title BTT Word Processing in 20pt Gill Sans Ultra Bold font at the top of the document 2. Type your first and last name in 14pt Comic Sans font below the title 3. Center and Bold the title and your name 4 Create a table that is 2 Columns and 4 Rows 5. Merge the top row of this table and shade this top row in light grey 6. Enter information and pictures about Google, Computer Crime or Web Design into the cells of this table. (Use the top row as your title) 7. Change the font inside the table to 12pt Corbel 8. Below the table create a subtitle Pause Before You Post 9. Below this title type the following… Before I make a post, I pledge to ask myself: • Who will be able to see what I post? • Will anyone be embarrassed or hurt by it? • Am I proud of what I’m posting? • How would I feel if someone posted it about me? 10. Create bullets for each of the bulleted points above 11. Use spell-check and correct any errors 12. Change the page margins to 1.5” or all the way around (Top, Bottom, Left and Right)
Table in Microsoft Word Note: the next slide includes instructions for creating this table
Instructions for creating theSummer Camp Table Construct a table that is 8 Columns and 10 Rows by selecting Table along the top toolbar and pressing New Table. Type in all the required information into the cells Merge the top title cells and the Canoeing cells. (You do this by selecting the cells that you want to merge and then press the Merge button under the table tab) The title should be Centered, 20pt Franklin Gothic Book All the other information should be in 12pt Arial Font Change the Fill of the appropriate cells to orange Outline the cells in orange
Shapes using Microsoft Word Path –> Insert – Shapes Task: Put together a group of shapes and create an object or picture
Adding an Image to Word 2013 • These screen shots and instructions will show you how to add images to Microsoft Word 2013 documents using the Picture Tool feature • It is difficult to move an image around on a Word document without using the Picture Tool feature • There are a variety of Picture Tool effects including In line with Text, Square, Tight, Top and Bottom, Behind Text, In Front of Text, Edit Wrap Points • This tutorial will demonstrate several of these features • You will then perform an activity to experiment with these features on a document
Picture Tools Steps Copy/Paste the image onto a page in word Click on the image Select Picture Tools Choose Wrap Text Choose your picture tool effect Move the image around on the page to the desired position • The next few slides will demonstrate several picture tool effects…
Picture Tools Behind Text In Front of Text
Picture Tools Tight Top and Bottom
Activity • Copy and Paste the information on the following slide about Google onto a Word Document • Find 3 images by doing a Google image search to add to this document • Add the 3 images to the document using Text Wrap. Note: you may need to reduce the size of the images so that they fit within this document. • Each image should have a different text wrap option
Google • Copy this into a Word document to perform the activity on the previous slide… They chose to name the company ‘Google’ because it sounded cool. Also, the word Google means a very large number (1 followed by 100 zeros). This is appropriate for a website that generates a large number of search results. The Google homepage is extremely clean. The homepage features only the logo and the search box. Unlike other search engines, Google does not have links cluttering its homepage. Back in the early 90s, people testing Google were not familiar with such a clean look. When they would open up the homepage they would wait for all of the links to load. However, no matter how long they waited, the links would not appear. Google AdWords is an online advertising program created by Google. It allows you to advertise to a large range of people to expand your business. You can personalize your ad by choosing where it appears, the cost for the ad, and even the impact of the ad. You are charged every time someone clicks on your ad. Your ad is attached to a keyword, so when someone searches the keyword your ad can appear. Working for Google appears very luxurious, as the company provides the employees with many perks. There is a volleyball game very day at lunch, a workout room and massages. Google wants their employees to spend a lot of time at the company. Therefore the company provides them with free meals, transportation and will even do their laundry. They want their employees to be as comfortable and focused as possible. The Google campus is like a playground. There is so much to do, whether you want to play volleyball or go on a bike ride. It also has a beautiful campus with many bright colors from Google’s logo. Everyone is welcoming and happy. Interns at Google are treated just like everyone else. They are given opportunities to create products and be involved just like any of the regular paid employees. Goggle is a place filled with geniuses, who all respect the ideas of each other, regardless of their title. Instead of “don’t be afraid to fail”, at Google they suggest “don’t be afraid to succeed”. I think this advice is given because even though people can say, “don’t be afraid to fail”, failure will always be peoples biggest fear. When rephrasing the sentence to, “don’t be afraid to succeed”, people imagine success and are more motivated. Also Google’s workplace really stresses on positivity and energy, using motivating words helps to maintain this positive, motivated workplace. Imagination is very important for an employee at Google. This is because everything new in technology is created through imagination. New technology is created by people who are willing to dream. At Google they’re always trying to improve and create new technology. They need staff with strong imaginations that can make their dreams a reality.
Creating a Resume In Word 2013
Resume Steps Click on New Scroll down through the options to Resume Click on it to open Select Create
Resume • Edit this resume template with your own information… • Type your name at the top of the page • Put your address, telephone and email • Fill in your Objective, Education, Skills and Experience
Resume Example