Download
1 / 16
160 likes | 164 Views
Learn how to safely enter the roadway, perform traffic checks, and master parking techniques including angle, perpendicular, and parallel parking.

E N D
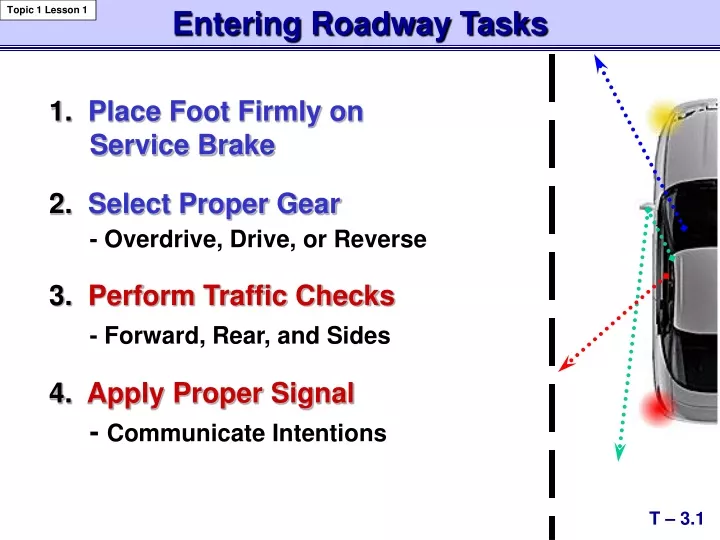
Entering Roadway Tasks Topic 1 Lesson 1 1. Place Foot Firmly on Service Brake 2. Select Proper Gear - Overdrive, Drive, or Reverse 3. Perform Traffic Checks - Forward, Rear, and Sides 4. Apply Proper Signal - Communicate Intentions T – 3.1
Entering Roadway Tasks Topic 1 Lesson 1 • Release Parking Brake • Select Gap in Traffic Flow • Move to Lane - Target Lane Position #1 - Release Service Brake - Accelerate Gradually - Steer to Center of Lane 3 feet Lane Position #1 CENTER OF LANE 3 feet T – 3.2
Topic 1 Lesson 2 Moving to Curb/Side of Road • Traffic ChecksFront/Rear/Sides • Proper Signal • Target Ahead • Check Visual Reference • - for 6” from Curb • Side Mirror and/or Blind Area Check T – 3.3
Topic 1 Lesson 2 Moving to Curb/Side of Road • Adjust Speed Using Controlled Braking • Use Gradual Steering • Make Adjustments to Align Visual Reference Points • Re-check Traffic • Cancel Signal Indicator T – 3.4
Topic 1 Lesson 3 Backing • Proper Seating and Hand Positions • Adjust Restraints if Necessary • Check Traffic to Front, Sides and Rear • Place Foot on the Brake • Shift to Reverse Backing T – 3.5
Backing Topic 1 Lesson 3 • Signal if Backing Right or Left • Release Parking Brake • Readjust Seat Position • Right Side/Left Side • Straight (Right Side) • Visually Target Position • Maintain Reference Points Backing T – 3.6
Backing Topic 1 Lesson 3 • Control Rear Movement Gradually Release Brake Pressure • Move as Slowly as Possible • Accelerate Gradually • Cover the Brake when Needed • Steer in the Direction You Want to Go Using Reference Points to Establish Position Backing T – 3.7
Topic 3 Lesson 1 Turning at Intersections Target • Right Turn • Approach to Intersection • Communication • Target Areas • Path of Travel • Line of Sight • Speed Adjustment • Lane Position • Turning Reference Point • Courtesy Considerations T – 4.18
Topic 3 Lesson 1 Turning at Intersections • Left Turn • Approach to Intersection • Communication • Target Areas • Path of Travel • Line of Sight • Speed Adjustment • Lane Position • Turning Reference Point • Courtesy Considerations T – 4.19
Turning Around Topic 4 Lesson 1 Two-Point Turns • Reference Points • Speed Control • Lane Position • Courtesy Considerations • Approach • Communication • Target Areas • Path of Travel • Line of Sight 1 Back into driveway on right side 2 • Check traffic flow. • Signal and position the vehicle 2-3 feet from curb. • Drive beyond the driveway and stop. • Shift to Reverse, monitor intended path of travel. • Back slowly, turning steering wheel rapidly to the right as you enter driveway. • Straighten wheels, centering car in driveway and stop with the wheels straight. • Signal left and exit driveway when the way is clear. 3 T – 4.24
Turning Around Topic 4 Lesson 1 Two-Point Turns • Approach • Communication • Target Areas • Path of Travel • Line of Sight • Reference Points • Speed Control • Lane Position • Courtesy Considerations 1 Pull into driveway on left side • Check traffic flow. • Signal and position your vehicle 3-6 inches from center yellow line. • When traffic is clear, pull into the driveway and stop. • Shift to Reverse, monitor intended path. • Back slowly, turning steering wheel rapidly to the right as you exit driveway. • Straighten wheels, centering car in proper lane. • Shift into Drive. Check traffic and accelerate to normal speed. 2 3 T – 4.25
Turning Around Topic 4 Lesson 1 Three-point Turn 2 4 1 3 5 • References • Speed Control • Lane Position • Courtesy Considerations • Approach • Communication • Target Areas • Path of Travel • Line of Sight NOTE: The safest way to change direction is to drive around the block! T – 4.26
Angle Parking Topic 5 Lesson 1 Parking at a 30 Degree Angle to the Curb • Signal intention and position vehicle 3-5 feet from the space in which the vehicle is to be parked. • Move forward until the steering wheel is aligned with the first pavement line. • Visually target the middle of the parking space and turn the wheel sharply at a slow, controlled speed. • Steer toward the target in the center of the space to straighten the wheels and stop when the front bumper is 3-6 inches from the curb. T – 4.27
Perpendicular Parking Topic 5 Lesson 1 Parking at a 90 Degree Angle to the Curb • Signal intention and position the vehicle 5 – 6 feet away from the space. • Move forward until the driver’s body is aligned with the first pavement line. • Visually target the center of the parking space and turn the wheel rapidly while controlling speed. • Steer towards the target and straighten the wheels. • Position the front bumper 3 – 6 inches from the curb. T – 4.28
Parallel Parking Topic 5 Lesson 1 Parking Parallel to the Curb • Select a space that is at least five feet longer than your vehicle. Flash your brake lights and put on your turn signal as you approach the space. • Monitor the traffic to the rear. • Place your vehicle 2 – 3 feet from the vehicle you want to park behind with back bumpers even. • Put your vehicle in Reverse. Back slowly and turn the steering wheel sharply. • Stop when your steering wheel is aligned with the back bumper of the front vehicle. • Continue backing slowly while steering sharply in the opposite direction. Use quick glances to the front and rear. • Center the vehicle in the space. Wheels should be 6 – 12 inches from the curb. T – 4.29
Topic 5 Lesson 1 Hill Parking When parking on a hill, you need to take special precautions to ensure your vehicle will not roll into the street and into traffic. UpHill - Curb Down Hill UpHill + Curb • Approach • Communication • Target Areas • Path of Travel • Line of Sight • Speed Adjustment • Lane Position • Reference Points • Courtesy Considerations T – 4.30