Download
1 / 14
140 likes | 148 Views
Preparation for Activity One: Soil Flotation. Overview.

E N D
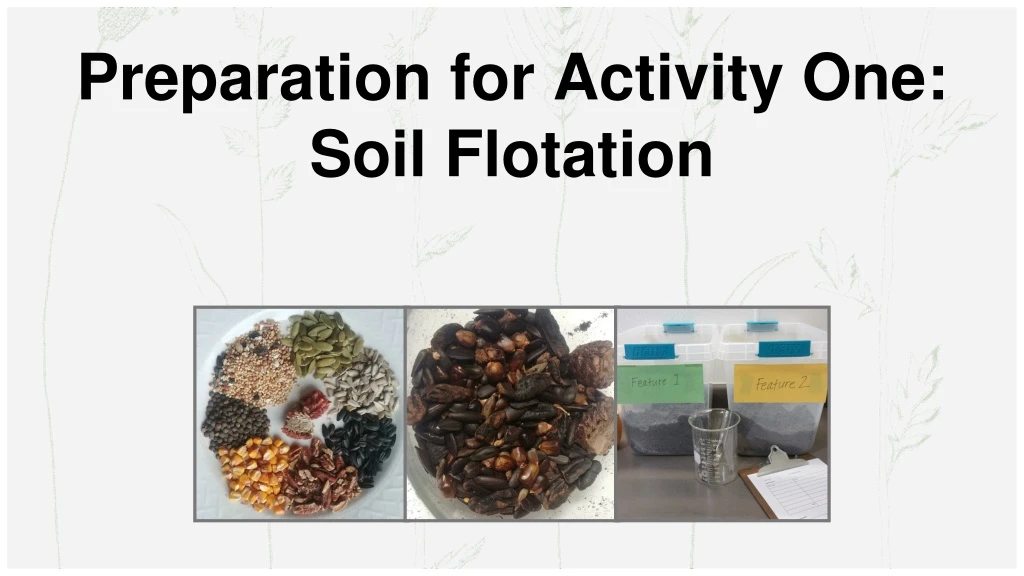
Preparation for Activity One: Soil Flotation
Overview In this activity, you will simulate authentic archaeological flotation procedures in your classroom using common household materials and pantry items. This activity involves advance preparation. These instructions detail the materials needed for one classroom (20 students) and how to prepare your seeds and other plant remains for the procedure, create your feature soil, and set up your classroom or learning space.
Plants you could include: Materials Per Class • 2-4 cups of seeds/nuts/grains, at least 5 different varieties (explained on pg. 5) • Soil • Access to running water • Outdoor space for dumping wastewater or 5-gallon (or larger) buckets or totes for dumping waste water • 3-5 plastic mesh kitchen colanders for the class to share • Optional: smocks, lab coats, or old shirts that can get wet or dirty • Optional: Serving spoons or spatulas Soil: You can use compost, but topsoil is preferable because it has fewer organics that will float and obscure the seeds. Sand filters too easily and doesn’t challenge the students. Aim for a minimum of one liter per pair of students or more for larger data sets.
Tools Needed for Each Pair of Students • Measuring container that holds at least one liter in volume • A 1 to 3 gallon bucket or wash basin for floating the samples • Fine mesh net, sieve, or strainer, such as a fish net or fine mesh kitchen sieve (must be finer than kitchen colander) • A drying tray (cookie sheet, cafeteria tray, or similar) lined with newspaper or paper towels
Preparing the Plant Remains For a small class of students, you will want at least two cups of nuts, seeds, and/or grains and at least five different varieties. More seeds create a larger data set and more discovery during analysis, but large amounts also take the students more time to sort. Remember, you don’t have to use plants that were typically found in the past. This is an exercise in analyzing data to make inferences about diet. Use things you have around the house or that are familiar to your students to make comparing the data to real archaeological data more interesting. Plants you could include: • Quinoa • Pumpkin seeds • Coffee beans • Fruit seeds • Rice • Shelled nuts • Nut shells • Dried corn kernels or cobs • Dried beans or lentils • Bird seed mix (note the seed types that are included) • Sunflower seeds (hulled or in the shell) • Tree nuts like acorns or black walnuts collected from outside
Preparing the Plant Remains Step 1 Set aside raw/uncharred samples of your plant remains in one or more sets of clear containers or plastic baggies for your “comparative collection.” Your students will use this comparative collection to help identify the remains they find after flotation.
Preparing the Plant Remains Step 2 To char seeds: Char your plant remains. Some plants will not typically float, even if charred. These include nut shells, beans, and kinds of rice. It is fine to include these in your soil matrix, as some may be found in the light fraction, but many will end up in the heavy fraction. This provides a good opportunity to discuss what student would or wouldn’t know if they only used one technique to collect one type of sample. • Preheat your oven to 400 degrees. • Wrap each plant type in aluminum foil, with 3-4 layers or folds for protection • Place on a baking tray on a middle rack for 45 minutes It will smell burned, but no smoke should be produced with this method.
Preparing the Feature Soil Divide your soil into a minimum of three separate totes or buckets, and label them Feature 1, Feature 2, Feature 3, etc. Use more soil and create more features for bigger sets of comparative data. For a class of 20 students, one 0.75 cubic foot bag of topsoil will provide just over 20 liters of soil, allowing for two one-liter samples per pair of students. In reality, archaeological features come in a wide range of sizes and do not ever have the same amount of soil. For simplicity, divide your soil equally. One bag of topsoil will easily make three features.
Classroom or Learning Area Set-up Outdoors: This activity is easily done outside if a water source is available. Designate an area for students to perform their flotation and soil screening directly onto the ground, but give each pair adequate space and mind drainage issues. Students must transport their light and heavy fraction back to the classroom to dry, so trays or cookie sheets are recommended. Both: • The light and heavy fraction samples will need to dry on the trays for a few days, so designate a space where several trays can sit undisturbed. • Whether outside or inside, you will need to determine where you can put the waste soil that is left over after screening for the heavy fraction sample. Indoors: Unless your classroom sink has a silt trap, do not perform the flotation over a drain. Know where you can discard muddy water and soil refuse. Have students perform flotation and soil screening over 5-gallon buckets or large totes as wastewater catch basins. Have students empty the wastewater as needed throughout the process (it gets heavy) in an appropriate place.
“Recipe” Ideas Being intentional about the plant remains you include in each feature will provide a richer set of data for comparing and contrasting and making inferences about the feature function; however, you can also simply mix your seeds and soil in one big container and explore the random patterns that result. Here are some “recipes” ideas to help you create your features. Note: Your plant remains can be reused! After the students sort them during analysis, collect them for future use.
“Recipe” Ideas A seasonal storage pit or cache: Before cupboards and pantries, storage or cache pits were dug into the ground. Storing food helped fortify families and villages through long winters. Storage pits would typically have a higher quantityof a low varietyof plant types. If you’re storing food, you would have the whole nut or seed, not broken shells. Make it seasonal! Include autumn harvest foods such as nuts, beans, pumpkin seeds, or those found in an inexpensive bird seed mix such as sunflower seeds, corn kernels, and millet.
“Recipe” Ideas Trash Pit or Midden: Trash pits are a mash-up of anything and everything. Sometimes pits were dug for trash, but often old fire pits, storage pits, or post holes were turned into trash pits. Trash pits have a very diverse rangeof plant types. A midden is essentially a pile of trash. Over time, these can also become buried underground. Trash includes the inedible parts of plants, like nut shells, corn cobs, and fruit seeds. It could also include food that is too burned to eat. If trash includes a lot of fruit seeds and pits, it indicates the time of year those fruits are ripe and eaten. If there are a mix of seasonal foods, it could indicate that the trash pit or midden was used throughout the year.
“Recipe” Ideas Husking, shelling, or food processing pit: A processing station could be interpreted as a trash pit but with a high quantityof the inedible parts of a single type or low varietyof plants like nut shells, acorn tops, and corn cobs. Often, foods were processed in a separate area or away from the village or camp, then transported home before cooking or storage.
“Recipe” Ideas Hearth or cooking fire pit: What plant combinations could students identify as a meal? Archaeologists typically find inedible plant parts, but sometimes food can spill and catch fire or leftovers get thrown in the hot coals. Maybe it was a cake filled with nuts and fruit, a stew or chili with corn and beans, or even ingredients from a piece of pizza!