Download
1 / 12
120 likes | 227 Views
Dreamweaver – Merging, Coloring, Fonts. Now it’s time to fill your page with some more interesting stuff The first thing we have to do is to move our links to other pages into out table. This is easy – first we select the links we want to move

E N D
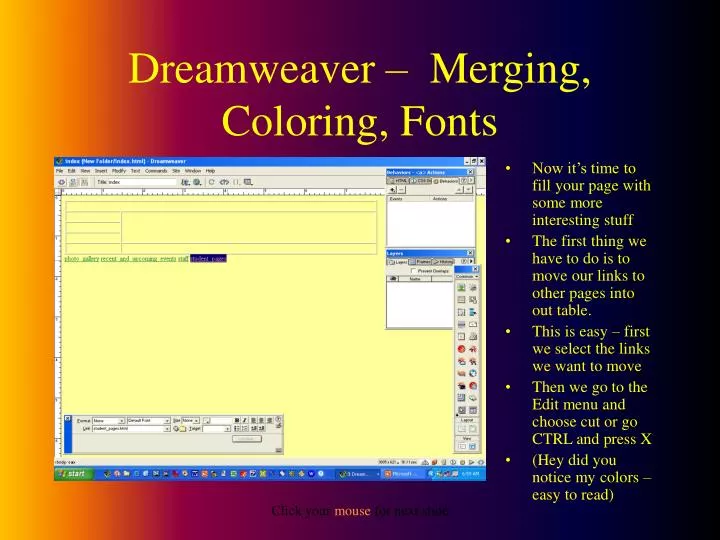
Dreamweaver – Merging, Coloring, Fonts • Now it’s time to fill your page with some more interesting stuff • The first thing we have to do is to move our links to other pages into out table. • This is easy – first we select the links we want to move • Then we go to the Edit menu and choose cut or go CTRL and press X • (Hey did you notice my colors – easy to read) Click your mouse for next slide
Dreamweaver – Merging, Coloring, Fonts • Next we choose the cell we want to put the link in and click once in it • Now either go to the Edit menu and choose Paste or go Ctrl and press V • Then we do the same with the rest of the links • Notice how the cell expanded to fit the largest link “recent and upcoming events” Click your mouse for next slide
Dreamweaver – Merging, Coloring, Fonts • You can control the overall size of the table on your screen and you can control the size of a cell • First lets establish the size of the table • To do this we have to select the table • Place your cursor on an outside wall of the table until you get the double line cursor • Then click once and you should see handles appearing on the outside walls of the table Click your mouse for next slide
Dreamweaver – Merging, Coloring, Fonts • Now look in the Property Inspector because here’s where you can make many changes. • If you don’t see a Property Inspector go to the Windows menu and choose Properties or go Ctrl + F3 • In the inspector you can Name your table (no spaces please) • You can choose a background color as I have • You can add a row as I have just by changing the number next to the rows column Click your mouse for next slide
Dreamweaver – Merging, Coloring, Fonts • Finally, you can control the size of your table • I have entered 95% for the height and the width. • This means the table will occupy 95% of the screen height and width • Make sure you enter a % sign or your table will only occupy 95 pixels which are the tiny dots your screen uses to present the image. Click your mouse for next slide
Dreamweaver – Merging, Coloring, Fonts • Now make some adjustments • Change the letters in your links so that they are capitalized • Use the Spell Checker available under the Text window and the Spell Checker choice (or go Shift +F7) Click your mouse for next slide
Dreamweaver – Merging, Coloring, Fonts • One final adjustment, I added a row to our table and Dreamweaver added a copy of the previous row • The problem is I need to make one big window in the middle and I only need one window along the bottom not two • I need to merge the big window and the wide sell just underneath it • So drag across both cells you want to merge Click your mouse for next slide
Dreamweaver – Merging, Coloring, Fonts • Now click on the little merge cell icon in the Property Inspector • On my screen it’s in the lower left hand corner of the Inspector window Click your mouse for next slide
Dreamweaver – Merging, Coloring, Fonts • There the cells are merged. • When you add cells it is easy to merge them in this way • You can also split cells by using the icon right next to this one Click your mouse for next slide
Dreamweaver – Merging, Coloring, Fonts • Now let’s change the font • Select the link you want to change • Go to the Property Inspector and drop the list of styles down • These are styles or fonts that are generally displayed well on web pages • They are fairly bland stuff because if you choose some funky font that you like but that isn’t installed on your viewers computer, it will default to Times New Roman anyway • So I chose the Verdana, Arial, Helvetica and I’ll get funky later. Click your mouse for next slide
Dreamweaver – Merging, Coloring, Fonts • Finish changing all the fonts by dragging down over all the cells on the left hand side • Then drop the list down by clicking on the down arrow • Choose the Verdana, Arial, Helvetica style • Now they are all changed • SAVE YOUR WORK Click your mouse for next slide
Super Giant Big Fun Assignment • Open up your index page • Move your links in and make any necessary changes in the capitalization • Use the Spell Checker to get rid of errors • Change the size of your table to 95% height and width • Change the background color and the font to something you are happy with on the style list • Add a row of cells and merge the big one with your main window • Save your work and proudly display to FST so he can TICK YOU OFF. Click your mouse for next slide