Download
1 / 25
461 likes | 1.18k Views
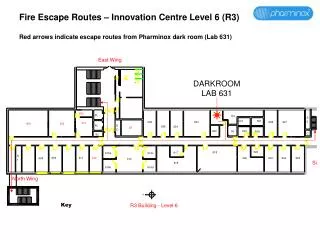
Darkroom:. A light-tight room containing the equipment to develop photographs. Revolving Door:. The revolving door allows you to access the darkroom without letting light in. Amber Safelight:.

E N D
Darkroom: A light-tight room containing the equipment to develop photographs.
Revolving Door: The revolving door allows you to access the darkroom without letting light in.
Amber Safelight: Printing papers are sensitive to light so photographers use a safelight, which is a low-watt bulb covered with an amber colored filter.
Enlarger: Literally makes enlargements – photographs that are larger than your negative.
Enlarger components: The Head: An adjustable mechanism houses the negative carrier and the enlarging lens which projects the negative image onto the printing paper. The head moves up and down along a rail that attaches to the baseboard. Baseboard: A flat board, that is attached to the enlarger head, and sits on a table or counter.
Negative carrier: The device that holds a strip of film negatives flat and in place within the enlarger head.
Negative: When the natural lights and darks of an image are reversed. Photogram by Caroline Cogan, 2011
Positive: An image in which the lights and darks appear as they do in nature.
Film Negative: When you take a picture, the part of the film that receives light will turn black whereas the dark areas in the photograph will block the light leaving the film clear. When you use your film in the darkroom, the film will correct the values and create a positive because the light will shine through the clear areas turning them back to a dark value.
Filter Pack: Filter packs contain filters ranging from 1-5 with .5 increments. For ex: 1, 1.5, 2, 2.5, etc. If you have taken a properly exposed photograph you will use a 2.5 filter. If you need more contrast you will use filters 3-5. If you need less contrast you would use 1-2.
Printing Paper: Consists of a shiny light sensitive emulsion coating on top of a base (support material). We will be using RC paper but some photographers use a fiber based paper. RC papers gained their name because they have a coating on each side of the paper.
Surface: Papers come with different paper types such as glossy, matte, semi-matte, satin, and pearl.
Easel: The easel goes under the enlarger and holds your paper in place. The easel can also be adjusted so that you can alter the photograph’s size. If you must turn on the enlarger light, place you paper in the paper safe: A light tight box that’s holds and allows easy access to unexposed printing paper.
Developer: Forms the image, turning exposed film into negatives or the blank paper into a photograph. It does so by reacting with the film’s/paper’s emulsion’s light-sensitive crystals and coverting them to black, metallic silver. The areas that the most exposure to the light turn the darkest, whereas areas exposed less to light will be lighter.
Stop Bath: The picture continues to develop until it is neutralized by the stop bath. The stop bath STOPS the developing process.
Fixer: The fixer clears away the paper’s unexposed and underdeveloped silver, allowing you to view the photograph in the light. Without adequate fixer, the paper will darken when the leftover silver is exposed to light.
Agitation: Gently rocking of the tray or tank to expose the entire paper or film evenly to the chemical.
Wash: The wash consists of water and is used to wash off any remaining chemicals including the fixer. The paper must be left in the wash for the entire time or the paper will slowly be affected by light over time.
Print Squeegee: The print squeegee removes the excess water from the photograph.
Print Dryer: The print dryer dries the photographic paper. Only whole sheets may go through the dryer and you must be careful with necklaces, scarves, hair, etc. which may be sucked into it.
Tones: Grays, black, and whites Tonal Range: The variety of tones from light to dark that make up an image. A strong photograph will have a wide tonal range from white-white to black-black.
Contrast: The difference between the dark and lights in a photograph. A photograph with extreme lights and darks would have strong contrast, however, a photograph should ALWAYS have middle tones even if their proportion is minimal compared to the lights and darks.
Print Dryer: You can dry prints by with a print dryer or by air drying. Using a print dryer will yield the fastest results, however, you must have thoroughly washed your photograph so that it is free of chemicals before using the dryer.
Print Squegee: A flat rubber blade or roller for squeezing excess water from a washed print for faster drying. The squeegee must be free of chemicals!
Emulsion: The light sensitive coating on photographic paper which has silver halide crystals that react to light.