Download
1 / 20
200 likes | 204 Views
Learn how to view the instructors' presentation on positioning and signals. Understand the safest positions to adopt when riding on the road and how to use signals effectively.

E N D
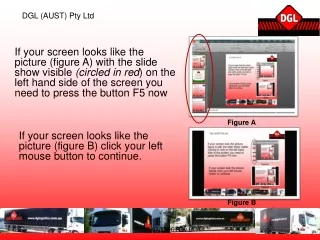
How to View the Instructors’ Presentation Each slide will animate when you press the LEFT mouse button. After all animations have taken place, you will see an arrow symbol at the bottom right hand corner of the screen. Press the LEFT mouse button to continue to the next slide. The arrow symbol looks like this: - If at any time you wish to end the presentation, press the Esc (Escape) key at the top left of the keyboard, then click on the X symbol at the top right of the screen to exit.
Click the left mouse button to move through the slides from now on. You are about to view the presentation element covering the skill areas of: - Positioning & Signals
Positioning & Signals The safest position to adopt when riding on the road should take into consideration actual or potential dangers. NEARSIDErisks from emerging vehicles, parked vehicles, cyclists & pedestrians. OFFSIDE risks from oncoming vehicles & traffic crossing from the offside. This zone is the safest area, as it gives clearance to pedestrians and other hazards. Alter your position depending on the hazards you encounter.
Positioning & Signals 1 The Nearside Position Early views on right hand bends Nearside views past large vehicles Extra space for oncoming vehicles Best position for left turns where there are no other hazards 2 The Central Position Good margins of safety on both sides Easy to change position 3 The Offside Position Early views on left hand bends Increased safety from nearside hazards Best position for right turns Any of the positions should be sacrificed for safety 1 2 3
Positioning & Signals When you have hazards such as parked cars on the nearside of the road, don’t ride close to them. Your view will be reduced - you can barely see the child about to run out from between the cars in this picture. Also, you don’t have much space to take avoiding action.
Positioning & Signals By adopting a position towards the crown of the road you can give yourself a better view of hazards on the nearside. It gives you more time to react, with a larger zone of safety around your bike due to you having more space to take avoiding action.
Positioning & Signals The position you adopt when following other vehicles is vital to your safety. It will govern how early you can appreciate hazards and how soon other road users and pedestrians will see you. Don’t place yourself in danger by following too close to the vehicle in front.
Positioning & Signals By following so close to the large vehicle in front, the rider puts himself at risk as this position restricts the amount of view of hazards ahead. (Shown inside the shaded area).
Positioning & Signals This rider is in a safer position by being further back from the lorry, as it enables a superior view of hazards to be obtained giving the rider time to react. 20 to 30 yards separation can give two to three hundred yards view along either side.
Positioning & Signals When turning left, do not firstly ride close to the near-side kerb and then swing out wide (known as ‘swan necking’). Drivers approaching may not be expecting this manoeuvre.
Positioning & Signals The Highway Code advises that 2 vehicles turning at crossroads against each other should pass offside to offside. This gives a better view of oncoming hazards.
Positioning & Signals If traffic conditions or other factors make it impractical to turn offside to offside, you should instead pass nearside to nearside. Your view of oncoming traffic will be obstructed. USE CAUTION.
Positioning & Signals When parked, leave yourself enough room to be able to pull out easily from behind the vehicle in front for greater convenience.
Positioning & Signals The signals available to you as a rider are: - Indicators Horn Hazard Lights (if fitted) Brakelight Headlight Arm Signals Courtesy Signals Give your signals in good time and make them clear. Use them when it will aid other road users and pedestrians.
Positioning & Signals The yellow car has just pulled out of the side turning and is indicating left. Is it indicating because it has just emerged from a junction? OR... Does the driver intend on taking the next left turn? OR... Does the driver intend on parking behind the car just beyond the junction? Make sure your signals cannot be mistaken. Be careful how you interpret the signals being given by others.