Download
1 / 61
610 likes | 780 Views
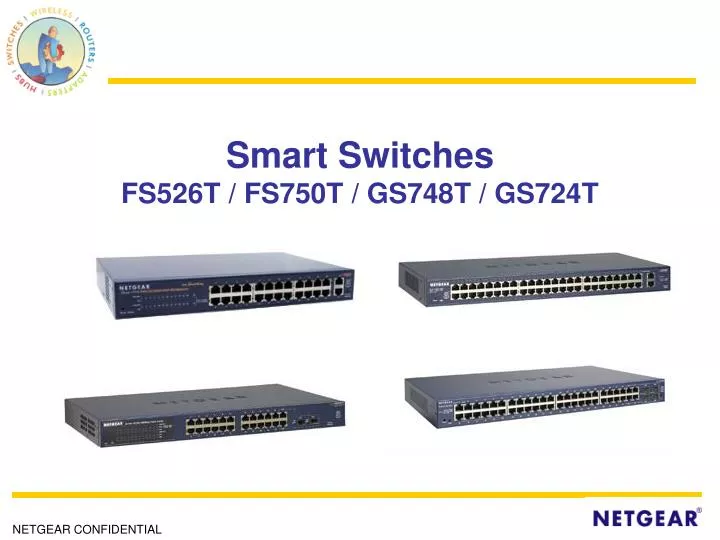
Smart Switches FS526T / FS750T / GS748T / GS724T. Features. Key management features without complexity of SNMP systems. Smart switch management features: Traffic monitoring for network planning. Port configuration. Trunking for higher bandwidth. Prioritization of packets for better flows.

E N D
Features • Key management features without complexity of SNMP systems. • Smart switch management features: • Traffic monitoring for network planning. • Port configuration. • Trunking for higher bandwidth. • Prioritization of packets for better flows. • VLANs to segregate and manage traffic. • At cost of unmanaged switch.
Applications (1) • Simple, daisy-chain network • Gigabit backbone • Light management FVL328 Server Server
Application (2) • Powerful, star-configuration network • Gigabit Core • Light management GS724T FVL328 Servers
Application (3) • Powerful, star-configuration network • Gigabit Core • Full L2 or L3 management GSM7224 or GSM7324 FVL328 Servers
Managed Switches Positioning • Best- Layer 3 managed • GSM7324, GSM7312, FSM7326P • Best control, security • Better- Layer 2 Fully managed • FSM726, FSM726S, FSM750S, GSM7224 • Better control, security, graphics • Good- Smart Switches • FS526T, FS750T, GS724T, GS748T • Basic control, security
FSM700s vs Smart Switches Additional capabilities the FSM products offer (why they cost so much more): Management Features: • 802.1x port-based security • RADIUS authentication • Spanning Tree Protocol • Port Mirroring • Interface Options: • Telnet • better charts, statistics • Management Features: • SNMP, RMON • DiffServ (L3 traffic prioritization) • LACP support (trunking protocol) • More VLAN's (64 vs. 24) • Interface Options: • Command Line Interface • Command Menu Interface • Physical Options: • Fiber capability on all switches • Built-in stacking (FSM726S, FSM750S)
Selling Tactics • Sell as an unmanaged switch with extra • Will be priced to fight with unmanaged products • Features there ‘just in case’ • Competition does not have them! • FS526T & FS750T • Sell on the low cost for gigabit ports • Slight premium over pure 10/100 products • GS724T • Position against GS524T • Pay a little more to get a lot more
Package Contents – FS526T • Smart switch. • Installation guide. • Smart switch resource CD. • Power cord. • Rack mount kit. • Warranty card. • Support information card.
Reset button To restart the switch without resetting the configurations
Factory Default Button Reset the switch to its factory default setting
Installing GBIC Module – GS724T 2 SFP GBIC slots for fiber connectivity options
Installing GBIC Module – GS748T 4 SFP GBIC slots for fiber connectivity options
Smart Wizard Discovery - Installation 1. Insert the resource CD into your CD ROM drive and the CD main page will load. 2. Click Install. Follow the instruction when prompted. 3. Click OK when done.
Smart Wizard Discovery - Discover Click on the Discover button, all the smart switches present will be display.
Smart Wizard Discovery - Configure Highlight the smart switch you want to configure, click on the Configuration Setting button, the configuration setting dialog box will be display. Enter IP address, subnet mask, gateway, system name, location and the switch’s password. Disable DHCP if switch will be assigned static IP or enable DHCP if switch will be assigned dynamic IP by the DHCP server. Factory default password is “password”.
Smart Wizard Discovery – Password Change Highlight the smart switch you want to change password, click on the Password change button, the Password Change dialog box will be display. Enter the new password twice and the current password. Click Set. Factory default password is “password”.
Smart Wizard Discovery – Firmware Upgrade Highlight the smart switch you want to upgrade firmware, click on the Firmware Upgrade button, the Firmware Upgrade dialog box will be displayed. Choose the new firmware file from the Browse window. Enter the switch’s password. Click Apply. Click Start Upgrade. Factory default password is “password”.
Smart Wizard Discovery – Web Access • To access the web admin interface: • Double click the switch in the Device List panel. • Highlight the device and click the Web Access button. • Start the web browser and enter the switch’s IP address as URL.
VLAN – Port Based FS750T * VLAN cannot across port group