Download
1 / 1

E N D
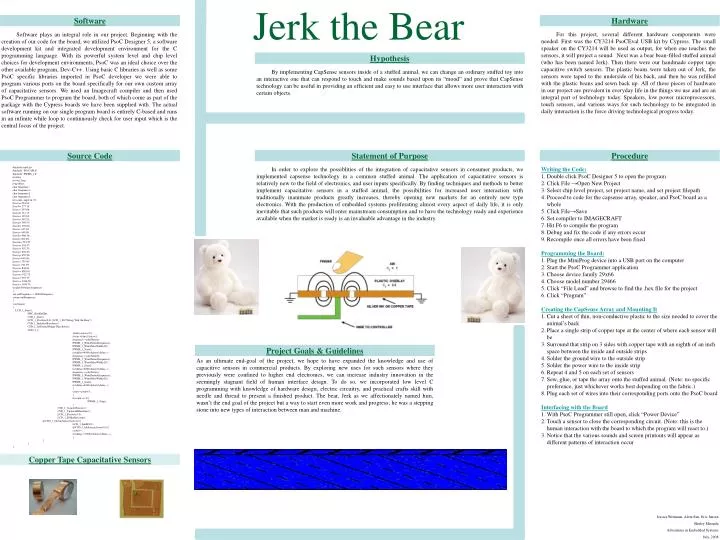
Hardware Software Jerk the Bear For this project, several different hardware components were needed. First was the CY3214 PsoCEval USB kit by Cypress. The small speaker on the CY3214 will be used as output, for when one touches the sensors, it will project a sound. Next was a bear bean-filled stuffed animal (who has been named Jerk). Then there were our handmade copper tape capacitive switch sensors. The plastic beans were taken out of Jerk, the sensors were taped to the underside of his back, and then he was refilled with the plastic beans and sewn back up. All of these pieces of hardware in our project are prevalent in everyday life in the things we use and are an integral part of technology today. Speakers, low power microprocessors, touch sensors, and various ways for such technology to be integrated in daily interaction is the force driving technological progress today. Software plays an integral role in our project. Beginning with the creation of our code for the board, we utilized PsoC Designer 5, a software development kit and integrated development environment for the C programming language. With its powerful system level and chip level choices for development environments, PsoC was an ideal choice over the other available program, Dev-C++. Using basic C libraries as well as some PsoC specific libraries imported in PsoC developer we were able to program various ports on the board specifically for our own custom array of capacitative sensors. We used an Imagecraft compiler and then used PsoC Programmer to program the board, both of which come as part of the package with the Cypress boards we have been supplied with. The actual software running on our single program board is entirely C-based and runs in an infinite while loop to continuously check for user input which is the central focus of the project. Hypothesis By implementing CapSense sensors inside of a stuffed animal, we can change an ordinary stuffed toy into an interactive one that can respond to touch and make sounds based upon its “mood” and prove that CapSense technology can be useful in providing an efficient and easy to use interface that allows more user interaction with certain objects. Source Code Statement of Purpose Procedure #include <m8c.h> #include "PSoCAPI.h" #include "PWM8_1.h" int freq; int out_freq; long delay; char frequency; char frequency1; char frequency2; char frequency3; int count, anger,in =0; float a= 261.63; float b= 277.18; float c= 293.66; float d= 311.13; float e= 329.63; float f= 349.23; float g= 369.99; float h= 392.00; float i= 415.30; float j= 440.00; float k= 466.16; float l= 493.88; float m= 523.25; float n= 554.37; float o= 587.33; float p= 622.25; float q= 659.26; float r= 698.46; float s= 739.99; float t= 783.99; float u= 830.61; float v= 880.00; float w= 932.33; float x= 987.77; float y= 1046.50; float z= 1108.73; int playNote(int frequency) { int outFrequency = 34000/frequency; return outFrequency; } void main() { LCD_1_Start(); M8C_EnableGInt; CSD_1_Start(); LCD_1_Position(0,0); LCD_1_PrCString("Jerk the Bear"); CSD_1_InitializeBaselines() ; CSD_1_SetDefaultFingerThresholds(); while (1){ while(count==5){ for(in =0;in<10;in++){ frequency = playNote(a); PWM8_1_WritePeriod(frequency); PWM8_1_WritePulseWidth(20); PWM8_1_Start(); for(delay=4000;delay>0;delay--); frequency = playNote(b); PWM8_1_WritePeriod(frequency); PWM8_1_WritePulseWidth(20); PWM8_1_Start(); for(delay=4000;delay>0;delay--); frequency = playNote(c); PWM8_1_WritePeriod(frequency); PWM8_1_WritePulseWidth(20); PWM8_1_Start(); for(delay=4000;delay>0;delay--); } count =count+5; } if(count == 8){ PWM8_1_Stop(); } CSD_1_ScanAllSensors(); CSD_1_UpdateAllBaselines(); LCD_1_Position(1,0); LCD_1_PrHexInt(count); if(CSD_1_bIsAnySensorActive()){ LCD_1_InitBG(0); if(CSD_1_bIsSensorActive(10)){ count++; for(delay =70000;delay>0;delay--); } } } } In order to explore the possiblities of the integration of capacitative sensors in consumer products, we implemented capsense technology in a common stuffed animal. The application of capacitative sensors is relatively new to the field of electronics, and user inputs specifically. By finding techniques and methods to better implement capacitative sensors in a stuffed animal, the possibilities for increased user interaction with traditionally inanimate products greatly increases, thereby opening new markets for an entirely new type electronics. With the production of embedded systems proliferating almost every aspect of daily life, it is only inevitable that such products will enter mainstream consumption and to have the technology ready and experience available when the market is ready is an invaluable advantage in the industry. • Writing the Code: • Double click PsoC Designer 5 to open the program • Click File →Open New Project • Select chip level project, set project name, and set project filepath • Proceed to code for the capsense array, speaker, and PsoC board as a whole • Click File→Save • Set compiler to IMAGECRAFT • Hit F6 to compile the program • Debug and fix the code if any errors occur • Recompile once all errors have been fixed • Programming the Board: • Plug the MiniProg device into a USB port on the computer • Start the PsoC Programmer application • Choose device family 29x66 • Choose model number 29466 • Click “File Load” and browse to find the .hex file for the project • Click “Program” • Creating the CapSense Array and Mounting It • Cut a sheet of thin, non-conductive plastic to the size needed to cover the animal’s back • Place a single strip of copper tape at the center of where each sensor will be • Surround that strip on 3 sides with copper tape with an eighth of an inch space between the inside and outside strips • Solder the ground wire to the outside strip • Solder the power wire to the inside strip • Repeat 4 and 5 on each set of sensors • Sew, glue, or tape the array onto the stuffed animal. (Note: no specific preference, just whichever works best depending on the fabric.) • Plug each set of wires into their corresponding ports onto the PsoC board • Interfacing with the Board • With PsoC Programmer still open, click “Power Device” • Touch a sensor to close the corresponding circuit. (Note: this is the human interaction with the board to which the program will react to.) • Notice that the various sounds and screen printouts will appear as different patterns of interaction occur Project Goals & Guidelines As an ultimate end-goal of the project, we hope to have expanded the knowledge and use of capacitive sensors in commercial products. By exploring new uses for such sensors where they previously were confined to higher end electronics, we can increase industry innovation in the seemingly stagnant field of human interface design. To do so, we incorporated low level C programming with knowledge of hardware design, electric circuitry, and practical crafts skill with needle and thread to present a finished product. The bear, Jerk as we affectionately named him, wasn’t the end goal of the project but a way to start even more work and progress; he was a stepping stone into new types of interaction between man and machine. Copper Tape Capacitative Sensors Jessica Weinman, Alvin Sun, Eric Jensen Shirley Miranda Adventures in Embedded Systems July, 2008