Download
1 / 41
410 likes | 425 Views
Learn how to run a team wrestling tournament using www.trackwrestling.com. Follow the event live online and enjoy the benefits of this online program.

E N D
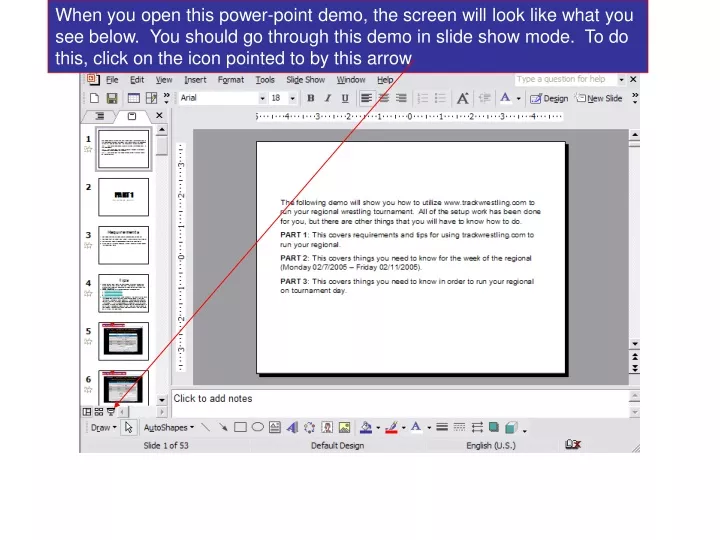
When you open this power-point demo, the screen will look like what you see below. You should go through this demo in slide show mode. To do this, click on the icon pointed to by this arrow
The following slide show is a demo of how to utilize www.trackwrestling.com to run a team wrestling tournament.The program is an online program so wrestlers, coaches, fans, and media can follow the event live online as it progresses. There are many benefits to using the program to run a tournament and you will see them after you go through this demo. PART 1: This covers requirements and tips for using trackwrestling.com to run your tournament. PART 2: This covers things you need to know how to do about 1-2 weeks before your tournament. PART 3: This covers things you need to know in order to run your tournament on tournament day. NOTE: MINOR CHANGES HAVE BEEN MADE TO THE PROGRAM THAT MAY NOT BE REFLECTED IN THIS DEMO. IF YOU CAN’T MAKE THE CONNECTION BETWEEN THIS DEMO AND THE PROGRAM AS YOU SEE IT, JUST LET ME KNOW AND I WILL HELP YOU.
PART 1 REQUIREMENTS AND TIPS
Requirements • You need a person that knows how to use a computer relatively well. • This computer needs to be connected to the internet and a printer. • Make sure that the person who will be running the computer goes through this power-point demo.
Tips • The recommended platform is a PC running Internet Explorer. Some views may be distorted if you are using a different platform. If you decide to use a different platform, thoroughly test everything on that platform before the tournament day. • If you can, go through this demo on a computer that is next to another computer, that way you can try things out as you follow along. • When printing things, always set your margins as small as possible and make sure you select the right orientation. (For example: when printing brackets, you should print landscape, but when printing bout sheets you should print portrait). • There are 4 servers that are used to operate trackwrestling.com • 1. http://www.trackwrestling.com • 2. http://www.trackwrestling1.com • 3. http://www.trackwrestling2.com • 4. http://www.trackwrestling3.com • 3. http://www.trackwrestling.com is used for viewers. This separates the server that people look at results on, from the servers you will use to run your tournament. Therefore if a million people hit trackwrestling.com and crash it, you will still be able to run your tournament because you will be working on trackwrestling 1, 2, or 3. When you login as an ‘Administrator’, the system automatically forwards you to one of these servers, but you can go directly to any of them if you need to. Please visit all of these sites before the day of your tournament, so you make sure you know how to do this. The next 4 slides illustrate what I am talking about.
This is http://www.trackwrestling1.com http://www.trackwrestling1.com
This is http://www.trackwrestling2.com http://www.trackwrestling2.com
This is http://www.trackwrestling3.com http://www.trackwrestling3.com Notice that they are all the same, the only difference is that only people that are running tournaments can login to 1, 2, or 3.
PART 2 1-2 WEEKS BEFORE TOURNAMENT
Find the tournament in the tournament list and click on it. The tournament name will appear here. Select ‘Administrator’ as your user type and then enter your username and password before clicking on the [Enter Tournament] button.
When you first login, you will see a screen like the one you see below. The buttons to the left are your navigational buttons. Whenever you want to do something, you will usually start by clicking on one of those buttons. The first thing you should do when you login to the tournament is set your tournament deadlines. To set the deadlines, click on the ‘DEADLINES’ button in the left menu. The deadlines are explained on the page so I will skip showing you that page in this demo. 4 Team Round Robin Now select the bracket type you would like to use from the select box. The next thing to do is enter the teams that will participate in your tournament. To do this, click on the ‘TEAMS’ button in the left menu. The first thing I will show you is how to select the bracket you will use in the tournament. To do this, click on the ‘BRACKET TYPE’ button in the left menu. Enter the default dimensions you would like to use for your bracket and click on the ‘Save Dimensions’ button.
After clicking on ‘TEAMS’ you will see a screen like what you see below. To add teams, click on the ‘Add Team’ button, fill out the form that pops up with the team information, and click on the ‘Add’ button.
You can add weight classes to your tournament in the same manner we just added teams by clicking on the ‘WEIGHT CLASSES’ button. When you are finished adding teams, the screen will look something like what you see below. Notice one of the teams has (Home Page) listed after the team name. If teams have a home page, you can associate the link with the team when you add them so fans can click on “Home Page” and go to the teams home page from this site. The next thing I will show you is what is under the ‘PARTICIPANTS’ button. Also notice “Seeding Info” is not filled out for any of the teams. This is because seeding information is entered by the coaches when they login and enter their teams lineup and other information. You will see it as soon as the coaches enter it. We will come back to this screen when it is time to create the bracket.
When you first click on “PARTICIPANTS’ you will see a screen like what you see below. As an ‘Administrator’, the first thing you should do on this screen is click on the ‘Fill Weight Classes’ button. This will add a wrestler to every weight class for every team.
One other thing worth pointing out right now is: You have control over the name of an extra field for each participant. You can make this field whatever you would like, but most people just call it Extra Info (meaning extra wrestler information). If you would like to change the name of the field, change the name in the text box and click on the ‘SAVE’ button. The ‘TEAM SCORING’ button will show you a screen that allows you to say how many points each win type is worth. Ex: Pins are 6 points, Tech Falls are 5, … When the operation is finished, the screen will look like this. Notice the wrestlers names are all “Unknown”. This is because that information will be entered by coaches when they login and enter their lineups. The next thing I will address is what is under the ‘TIE BREAKING’ button.
The screen below is what you will see when you click on the ‘TIE BREAKING’ button. This screen will allow you to setup how you will break ties when teams have the same record in a round robin. Click on the ‘Dual Meets’ link to determine how you would like to break ties for individual dual meets if the score at the end of the dual is tied. Use the ‘move up’ and ‘move down’ links along with the ‘Save Order’ button to set the order of priority among the criteria. Check the boxes next to the criteria you would like to use and un-check the boxes next to the criteria you would not like to use. The next thing to do is setup the rounds for your tournament. To do this, click on the ‘ROUNDS’ button.
When you click on the ‘ROUNDS’ button you will see a screen like what you see below. To add a round to your tournament, click on the ‘Add Round’ button. Then click on the ‘Add’ button. Enter the name of the round you would like to add. Enter the bouts you would like to wrestle in the round you just added. Note: you can open the bracket to look at bout numbers by clicking on the ‘View Bracket’ button at the top. Select the number of bouts you would like to print per sheet of paper when printing bouts for the dual meets in the round you just added. Note: The bouts that you print will be for individual matches within a dual meet.
Use the ‘move up’ and ‘move down’ links along with the ‘Save Order’ button to put the rounds in the order you will wrestle them. When you are finished adding the rounds to your tournament the screen will look something like this. The next thing to do is click on the ‘MATS’ link in the left menu.
The screen below is where you will add the mats in your tournament and assign which bouts you are going to wrestle on those mats. To add a mat, click on the ‘Add Mat’ button. Select the mat number Enter the bouts you will wrestle on the mat selected. You only have to enter something into the ‘Prelim Bout String’ box if you have prelims (rattails) in your tournament. Note: Use the ‘View Bracket’ button to see the bout numbers on the bracket Click on the ‘Add’ button.
When you have finished adding the mats to your tournament you will see a screen like what you see below. Use the ‘move up’ and ‘move down’ links along with the ‘Save Order’ button to put the mats in order if they are not already. The next thing to do is setup teams to be able to login and enter their lineups and other team information. To do this, click on the ‘USERS’ button.
The screen you see below is where you will setup team representatives (Statisticians) to enter their teams lineup and other information. The first thing you should do as an ‘Administrator’ is click on the red ‘Statistician Operations’ menu. Select ‘Add Team Statisticians’ and the program will add a statistician to every team.
After adding a statistician to every team, the screen will look like what you see below. The next thing to do is enter the name and email address for each teams contact person. To do this, click on the current name for the team, fill out the form with the correct information, and save it. You can use the ‘Search Email Archive’ operation to find email addresses for team contacts that you don’t currently know.
Choose ‘Send Notification Emails’ in the ‘Statistician Operations’ menu to send an email to each team giving them all the information they need to enter their teams lineups and other team information. If you need to mail or fax the information to someone, you can print off a hard copy of the information packet by choosing the ‘Print Notification Letters’ operation. When you finish entering the names and email addresses, the screen will look like what you see above. Notice the names and email addresses are now listed. Statisticians can now login and enter the lineups and other information for their teams. You should monitor which teams are entering information so if someone is not, you can contact them right away. You can easily do this by clicking on the ‘PRINT DOCUMENTS’ button and selecting ‘Team Detail’. In the next part of this demo, I will show you the statistician process so you know what that is, and then return to running the tournament.
Statisticians go to www.trackwrestling.com Find the tournament in the tournament list, click on it, and it will show up here. Select ‘Statistician’ as the user type, enter their username and password, and click on the ‘Login’ button.
Statisticians will first see a screen like what you see below. When they click on the team they would like to edit, they will be brought to the following screen. Note: Teams are only allowed to change information about themselves, so if they click on the wrong team, they will not be able to make changes.
The screen below is where teams can manipulate their lineups and seeding information. You can use the ‘Add Team Member’ button to add a new wrestler to the roster. For Example: If you have 2 103 pounders you will have to add the second one. You can click on the name of a wrestler to edit that wrestlers information. Enter the teams seeding information into the corresponding text box Cedar Falls is 22-0 this season and they were last years state champions. Click on the ‘Save Seed Information’ button.
When you are finished entering your teams information, the screen will look something like what you see below. Notice there are two wrestlers at 103 and 125. The starter is listed on top, and you can use the ‘move up’ and ‘move down’ links along with the ‘Save Order’ button to change starters if you would like Teams can also use the ‘MEDIA CONTACTS’ button to associate themselves with email addresses for local media that will get the results after the tournament completes. That is all there is to the statistician process. As you can see, it is a very straightforward process that allows you to get the correct information in an efficient manner. I will now return to running the tournament.
PART 3 TOURNAMENT DAY
Use the ‘Delete Unknowns’ button to delete all wrestlers who’s name is still unknown after the statisticians have all entered their lineups. Use the ‘Search’ button to find wrestlers you are looking for. There are some other useful operations to point out that are located under the ‘PARTICIPANTS’ button. Use the check boxes along with the delete selected button to delete multiple wrestlers at once. You can click on the name of a wrestler to edit information about that wrestler (name, team,…) Now I will show you some useful documents located under the ‘PRINT DOCUMENTS’ button.
You can get a list of what each team has entered as lineups and seeding information by clicking on the ‘Team Detail’ link. You can get a wrestler list by weight class from the ‘Weight Class Detail’ link. Using that information and your knowledge of the teams, you can now seed the tournament and build the bracket. To do this, click on the ‘TEAMS’ button in the left menu. The next thing you probably want to do is make use of some of the documents provided for you under the ‘PRINT DOCUMENTS’ button.
This is the screen you will use to seed the teams and build the bracket. As you can see, the seeding information for teams has been entered by the statisticians. After building the bracket, you can see the bracket and print if off by clicking on the ‘BRACKET’ button. When you are satisfied with the seeds, click on the ‘Build Bracket’ button and the bracket will be built. Use this select box to determine the number of teams you will seed, and the rest will be randomly drawn in. The seeds and where on the bracket those seeds will go is listed here. Use the ‘move up’ and ‘move down’ links to place teams in order of seed with the number 1 seed on the top. I will now show you some more of the useful things under ‘PRINT DOCUMENTS’.
Once the tournament is running, you will spend most of your time working under the ‘WORKER WIZARD’ button. You can print off a tournament program for fans which includes the bracket, the teams lineups, and the seeding information for each team. You can print off a Weigh-In Sheet for referees by team or by weight class. You can print off bout sheets for the tables so they can record the winners of matches in duals and bring them back to the head table to be entered. You can print off a tournament schedule for coaches and fans so everyone knows where and when the matches will be taking place. You can print off the lineups for teams in each dual so table workers can verify who is wrestling in the match and hang numbers above the tables so fans know who is wrestling by looking at their program. You may also come back to this screen during your tournament to print off a Tournament Update for coaches and/or fans. The update includes the updated bracket along with the detailed results by match of all the duals that have been completed.
The screen below is what you will see when you click on the ‘WORKER WIZARD’ button. It is used to enter the results of dual meets. Notice the dual has some bouts entered, but is not yet completed. You can easily select the dual you are working on using the select box here. You should also utilize what is under the ‘Schedule’ link. To enter the result of a match, click on the weight class you are going to enter a result for and enter the result using a self explanatory interface. You can make adjustments for things like un-sportsman-like conduct using the ‘Adjust Team Points’ button. Details about the dual meets are listed at the bottom.
The screen you see below is what the screen will look like after you click on the ‘Schedule’ link. This screen will allow you to keep track of where your tournament is at and allow you to print bouts and lineups for the duals. Click on the ‘Duals’ link to go back to the dual meet result entry screen. You can also print lineups for duals from this screen using the ‘Print Lineups’ button. The duals will be crossed off when they have been completed. You can print the bouts for an entire round by clicking on the name of the round. You can use the check boxes to indicate which duals you have printed bouts for and which ones you have not. You can print bouts for an individual dual meet by clicking on the dual meet itself. NOTE: Whenever you print bouts or lineups, you will first be prompted with a parameters screen asking you what bouts or lineups you would like to print. For example: You may want to print all the bouts for ‘Round 1 (10:00)’ or just the bouts for ‘Bout 1: CF vs EM’. The same goes for printing lineups. I say this so you are not confused when you are prompted with those parameter screens.
The screen will look like what you see below when a dual meet is completed. You can also easily view the bracket from this page by clicking on the ‘Bracket’ link. Notice you can print bouts and lineups from this screen as well.
You can go back to the dual meet entry screen simply by clicking on the bout number for the dual meet you want to go back to.
You can view the results for your tournament by looking under the ‘RESULT SUMMARIES’ button. When the tournament completes, the last thing to do as an ‘Administrator’ is to send the results to the media for all the teams. To do this, simply click on the ‘MEDIA CONTACTS’ button in the left menu and then click on the ‘Email Media Updates’ button.
This is a sample of the ‘Weight Class Results’ You will find similar results for teams under the ‘Team Results’ link. You can view all kinds of tournament stats like ‘most pins least time’ under the ‘STATS’ button.
If you would like to utilize this service to run a wrestling tournament, please send email to justin@trackwrestling.com with your contact information and I will set you up.