Download
1 / 31
330 likes | 368 Views
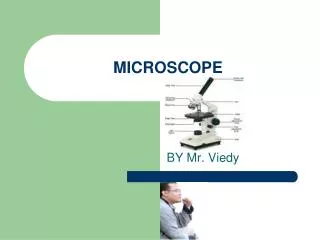
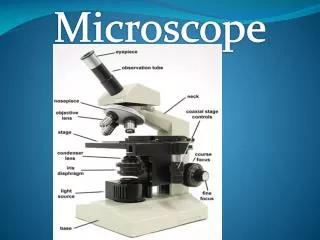
Microscope. Microscope Parts. Eyepiece. Body Tube. Arm. Stage. Revolving Nosepiece. Objective Lens. Coarse Focus. Fine Focus. Stage Clips. Diaphragm. Light. Base. Microscope Notes. The kind of microscope we use at Pearl High school is the Compound Light Microscope.

E N D
Microscope Parts
Eyepiece Body Tube Arm Stage
Revolving Nosepiece Objective Lens Coarse Focus Fine Focus
Stage Clips Diaphragm Light Base
Microscope Notes
The kind of microscope we use at Pearl High school is the Compound Light Microscope.
This type of microscope can view cell organelles but it can not view DNA.
Proper use of the microscope: • Always carry microscope with one hand on the arm and the other hand on the base.
Microscopes should be covered when stored away to prevent dust from ruining them.
When preparing a slide, always put the cover slip on at a 45 degree angle.
If there are air bubbles, gently tap cover slip with a pencil eraser.
The purpose of the cover slip is to prevent the lens from touching whatever you are viewing.
Any object viewed under a microscope will appear upside down and backwards.
The objective contains the magnification powers of the microscope. They are attached to the nosepiece which revolves so you can go from low to high power easily.
To determine magnification of the microscope, multiply the objective times the ocular.
10 power 40 power Magnification =?
You will get the widest field of view with the least magnification.
The diaphragm adjust the amount of light that enters the microscope.
Directions for use: • Carry the microscope properly. • Place the microscope on a flat surface with arm facing you.
Place a slide on the stage and hold it firmly in place by the stage clips. • Look through the ocular and adjust the diaphragm so that light comes through the opening in the stage.
Always focus first with the coarse adjustment (the bigger knob) and the low power objective lens. • Once the object is in focus, turn the nosepiece until high power is in place.
Then use only the fine adjustment (smaller knob) to focus your object. • Store microscope covered with finished.
The next slide demonstrates how NOT to handle the microscope.