Download

1 / 40
400 likes | 402 Views
ProSAM. Objectives. Signing On and Setting Preferences Learn basic navigation in ProSAM Toolbar Memoranda Document Tracking Initial Contact, Financial Advising, Financial Advising Complete Quick Tips. Signing on to ProSAM. Select Helping Students Click on Open ProSAM.

E N D
Objectives • Signing On and Setting Preferences • Learn basic navigation in ProSAM • Toolbar • Memoranda • Document Tracking • Initial Contact, Financial Advising, Financial Advising Complete • Quick Tips
Signing on to ProSAM • Select Helping Students • Click on Open ProSAM Once the dialog box appears, select Open.
User Set Up Once you log in, it is important to set up your “User Preferences” prior to using the system. Go to the top menu bar and click on: • Tools • Options The following window will display…
User Setup Explicit Save requires you to save your data every time as ProSAM will not prompt you or remind you to save. Auto Save will automatically save changes when you change from one student to the next, or, when you change screens within ProSAM.
User Setup Browse will immediately open the browse screen when ProSAM is accessed. Open Student will immediately bring up the open student screen when ProSAM is accessed.
User Setup Retrieve Online Task Document allows ProSAM to send reports back to the user when a job script is done. For example, selecting this option would allow the user to view an ISIR output after selecting the proper toolbar icon.
User Setup Screen Timeout controls the amount of time ProSAM will wait before it times out. Best practices is to set it at 60 minutes. Size and Position controls how the ProSAM screen is presented on your screen. Always keep it checked.
Navigation Tool Bar Finger Tip Section Navigation Tree Area
Finger Tip Section Name ID is the D number ID 2 Social Security Number Institution D – DeVry K – Keller C- Chamberlain Alert – would be a stethoscope if there were an issue Privacy This would let us know if there were a FERPA on file – but we would not know for whom
Navigation Tree Area The GREEN symbol represents the function you are currently using. It says “You are here!” The YELLOW symbol represents groupings of functions. These groupings can be expanded or minimized. It says “There’s more to see here!” The RED symbol represents functions that can be accessed. It says “You can click here!” These groupings can be expanded with the+or collapsed with the -symbol. *Look at Handout
Student Tab • Expand Campus Tools. • The Student area is divided into 6 sections. • Select Browse to look up a student by last name. • Click on the first letter of the student’s last name. • Enter a portion of the student’s last name. • Double click the highlighted row to select the student.
Toolbar This toolbar is similar a Windows toolbar. Items not needed are grayed out.
Open a Student • Click on this icon to look up a student record by entering the identifier. Identifier = D# or SSN
Cancel Task • Click on this icon to cancel the date that you have recently updated and saved in ProSAM • You can also cancel by using Ctrl + C at any time during the processing.
New Click on this icon to add a new record to the Financial Aid database. This will be used for adding records other than new students: • Adding new memos • Adding information for a PLUS/private loan
Delete Task Click on this icon to delete a record from the Financial Aid database, such as removing a specific memo from a student’s record.
Send Email This icon is NOT used. All student email communication must be sent via Salesforce.
Calculate EFC A student record must be open in order to use this icon. • Select the “Scales of Justice” icon. • A box will appear. Select Student Aid Report. • A Word document will generate. The first page will be blank. • You can print the ISIR from the Word document.
Diagnostics A student record must be open to use this icon. • Click on the diagnostics icon to determine what information or documentation is needed to complete the student’s financial aid process. This is a great tool!
Memoranda Campus Tools -> Student -> Memoranda
Memoranda • Browse is a summary view of every posted memo • Editor displays memoranda text • Summary displays memo specifics
Memoranda • To create a new memo, select the New icon from the toolbar. • Key Date will default to today’s date. • Aid Year defaults to the current year. • The users DSI will populate in the Originator field. • Fill in the application data fields: • Memoranda Type – select the correct type from the dropdown • Description – write a brief description (i.e. Official Transcripts) • Reference Number – can enter associated RN ticket number; not required
Memo Types • Standard - Award adjustments, Transcript evaluation etc. This will be the main type used by an SSA • B-BAY Info – Typically will be an automated ProSAM note regarding BBAY adjustments for awards • Prim Ident - Regarding students DSI, SSN, demographic • Name Ident - Comments regarding student name • Letter Sent - Emails or paper mail sent to students • Hold Codes – Information regarding F holds (ie: put on or taken off) • Verification – If applicable, the Verification team may make notes regarding a student’s account
Tips • A memo can be deleted or overwritten by other notes • Start from the top/down when writing a memo • Standard Identification Signature = Date (XX/XX/XX), First initial and Last name, Location Example : (02/21/2011, KFedele, CMC- Student Finance)
Add to an existing memo… • Highlight and double click the applicable Memo Type. • Add the Standard ID signature and message. • To view all messages select *** on the drop down box.
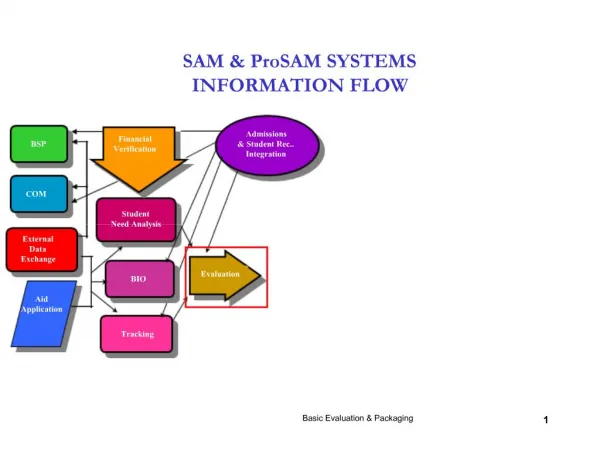
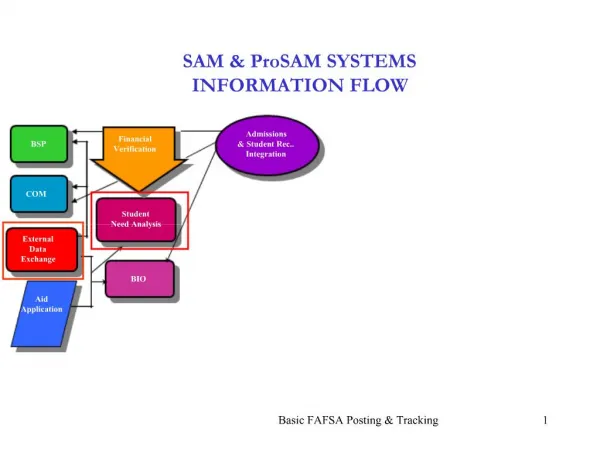
Document Tracking Financial Aid -> Aid Application -> Document Tracking
Displays the student’s track. A list of current documents on file for this track will display here The date of the status displays here The status of the document will display here i.e. Processed Displays number of total documents
The Documents Tab displays the student assigned track along with the documents required for that specific track. Requireddocument / Has not been received Required document / Has been received *Status and received date would also display Incomplete File / Has not been received Complete File / Has been received *Status and received date would also display
Packaging • Under Packaging you can see what the student can receive in financial aid
Packaging – Award Package • Following information found in Packaging Award Package tab • Student’s total COA • EFC • Broken down between student and parent contribution • Grade Level • Dependency Status • Current Financial Aid • Financial Aid that has paid
Packaging – Term Breakdown • To move to term breakdown screen • Click on the loan/grant • Click on term breakdown tab • Following information found in Packaging Term Breakdown Tab • Fund ID • Amount offered • Amount paid • Minus fees • BBAY terms
Packaging – Enroll Data • To move to term enroll data screen • Click on the loan/grant • Click on enroll data tab • From Term breakdown tab, you can click enroll data right away • Following information found in Packaging Enroll Data tab • Fund ID • Begin/End Date of Fund ID • Planned Enrollment • Identifies student’s BBAY terms • Packaged Enrollment • Must match Actual Enrollment for aid to disburse
What does the student see? • You are able to view the requested documents in the same manner that the student can view them. • Log into your staff portal at http://my.devry.edu
Staff Portal Select “Helping Students”
Staff Portal • Type in the student’s DSI number • Select the award year you wish to view • Select Search
Document Tracking: Application Status 2 important dates to look at: • This tab displays information from the student’s admission application as well as from the student’s FAFSA • The Status Dates area houses information that is queried for reporting
Quick Tips • F1 function: roll over of definitions and explanations • Auto Save: Under “User Preferences” to save your work automatically • Copy and paste function can be used in Memoranda for “New” memos only and not for saved or existing memos.
Questions – Please contact the Student Finance Training Team