Download
1 / 93
960 likes | 1.37k Views
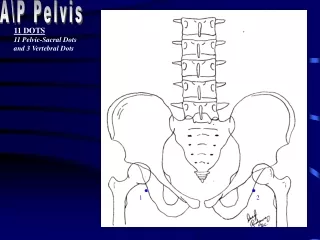
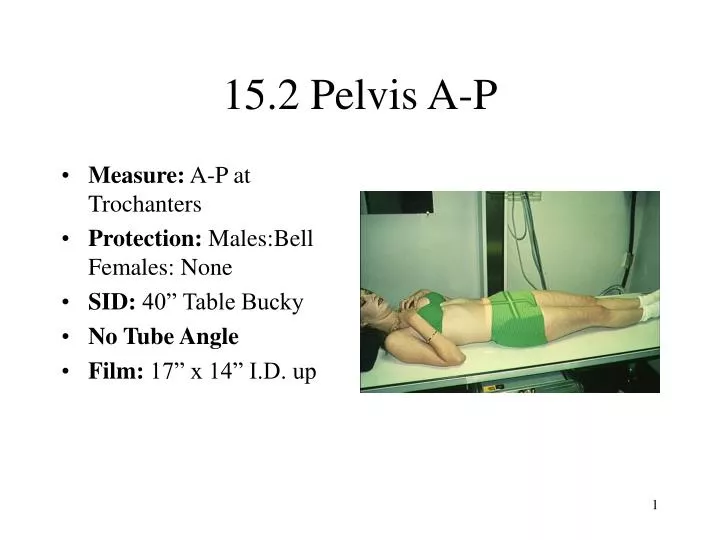
15.2 Pelvis A-P. Measure: A-P at Trochanters Protection: Males:Bell Females: None SID: 40” Table Bucky No Tube Angle Film: 17” x 14” I.D. up. Pelvis A-P. The Vertical CR is used to center the table and lock wheel locks. Males: place belt for bell at level of ASIS.

E N D
15.2 Pelvis A-P • Measure: A-P at Trochanters • Protection: Males:Bell Females: None • SID: 40” Table Bucky • No Tube Angle • Film: 17” x 14” I.D. up
Pelvis A-P • The Vertical CR is used to center the table and lock wheel locks. • Males: place belt for bell at level of ASIS. • Patient lies supine on the table. • Heels and Toes are together or heels may be apart with toes together.
Pelvis A-P • Horizontal CR: 1” to 1.5” superior to Symphysis pubis • Vertical CR: mid-sagittal • Film centered to horizontal CR. • Collimation: slightly less than film size. • Breathing Instructions: Full expiration
Pelvis A-P Film • The pelvis should be centered on film. • Rotation should be avoided. • Both femurs will be in true A-P position if feet were properly positioned.
15.3 Pelvis Bilateral Frog leg Lateral • Measure: A-P at Trochanters • Protection: Males:Bell Females: None • SID: 40” Table Bucky • No Tube Angle • Film: 17” x 14” I.D. up
Pelvis Frog Leg Lateral • The Vertical CR is used to center the table and lock wheel locks. • Males: place belt for bell at level of ASIS. • Patient lies supine on the table. • Patient places heels together with knees bent.
Pelvis Frog Leg Lateral • The patient then externally rotates legs as far as possible. • A sponge may be used under the affected side to improve comfort. • Watch the placement of the bell on male patients as it is prone to be too high on this view.
Pelvis Frog Leg Lateral • Horizontal CR: 1 1/2” superior to symphysis pubis • Vertical CR: mid-sagittal • Film centered to horizontal CR. • Collimation: slightly less than film size. • Breathing Instructions: Full expiration
Pelvis Frog Leg Lateral Film • The pelvis should be centered on film. • Rotation should be avoided. Note rotation on this film. • Both femurs will be in a lateral oblique position. • Note that bell is too high and blocks view of symphysis.
15.4 Hip Unilateral A-P • Measure: A-P at trochanters • Protection: Bell: males: Females: None • SID: 40” Bucky or Table Bucky • No tube angle • Film: 10” x 12 I.D. up
Hip Unilateral A-P • This view may be taken erect or supine. • For supine view, center and lock table to vertical CR. • Place belt for bell on patient at level of the ASIS. • Patient stands or lies facing the tube.
Hip Unilateral A-P • The leg is internally rotated about 15 degrees to get lower leg in A-P position. • Males: place bell below symphysis pubis • Horizontal CR: 1 1/2” superior to symphysis pubis.
Hip Unilateral A-P • Center film to horizontal CR • Vertical CR: 2” to 3” lateral to mid-sagittal or through the acetabulum. • Collimation top to bottom: iliac crest to lesser trochanter • Collimation: symphysis to soft tissue of hip
Hip Unilateral A-P • Check that leg in in true A-P position and bell on male patient is not too high. • Breathing Instructions: Full Expiration • Make exposure and let patient relax
Hip Unilateral A-P Film • Must include symphysis pubis and iliac crest. • There should be no rotation. • Upper femur must be in true A-P position. • Adjacent soft tissues should be seen
15.5 Hip Frog Leg Lateral • Measure: A-P at trochanters • Protection: Bell: males: Females: None • SID: 40” Bucky or Table Bucky • No tube angle • Film: 10” x 12 I.D. up
Hip Lateral • This view may be taken erect or supine. • For supine view, center and lock table to vertical CR. • Place belt for bell on patient at level of the ASIS. • Patient stands or lies facing the tube.
Hip Lateral • The knee is bent and leg externally rotated until the femur is parallel to film. The pelvis may be rotated if necessary. • Males: place bell below symphysis pubis • Horizontal CR: 1 1/2” superior to symphysis pubis.
Hip Lateral • For erect views, the patient bends knee and rests foot on rung of stool or chair with femur parallel to film. • The film is centered to horizontal CR. • Vertical CR: 2” to 3” lateral to symphysis or through the acetabulum.
Hip Unilateral A-P • Make sure bell is below symphysis and not over acetabulum. • Collimation top to bottom: iliac crest to lesser trochanter • Collimation: symphysis to soft tissue of hip • Breathing Instructions: Full Expiration
Hip Lateral Film • Must include symphysis pubis and iliac crest. • There should be no rotation. • Upper femur must be in true lateral position. • Adjacent soft tissues should be seen
15.6 Femur A-P • Measure: A-P at mid thigh • Protection: Bell: males; Male or Female: Apron over pelvis • SID: 40” Bucky • No Tube angle • Film: 7” x 17” I.D. Up or 14” x 17” I.D. Up for large muscular femur
Femur A-P • Table locked and centered to Vertical CR. • Patient lies recumbent on table with femur internally rotated 15 degrees or until the condyles are parallel to film. • The bottom of the film is placed 2” below femur condyles.
Femur A-P • Horizontal CR: centered to the film. • Vertical CR: long axis of the femur • Collimation Side to side: soft tissues of femur or slightly less than film size. If soft tissue will not fit on the 7” x 17” use a 14” x 17” and collimate
Femur A-P • Collimation top to bottom: from knee joint to trochanters. Most adults will require an A-P hip to complete view. • Breathing Instructions: remain still • Make exposure and let patient relax
Femur A-P Film • Must include joint space to determine rotation. • Soft tissue of femur should be seen. • Note that an A-P can be taken from the hip down by placing top of film at level of the ASIS
15.7 Femur Lateral • Measure: Lateral at mid thigh • Protection: Apron over pelvis • SID: 40: Bucky • No Tube Angle • Film: 7” x 17 I.D. up
Femur Lateral • Patient lies on affected side with pelvis in lateral position. • Knee is flexed 45 degrees. • Long axis of femur aligned with vertical CR • Bottom of film placed 2” below femur condyles. • Apron draped over pelvis.
Femur Lateral • Horizontal CR: centered to film • Vertical CR: centered to long axis of femur • Collimation side to side: soft tissue of femur or slightly less than film size. Use 14” x 17” and collimate for large or muscular femur
Femur Lateral • Collimation Top to Bottom: to include knee joint to trochanters. Lateral hip may be needed to complete study. • Breathing Instruction: Hold still. • Make exposure and let patient relax
Femur Lateral Film • The complete exam will include both articulations. • Note improper I.D. placement blocking distal joint space. • By placing the top of the film at the ASIS and the pelvis in oblique position, a film can be taken from hip down.
Knee & Patella Radiography • Ltd Knee Series: A-P and Lateral • Complete Knee: A-P, Lateral, Tunnel, may include Sunrise or Settegest & Oblique Views • B/L Knees: A-P Weight-bearing & Both Laterals
Knee & Patella Radiography • May be taken erect or recumbent. • Lateral Views more difficult erect due to taper of the femur. • Tunnel view very difficult erect. • Weight-bearing good to access joint spaces. • A B/L P-A Tunnel type view is best for joint assessment but difficult to set up.
Knee & Patella Radiography • Some tube angulations is used for all knee views except for the erect lateral view. • A 5 degrees cephalad angle is used for the A-P, P-A, Oblique and recumbent lateral views. • Because of the density of the bone of the distal femur, views are taken Bucky.
16.2 Knee A-P • Measure: A-P at patella • Protection: recumbent : Apron ; erect: Males: Bell; Females: Apron • SID: 40” Bucky • Tube angle: 5° cephalad • Film: 8” x 10” I.D. up
Knee A-P • Erect: Patient standing facing tube. Recumbent: Patient supine with knee centered to vertical center of table. • Patient internally rotates leg 15° until the knee is in a true A-P position. Femur condyles parallel to film.
Knee A-P • Horizontal CR: 1 cm distal to apex of patella • Vertical CR: long axis of knee and femur. • Film centered to horizontal CR. • Collimation Top to Bottom: slightly less than film size
Knee A-P • Collimation Side to Side: soft tissue of distal femur and proximal lower leg. Slightly less than film size. • Patient Instructions: hold still. • Make exposure and let patient relax
Knee A-P Film • The joint space should be open. • The patella should be midline. • The adjacent soft tissues should be well visualized.
16.3 Knee Medial Oblique • Measure: A-P at patella • Protection: Recumbent: apron; Erect: Male: Bell, Female: Apron • SID: 40” Bucky • Tube Angle: 5° cephalad • Film: 8” x 10” Regular I.D. up
Knee Medial Oblique • Patient lies supine on table with affected knee centered on table. • Patient internally rotates lower leg as far as possible or until the femur condyles form a 40 to 45° angle to film. Avoid letting patient raise pelvis and increase object to film distance.
Knee Medial Oblique • Horizontal CR: 1 cm distal to medial condyle. • Film centered to horizontal CR. • Vertical CR: long axis of femur. • Collimation Top to Bottom: slightly less than film size.
Knee Medial Oblique • Collimation side to side: soft tissue of knee region or slightly less than film size. • Patient instructions: remain still
Knee Medial Oblique Film • The fibular head will be clear of the tibia. • The Knee joint space should be open. • The soft tissue of the knee should be visualized. • This view is useful in detecting loose bodies.
16.5 Knee Lateral Oblique • Measure: A-P at patella • Protection: Recumbent: Apron; Erect: Male: Bell; Females: Apron • SID: 40” Bucky • Tube Angle: 5° cephalad • Film: 8” x 10” I.D. up • Accessories: 45° sponge
Knee Lateral Oblique • The patient lies supine on table or stands facing tube. • The knee is externally or laterally rotated 40 to 45°. • The 45°sponge may be used as a rest for the lateral side of the foot. • The vertical long axis of the femur is centered to the Bucky or table center.
Knee Lateral Oblique • Horizontal CR: 1 cm distal to medial condyle of femur or through the knee joint space. • Vertical CR: centered to long axis of femur. • Collimation: slightly less than film size or soft tissues of knee.