Download
1 / 20
200 likes | 218 Views
This job hazard analysis (JHA) provides information and education on relocating a three phase transformer bank. It includes hazards associated with the job, work procedures, special precautions, energy source controls, and required personal protective equipment (PPE).

E N D
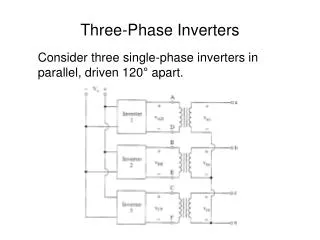
Relocating a Three Phase Transformer Bank Wye/Delta 120/240 4 Wire Service. • DISCLAIMER: This job hazard analysis (JHA) has been made available for informational and educational purposes only. The IAEC does not make any representation or warranty with respect to the accuracy, applicability, fitness, or completeness of the JHA. The IAEC hereby disclaims any and all liability to any party for any direct, indirect, implied, punitive, special, incidental or other consequential damages arising directly or indirectly from any use of this JHA which is provided as is.
OSHA Required Tailgate Discussion Topics • Hazards Associate with the job • Work Procedures Involved • Special Precautions • Energy Source Controls • PPE Required
Special Precautions Work Procedures Involved Hazards associated with the job Energy Source Controls Personal Protective Equipment Be sure to record your emergency location and post in a location everyone on the crew knows. Have your PPE and First Aid kit available Be sure your AED is accessible. A safe job begins with a thorough inspection of… Tools Be certain all of your tools are in good shape. Equipment Make sure your trucks are all in working order take time to preflight your equipment and insure there are no surprise. Line/Structure Look over the line and structure. Are there any potential hazards? (Broken insulators, damaged wire, clearances over roads or from trees?) Be aware of your work area, be sure to cover anything you can reach touch or fall into. And anything that can reach touch or fall into you! Discuss all PPE needed for the job and wear your PPE. Be sure to inspect your equipment prior to use. Identify all voltages you are exposed to. Be sure to have all of your Arc-Flash protective gear on. Identify a dedicated observer Working in traffic exposes you to hazards that are difficult to control. Give the vehicles plenty of time to see and avoid you! Follow the manual of traffic control for your area. Slips trips and falls are some of the most common injuries, look for hazards that could cause this. Be sure to inspect and wear your fall arrest harness.
Identify the Existing Connection Label all secondary wires on the service side. Identify voltages on the service side, particularly the “wild leg” if there is one. Check the rotation on the secondary side and record it.
Identify the Existing Connection This connection is a Wye Delta with the primary “Wye Point” floated (not connected to the neutral or ground) Take a few digital pictures of the bank. Identify what one of the quadraplex service wires are fed from each of the lines connected to the bank.
Identify the Existing Connection Follow the service wires to identify what they are connected too. Label them *Please note that the color code shown in the picture may not be correct it is shown as an example.
Identify the Existing Connection. Notice The left transformer is connected to the left phase. The center transformer is connected to the center phase. The right transformer is connected to the right phase. They are fed into the H2 bushings and the H1 bushings are tied together. Changing this to feed the H1 and tying the H2 bushings together will have no effect on rotation if you choose to.
Identify the Existing Connection. Notice The bank is a Wye/Delta 120/240 4 wire service. This bank will have two lighting legs ( 120v to ground) and a “wild leg” with 208v to ground. In the diagram it shows this with a blue identification. *Please note that the color code shown in the picture may not be correct, it is shown as an example.
Build the New Bank It will be easy to just duplicate the bank as it was previously constructed. You can use your digital pictures for this.
Build the New Bank Install the new URD service wires to the new bank. If the wires have identification on them use of these will simplify to identification of the secondary lines. If there are no markings you must ohm them out to identify them.
Build the New Bank Identify the colors as they were on the old bank and connect them in the same positions as they were on the old bank. *Please note that the color code shown in the picture may not be correct, it is shown as an example.
De-Energize the Old Bank and Service Have the member disconnect their load. Temporarily bond the wye point with the use of a protective ground and a hot stick. Open the cut-outs.
Install the New Primary Line *Please note that the color code shown in the picture may not be correct, it is shown as an example.
Complete the Primary Connection *Please note that the color code shown in the picture may not be correct, it is shown as an example.
Install the new URD Service to the existing Service Pole. These should already be identified by either previous markings or ohming them out. *Please note that the color code shown in the picture may not be correct, it is shown as an example.
Remove the Old Service and Install the New URD Service to the Existing Service Pole. Follow the markings you have been using. *Please note that the color code shown in the picture may not be correct, it is shown as an example.
Energize the New Bank. Temporarily bond the wye point with a protective ground so it can be removed with a hot stick when energizing is completed. Close the cutouts. Remove the temporary wye point ground. *Please note that the color code shown in the picture may not be correct, it is shown as an example.
Test the New Service Be certain all voltages are the same as they were prior to changing the bank. Insure that the rotation is the same. If the rotation is not correct change the lighting legs around and recheck everything. *Please note that the color code shown in the picture may not be correct, it is shown as an example.