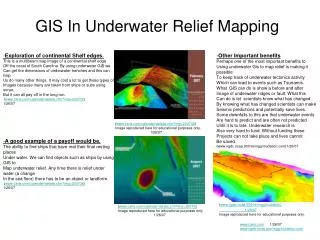
Download
1 / 36
370 likes | 660 Views
GIS and Mapping Procedures in ArcMap 9.x. Creating an ArcMap Project Editing an ArcMap Project Printing an ArcMap Project Digitizing in ArcMap. Coordinate Systems/Units.

E N D
GIS and Mapping Procedures in ArcMap 9.x • Creating an ArcMap Project • Editing an ArcMap Project • Printing an ArcMap Project • Digitizing in ArcMap
Coordinate Systems/Units In any GIS progam, it is best to have all of your layers have the same coordinate system and projection. ArcGIS will allow you to have layers with different coordinate systems and projections, but it has to reproject those to match the project settings. It is best to export your shapefiles out of SoloFieldCE so that they match your topo or photo basemap layer. Once you have collected and exported your GPS data out of SoloField to match your basemap, you are ready to open ArcMap. Execute the ArcMap program by double-clicking on the shortcut on your desktop.
Now we that we have opened ArcMap, we will need to add our data. It is also recommended that you read the ESRI ArcMap book that came with your software and familiarize yourself with the toolbars at the top of the screen. To begin adding the data we have collected, press the Add Data button on the toolbar. Creating an ArcMap ProjectStep #1 – Add Basemap Layer
Creating an ArcMap ProjectAdd Basemap Layer Navigate to the folder that you stored your basemaps in and Add the appropriate basemap. You may need to use the Connect to Folder button.
Creating an ArcMap ProjectStep #2 – Defining the Project Coordinate System If ArcMap does not recognize the reference information for the layer you just added, you will see the following message: It is very important for ArcMap to get this first layer projected correctly, so that it knows how to line up all of your subsequent layers. If you do not see this message, ArcMap has set the project Coordinate System to match the layer you just loaded.
Creating an ArcMap ProjectDefining the Project Coordinate System To define the Project Coordinate System, Right-Click on Layers in the Table of Contents (TOC), and select Properties.
Creating an ArcMap ProjectDefining the Project Coordinate System First, go to the General Tab and set the Display units to feet. This will ensure that all measurements you do will be in feet not meters.
Creating an ArcMap ProjectDefining the Project Coordinate System Next, select the Coordinate System tab and then select the Predefined Folder and then select the Geographic if you want a Lat/Long System or the Projected Folder if you want UTM or State Plane. Click OK once you select the correct system.
Creating an ArcMap ProjectStep #3 – Adding GPS Data To add GPS data, click the Add Data button and then navigate to the correct folder under GPS Projects. You can select multiple shapefiles at the same time. Select Add.
Creating an ArcMap ProjectAdding GPS Data Notice that the GPS layers are automatically added to the TOC above the basemap layer. To Zoom to a given layer, Right Click that layer and select Zoom to Layer.
Creating an ArcMap ProjectAdding GPS Data Checking Acres To check the Acres of a stand, you need to install the Acres Calculator from your Customer CD. Follow the ReadMe.txt instructions provided with the file. Once it is installed, use the Select Features Tool to select the feature and then click the Acres button on the Toolbar.
Editing an ArcMap ProjectStep #1 – Editing Layer Properties You can edit how the GPS layers are displayed by double clicking on the Layer Display line. You can then select a Hollow fill, increase the Outline Width to 2 and change the color if you want to.
Editing an ArcMap Project Editing Layer Properties You can also change the look of the point shapefiles so that they show up better on your basemap.
Editing an ArcMap Project Step #2 – Editing GPS data Sometimes when you get back in the office, you may need to edit your GPS data. You may want to delete some bad nodes or move some nodes. To begin this editing, select the layer that you want to edit in the TOC and then select Editor > Start Editing.
Editing an ArcMap Project Editing GPS data Next, if you have more than one geodatabase open, select the database that contains the layers you want to edit.
Editing an ArcMap Project Editing GPS data Next, make sure that the Edit Tool is selected and make the Task = Modify Feature.
Editing an ArcMap Project Editing GPS data Moving Data Next, double click on the feature to edit so that the nodes are displayed. Then, place the Edit Tool over the node you want to move, left-click, and drag that node to its new position. Double click when you have finished.
Editing an ArcMap Project Editing GPS data Deleting Data To delete a feature simply draw a box around or double-click the feature(s), making sure you have selected the correct one(s) and then hit the Delete key or the X button. If you are having trouble selecting the correct feature (like a grid point inside a stand), clear your selection by Right-Clicking and selecting Clear Selected Features. Then try again.
Editing an ArcMap Project Editing GPS data Saving Changes Lastly, to save your edits, simply select Editor > Save Edits and the change will be permanent. You can always click the undo button to restore the feature to its original state.
Printing an ArcMap Project Step #1 – Go to Layout View The first step in printing a map is to select the Layout View button at the bottom of the screen.
Printing an ArcMap Project Step #2 – Inserting Map Objects Once you are in the Layout View, you can select the Insert Menu and add any of the following: Title, Text, Legend, North Arrow, Scale Bar, Scale Text, and/or a Picture or Company Logo.
Printing an ArcMap Project Inserting Map Objects When you insert a legend, you will see the following Wizard that allows you to add or remove layers from the Legend. Typically, I do not like to have the Basemap layer in my legend, so I will select it and click the Remove arrow.
Printing an ArcMap Project Inserting Map Objects Once the Legend is displayed, you can move or resize it with your mouse. Additionally, you can double-click it and then change various display properties like the frame border, X and Y gap, and background color.
Printing an ArcMap Project Step #3 - Printing the Final Map In seconds, you can add a North Arrow, Scale, and Logo. The display of the Layout elements can be changed by double-clicking on the element and then adding a border, background, or shadow. Select Print when you have it like you want it.
Digitizing in ArcMapStep #1 –Create a New Shapefile Layer To begin digitizing on a photo basemap layer, you need to create a new shapefile layer. To do this select the Enhanced Shapefile Creation Tool. If this is not on your toolbar, install it from your customer CD. Follow the directions on the CD.
Digitizing in ArcMapCreate a New Shapefile Layer You need to select the following parameters: 1. Whether your layer is a point, line, or polygon 2. Browse to where you want to store the new layer and check the Add to current Map box 3. Set the Projection and Coordinate System like you did the Project earlier
Digitizing in ArcMapStep #2 – Changing the Layer Display Properties Next set the Layer Display properties by double clicking on the Layer Display Line. Hollow is best for Digitizing.
Digitizing in ArcMapStep #3 – Add Attributes to the Shapefile Next you can add Attributes columns to the new shapefile by Right-Clicking on the layer and then selecting Open Attribute Table.
Digitizing in ArcMapAdd Attributes to the Shapefile Then select Options > Add Field and Type in a Name and Type of Data. You can add as many Attributes as you want. Note: The name cannot have symbols or spaces in it.
Digitizing in ArcMapStep #4 – Starting the Editor To begin digitizing, you need to make sure that the new layer is selected in the TOC and select Editor > Start Editing. If you don’t see the Editor Toolbar on your screen, go to View > Toolbars and check the Editor Toolbar.
Digitizing in ArcMapStep #5 – Selecting the Database Next, select the database that contains the new layer.
Digitizing in ArcMapStep #6 – Selecting the Sketch Tool Next, select the Sketch Tool on the Editor Toolbar and make sure that the Task is set to “Create New Feature”.
Digitizing in ArcMapStep #7 -Digitize the Stand Next, Zoom into the area you want to digitize and begin clicking around it. You may zoom in or out and pan to be more exact. Double click when you are through.
Digitizing in ArcMapDigitize the Stand You can digitize multiple stands at the same time if you want them to appear in the same layer in the TOC.
Digitizing in ArcMapStep #8 – Editing Attributes While you are in the Editor, you can edit the Layer Attributes by selecting the Attributes Button on the Editor Toolbar. Then just type in the Attributes like Age and Planting Date.
Digitizing in ArcMapStep #9 – Save the Edits The last step in digitizing is to Save your edits. To do this click the Editor dropdown list and select Save Edits and then select Yes. This shapefile can now be copied and sent to a handheld for use in SoloField.