Download
1 / 13
130 likes | 272 Views
Configuring Super ASO With Aliases. - Source system. Select Switch-Over >Source Options. Configuring Super ASO With Aliases. Click Add to add a new alias for the source system. Configuring Super ASO With Aliases. Click Add to add a new alias for the source system.

E N D
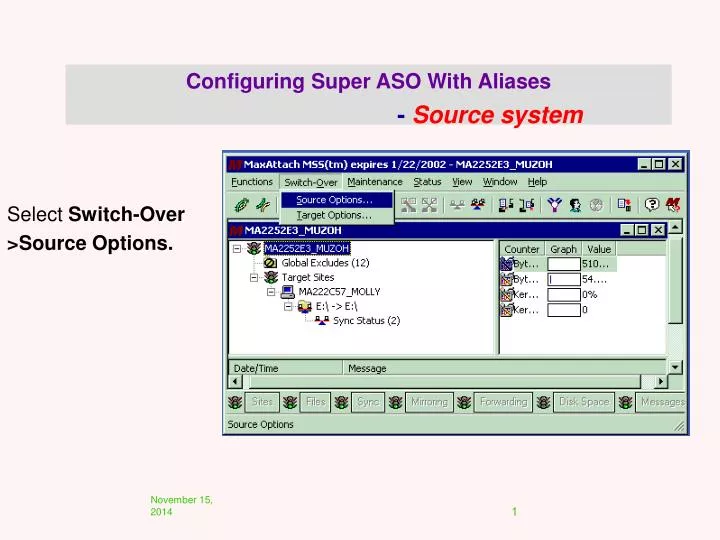
Configuring Super ASO With Aliases - Source system Select Switch-Over >Source Options.
Configuring Super ASO With Aliases Click Add to add a new alias for the source system.
Configuring Super ASO With Aliases Click Add to add a new alias for the source system.
Configuring Super ASO With Aliases Click the IP Addresses tab to optionally specify: • DNS • IP and subnet information Click OK.
Configuring Super ASO With Aliases Check box next to the alias, Select Activate Alias, Click OK.
Click on the target system window Select Switch-Over >Target Options. Configuring Super ASO With Aliases - Target
Select Add Site (Super ASO) and the Accept Aliases check box. Configure additional target options as needed Click OK. Configuring Super ASO With Aliases - Target
B: Target A: Source C: Alias Replication path #1 Dedicated link Replication path #2 Super ASO Switch-over Configuration With Alias Basic MaxAttach MSS configuration
B: Target C: Alias Dedicated link Successful Fail-over with alias B: Target In the case the target detects failure of the source, it will attempt to ping ALL possible paths to the source to be sure the source has actually failed
Successful Fail-over with alias B: Target The target takes over the alias from the original source and becomes the source. The original source is now the target.
Configuring Super ASO without Aliases (Source Options) • Select Switch-Over>Source Options. • Select the Timeouts tab and make the appropriate entries. • Click IP Addresses. • Click the Services tab. • Click OK. Toconfigure the target switch-over options as follows
Configuring Super ASO without Aliases (Target Options) From the target system, select Switch-Over>Target Options. Select Add Site (Super ASO) and the Accept Aliases check box. Configure additional target options as needed Click OK.
B: Target Dedicated link Successful Fail-over without alias B: Target In the case the target detects failure of the source, it will attempt to ping ALL possible paths to the source to be sure the source has actually failed