Download

1 / 39
390 likes | 467 Views
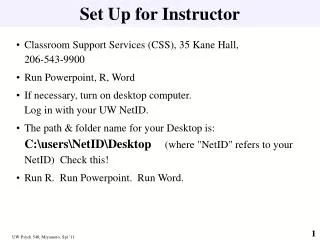
Instructor Set-Up. Login to your Cengage SSO account and click on CSFI 2.0. CSFI Opens in CengageNow. Click on Courses Tab. Create a New Course. Click “Create a New Course”.

E N D
Instructor Set-Up Login to your Cengage SSO account and click on CSFI 2.0
CSFI Opens in CengageNow Click on Courses Tab
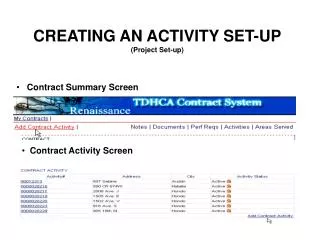
Create a New Course Click “Create a New Course”
Choose “Copy an Existing Course” and “Modify a template course designed by Cengage Learning” and then click “Continue”.
Follow the prompts to enter your textbook under Template, your course name and your course number. Enter your Start and End Dates for your course, then click “Create Course”. Note – you must create a course for each section.
You’ve now created your course. Please make note of your unique Course Key which you must provide to your students to enroll them in your CSFI course. Click here to print student registration instructions
These student registration instructions, called a Boarding Pass, can be printed or emailed to your students. In addition to providing them with your unique course key, students are directed to self-training videos on how to register and use CSFI.
Next, set the dates when your students will take the Pre-Test and Post-Test, by clicking “Modify Dates”.
Click on the Calendar buttons to select the dates for each test. Students will not be able to take either test before the available date. Choose today’s date for the Pretest so that you will be able to take it as a student. Leave the Due Date as “Not Specified”. Be sure to click the Save Dates button.
To see the CSFI as a student, click on “Change to Student View” at top right.
Click on Assignments and you will see this screen. Click the Take button to take CSFI as a student. Note: You will only see this Take button if the date for the Pretest is not in the future.
Taking the Pretest as a Student Click the “Start Assignment Now” button to take the CSFI PreTest.
Students Must Answer All 100 Questions Click on “Lock and View Results” to see results.
Students Immediately See Results Clicking on score reveals how they answered that factor’s questions. Clicking on the factor name provides book specific advice (see next screen).
Students Receive Reading Advice Tied to Their Textbook
Accessing CourseMate Go Back to SSO Dashboard and click on College Success CourseMate for Staley
CourseMate Homepage Optional – Set-up Course to Track Students’ Assignments and Activity on Site
Course Key Generated Email Sent Automatically to You