Download
1 / 17
210 likes | 519 Views
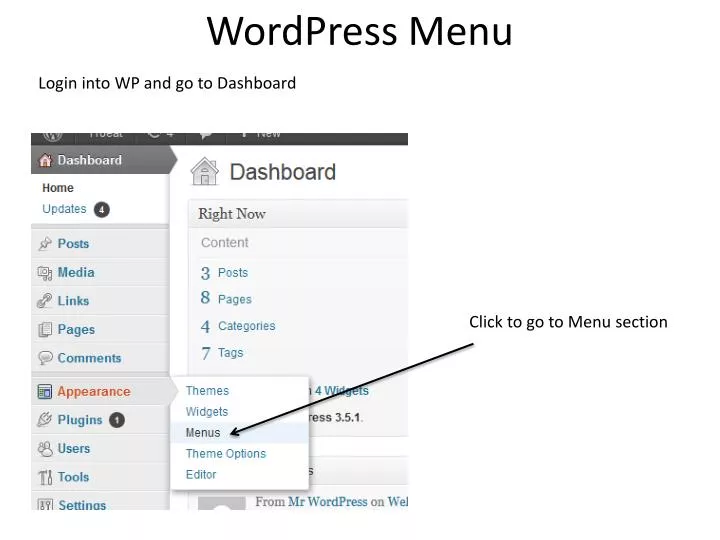
Login into WP and go to Dashboard. WordPress Menu. Click to go to Menu section. Enter a menu Name. I.e. Main Menu. Click to create the menu. To set as main menu click in the box and select the menu you just created. This will then become the main menu. Press save to confirm the choice.

E N D
Login into WP and go to Dashboard WordPress Menu Click to go to Menu section
Click to create the menu To set as main menu click in the box and select the menu you just created. This will then become the main menu. Press save to confirm the choice
Type in home page of website. If you are on Xampp then it will be localhoast/foldername of wordpressinstall/ If using instant WP then the address is http://127.0.0.1:4001/wordpress/ If online then it would be http://yoursitename Create a Home link Title the page Add to the menu
Name of menu you are editing The home page now appears in the menu
Click to show the following information Add a title such as Index, Your site home page, etc.
Save the changes Note: The top save button is for saving the menu name. You need to click this save to save changes to the actual menu.
Add a page to a menu 1) Select the pages 2) Add to Menu
Pages now in Menu Click to show details
2) Click to hide info 1) Add titles to menus
Move mouse over menu. Left Click and hold and drag until the menu is indented from the one above. This will now make History a sub menu of News.
Add a Category Select the categories to add to your menu Click to add selected categories
Categories now appear in your menu. Click on arrow next to Category to add a title.
To make the F1 option a subcategory of Motoring click and hold the F1 menu and drag it so that it indents the motoring menu option F1 option now indented and becomes a sub menu of Motoring.
Save Changes View your menu on home page. Don’t forget to refresh the page to see your changes
Add a page, category, custom link and then hold menu option and indent below sub menu Menus can be sub menus of a submenu! In the example above engines is a sub menu of f1 which is a submenu of Motoring.