Download
1 / 10
100 likes | 217 Views
7.6 - Calculating Voltages of Electrochemical Cells. Unit 7 – Redox Reactions & Electrochemistry. From last lesson:.

E N D
7.6 - Calculating Voltages of Electrochemical Cells Unit 7 – Redox Reactions & Electrochemistry
From last lesson: • Let's return to our zinc - copper electrochemical cell. We can now use the Table of Standard Reduction Potentials to not only calculate the voltage of our cell, but also to explain why it was zinc, and not copper, that underwent oxidation. • Before calculating the voltage of a cell you must first determine which half-cell will undergo oxidation and which one will be reduced. Find the copper and zinc half-reactions in the Table of Standard Reduction Potentials. Be careful - there is often more than one half-reaction for an element. For copper locate the Cu|Cu2+half-reaction (unless otherwise directed, always use this half-reaction for copper). • Awww yeah
In the Table, all reactions are written as reduction reactions. The E° values indicate which half-reaction is better at competing for electrons. Since the copper half-reaction has a larger value for E° than the zinc half-reaction, copper will be reduced, forcing zinc to be oxidized. So we reverse the zinc equation and in doing so change the sign for zinc. As long as electrons cancel out, we can then add the two equations together to get the full redox reaction and determine the voltage of the cell: • h
When creating an electrochemical cell, always reverse the half-reaction that will result in a positive value for E° when the equations are added together. • A positive value of E° indicates a spontaneous chemical reaction • Electrochemical cells always involve a spontaneous chemical reaction
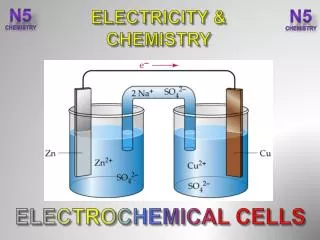
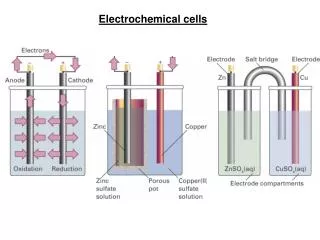
Setting up an Electrochemical Cell – Example: • We want to create an electrochemical cell using aluminum (Al|Al3+) and lead (Pb|Pb2+) half-cells. Our tasks: • 1) Determine the two half-reactions involved, and which reaction will undergo oxidation and which one will be reduced. • 2) Determine the voltage of the cell. • 3) Diagram the set-up of the electrochemical cell, including the following items: • the two half-cells, including the electrodes and electrolytic solutions • the external circuit, showing the direction of electron flow • the salt bridge with an electrolyte, including movement of ions • label the anode and the cathode • label the positive and negative posts
Step 1 • Before you begin to create your diagram you need to determine what will be oxidized and what will be reduced. At the same time you can calculate the voltage of the cell. Locating the two half-reactions in the Table of Standard Electrode Potentials:
Step 2 • Since lead has a larger electrode potential than does aluminum, lead will be reduced and aluminum will be oxidized. So we will reverse the aluminum equation and reverse its sign. • Also identify what is oxidized and what is reduced. • u
Step 3 • We can now calculate the cell voltage. A useful tip - you know if you've switched the correct equation when you get a positive voltage. All electrochemical cells will have a positive voltage! • Another key thing to know - this is new. We must balance the two equations for electrons before we add them together. However, this will NOT change the value of E°!!! • At this time we will also determine which electrode will be the anode and which will be the cathode. Remember - An Ox and a Red Cat: • H
Step 4 • Now that we have all of the key information we can diagram the cell. • Step-by-step: • Draw 2 beakers, each containing an electrode - the two metals used in our reactions. To each beaker add an electrolytic solution. The electrolyte will include the metal ion and another ion (NO3- is usually a good choice since it will not form a precipitate). • Add an external circuit (the wire connecting the two electrodes) and a salt bridge with an electrolytic solution (KNO3 is often a good choice).
Step 5 • Indicate the following on your diagram: • Direction of electron flow (Electrons flow from A to C) • Ion movement from the salt bridge (Anions to Anode; Cations to Cathode) • Positive and negative posts (the anode - site of oxidation- releases electrons so it is the negative post; the cathode - site of reduction- uses up electrons so it is the positive post).